“Step-by-step grid-tied solar panel wiring”
One of the most common types of solar panel systems is grid-tied, which connects directly to the electrical grid and allows homeowners to sell excess energy back to the utility company. However, installing a grid-tied solar panel system requires careful planning and execution, particularly when it comes to wiring. In this article, we will provide a step-by-step guide to grid-tied solar panel wiring, covering everything from preparation to final inspections.
Introduction to Grid-Tied Solar Panel Systems
Before we dive into the wiring process, it’s essential to understand how grid-tied solar panel systems work. A typical grid-tied system consists of solar panels, a mounting system, an inverter, and a grid connection. The solar panels generate DC (direct current) electricity, which is then converted to AC (alternating current) electricity by the inverter. The AC electricity is then fed into the electrical grid, where it can be used to power homes and businesses. Any excess energy produced by the solar panels is sold back to the utility company, providing homeowners with a credit on their energy bill.
Pre-Wiring Preparation
Before starting the wiring process, it’s crucial to prepare the site and gather all necessary materials. Here are some essential steps to take:
- Plan the system: Determine the size of the solar panel system based on energy needs and available roof space. Ensure that the system is designed to meet local electrical codes and regulations.
- Gather materials: Collect all necessary wiring components, including wires, connectors, and grounding equipment.
- Inspect the roof: Ensure that the roof is structurally sound and can support the weight of the solar panels and mounting system.
- Identify electrical connections: Determine the location of electrical connections, including the main electrical panel and any sub-panels.
Wiring the Solar Panels
The first step in wiring a grid-tied solar panel system is to connect the solar panels to the mounting system. Here’s a step-by-step guide:
- Connect solar panels to the mounting system: Use mounting clamps or clips to secure the solar panels to the mounting system. Ensure that the panels are securely fastened and level.
- Connect solar panel wires: Connect the positive and negative wires from each solar panel to the corresponding wires on the next panel. Use wire connectors or crimpers to secure the connections.
- Use a combiner box: If the system has multiple strings of solar panels, use a combiner box to combine the wires from each string. The combiner box should be rated for the maximum voltage and current of the system.
- Ground the system: Connect the grounding wire from the combiner box to a grounding rod or plate. Ensure that the grounding system is properly sized and installed.

Connecting the Inverter
The inverter is a critical component of a grid-tied solar panel system, as it converts DC electricity from the solar panels to AC electricity for the grid. Here’s how to connect the inverter:
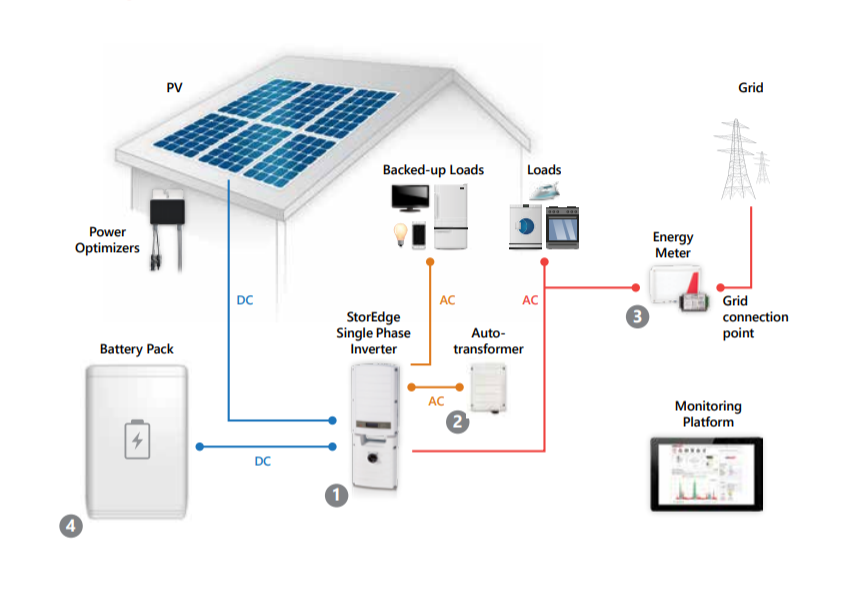
- Connect the inverter to the combiner box: Connect the positive and negative wires from the combiner box to the corresponding terminals on the inverter.
- Connect the inverter to the grid: Connect the AC output wires from the inverter to the grid connection point, usually a circuit breaker or fuse box.
- Connect the grounding system: Connect the grounding wire from the inverter to the grounding rod or plate.
- Configure the inverter settings: Configure the inverter to meet local electrical codes and regulations, including setting the grid connection point and configuring the system for islanding mode (if applicable).
Connecting to the Grid
The final step in wiring a grid-tied solar panel system is to connect the system to the electrical grid. Here’s a step-by-step guide:
- Identify the grid connection point: Determine the location of the grid connection point, usually a circuit breaker or fuse box.
- Connect the grid connection wires: Connect the AC output wires from the inverter to the grid connection point.
- Install a net meter: Install a net meter to measure the amount of energy produced by the solar panel system and the amount of energy consumed from the grid.
- Configure the net meter settings: Configure the net meter to meet local electrical codes and regulations, including setting the meter to measure the net energy production.
Final Inspections and Testing
After completing the wiring process, it’s essential to perform a series of inspections and tests to ensure that the system is safe, functional, and meets local electrical codes and regulations. Here are some final steps to take:
- Inspect the wiring: Inspect the wiring for any signs of damage, wear, or corrosion. Ensure that all connections are secure and meet local electrical codes.
- Test the system: Test the system to ensure that it’s producing energy and feeding it back into the grid.
- Check the inverter settings: Check the inverter settings to ensure that they’re configured correctly and meet local electrical codes and regulations.
- Obtain final inspections and approvals: Obtain final inspections and approvals from local authorities, including the electrical inspector and the utility company.
Conclusion
Wiring a grid-tied solar panel system requires careful planning, attention to detail, and a thorough understanding of electrical codes and regulations. By following the step-by-step guide outlined in this article, homeowners and solar installers can ensure that their system is safe, functional, and meets local electrical codes and regulations. Remember to always follow safety guidelines and best practices when working with electrical systems, and consider hiring a licensed electrician or solar installer if you’re unsure about any aspect of the process. With proper installation and maintenance, a grid-tied solar panel system can provide years of clean, renewable energy and help reduce your carbon footprint.


