“12V RV solar power wiring diagram”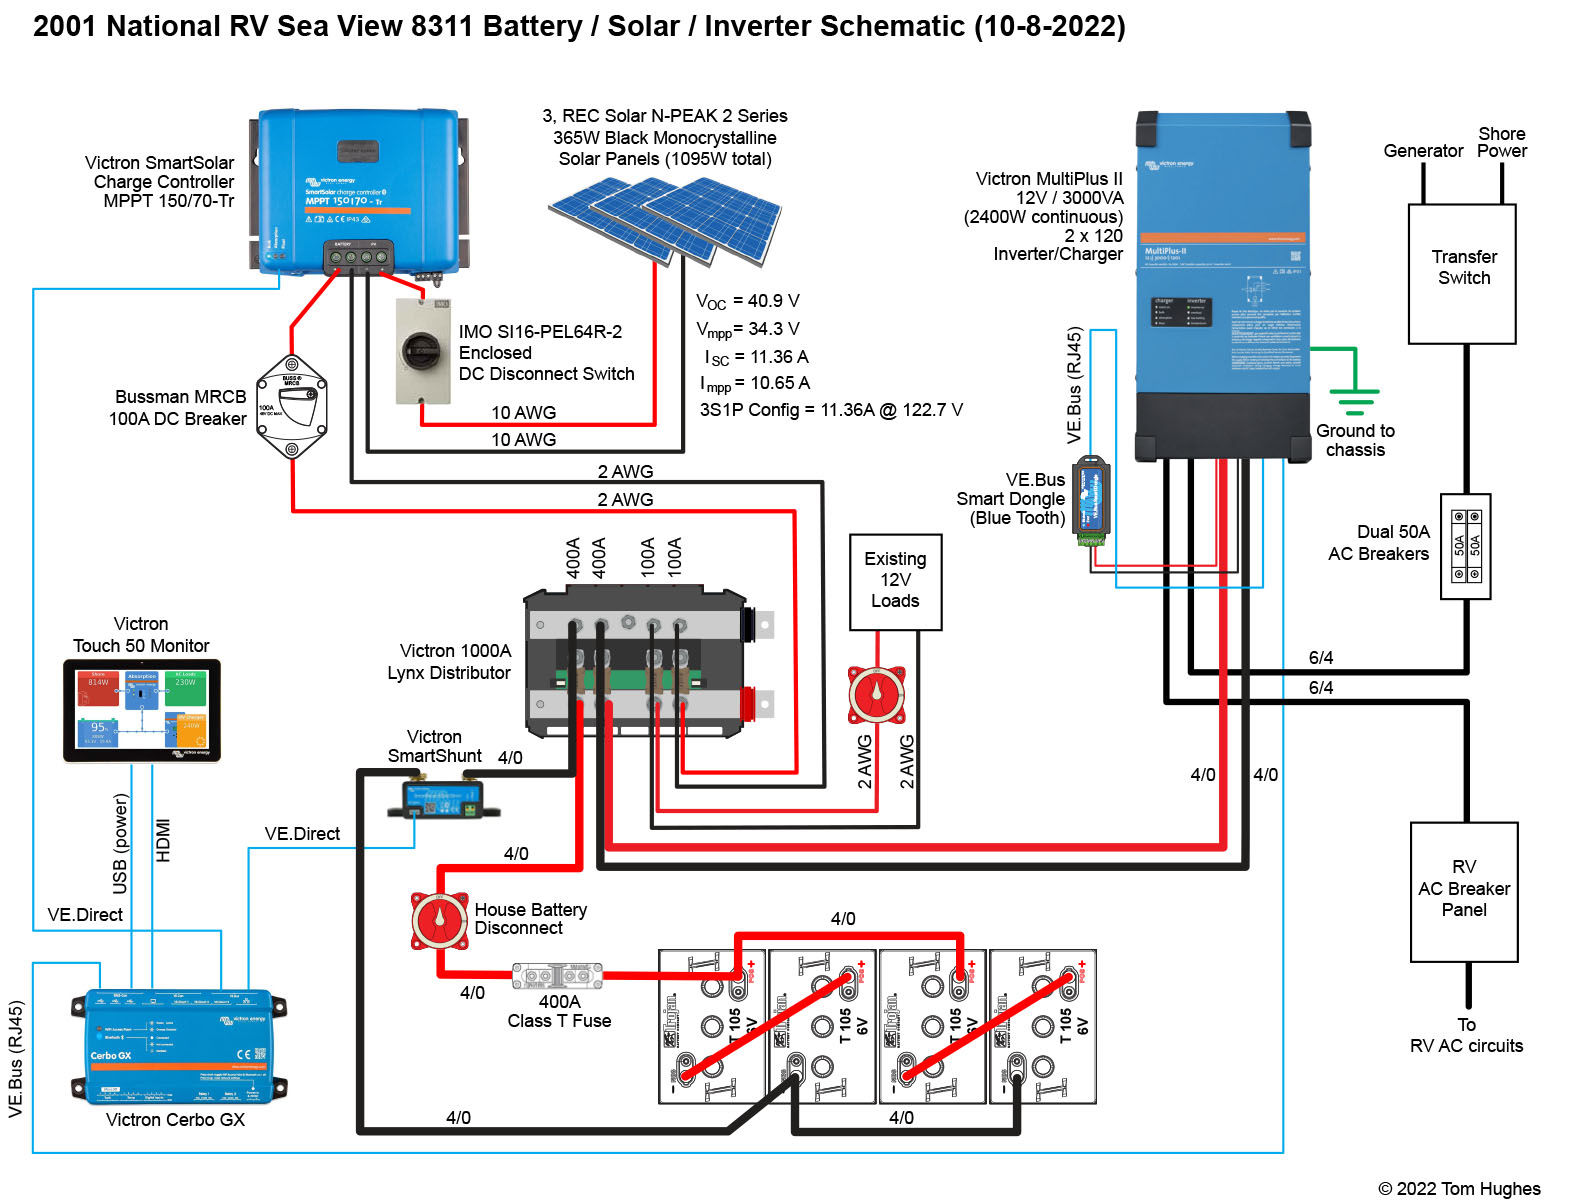
A 12V RV solar power system is an excellent way to harness the sun’s energy and keep your recreational vehicle running smoothly. However, installing a solar power system can be a complex process, and a well-designed wiring diagram is essential to ensure safe and efficient operation. In this article, we will provide a detailed guide on creating a 12V RV solar power wiring diagram, including the necessary components, wiring considerations, and safety precautions.
Introduction to 12V RV Solar Power Systems
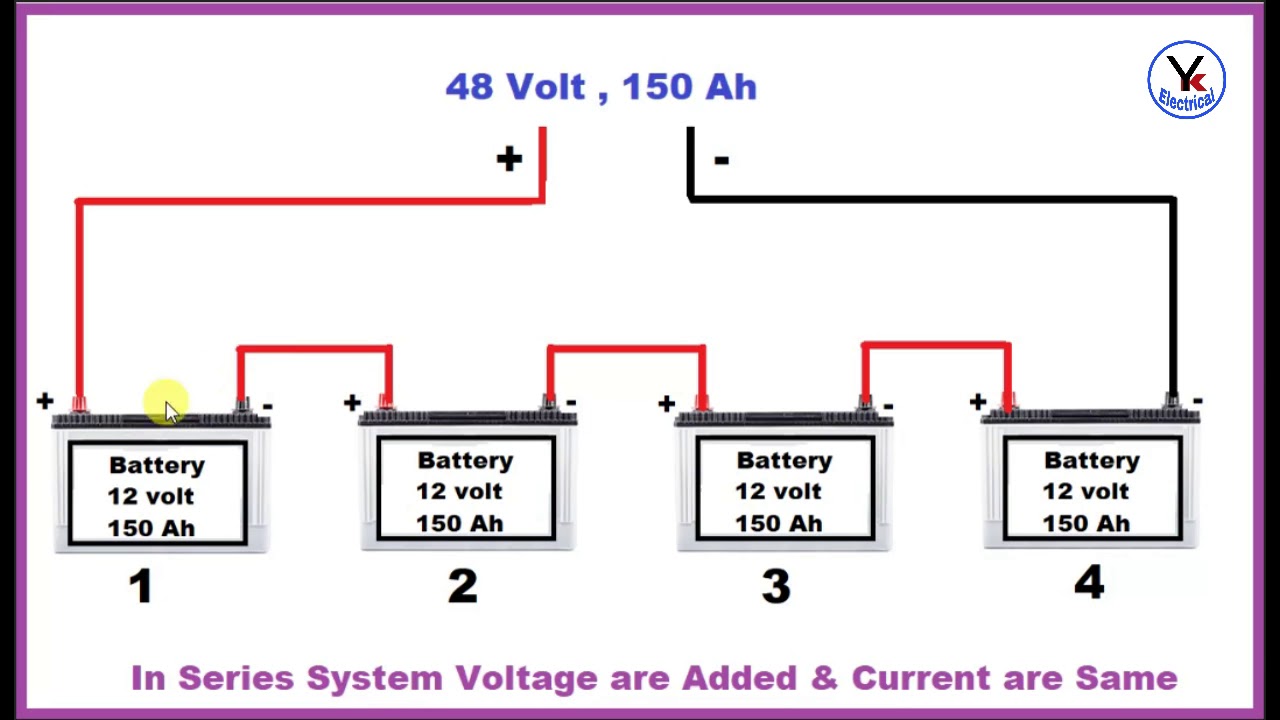
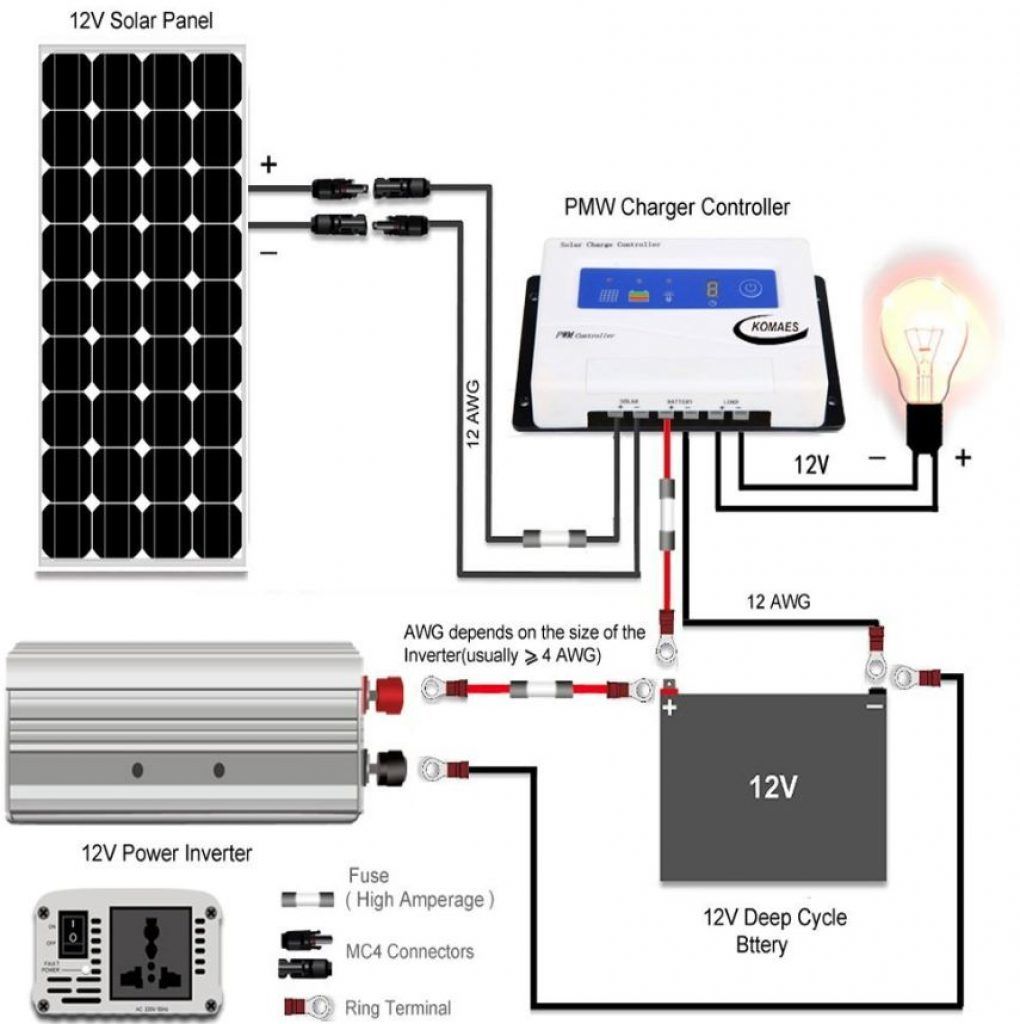
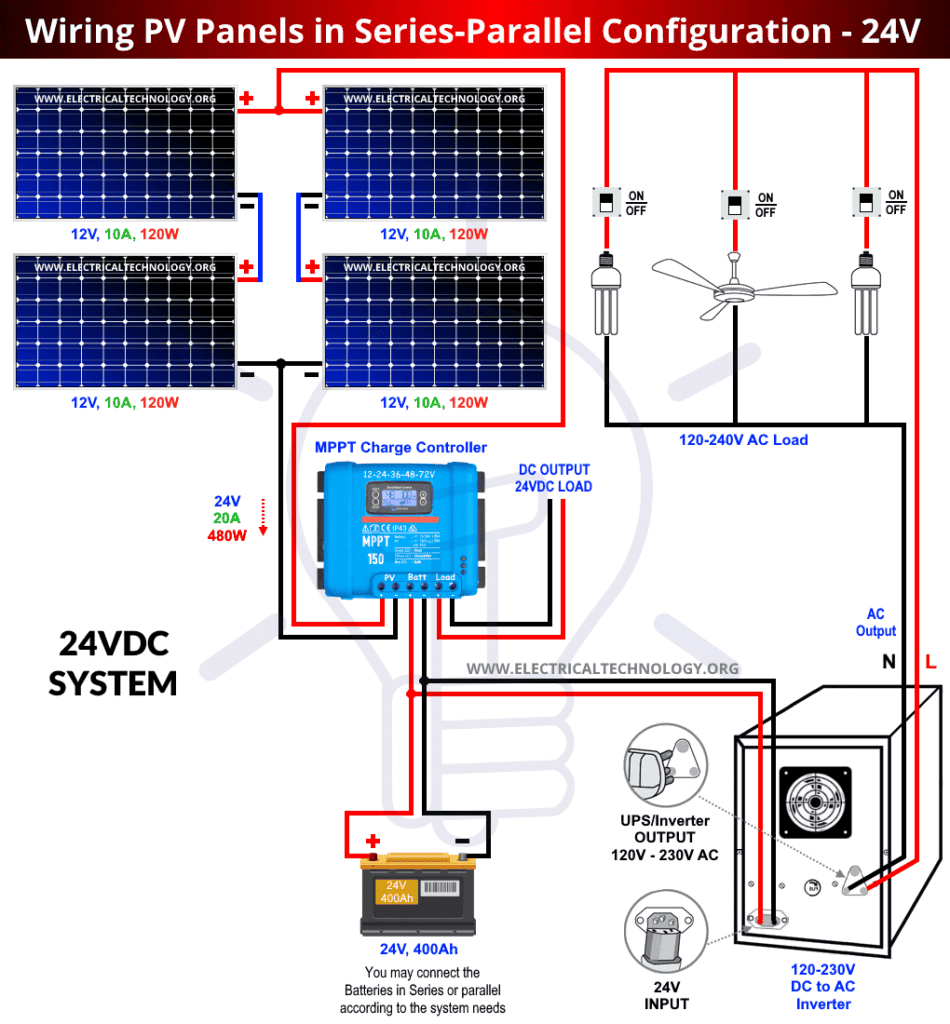
A 12V RV solar power system consists of several key components, including solar panels, a charge controller, a deep cycle battery, and an inverter/charger. The solar panels generate DC power, which is then regulated by the charge controller and stored in the battery. The inverter/charger converts the DC power to AC power, allowing you to run appliances and devices in your RV.
Components of a 12V RV Solar Power System
To create a 12V RV solar power wiring diagram, you will need to consider the following components:
- Solar Panels: These are the primary source of power for your system. Choose solar panels with a combined wattage that meets your energy needs.
- Charge Controller: This device regulates the flow of energy from the solar panels to the battery, preventing overcharging and damage.
- Deep Cycle Battery: This type of battery is designed to provide a steady flow of power over a long period. Choose a battery with a sufficient ampere-hour (Ah) rating to meet your energy needs.
- Inverter/Charger: This device converts the DC power from the battery to AC power, allowing you to run appliances and devices in your RV.
- Wiring and Connectors: You will need to connect the components using suitable wiring and connectors, taking into account the required gauge and insulation.
Wiring Considerations
When creating a 12V RV solar power wiring diagram, consider the following wiring guidelines:
- Wire Gauge: Use a wire gauge that can handle the maximum current expected in your system. A larger gauge wire can handle more current, but it is also heavier and more expensive.
- Insulation: Use insulated wire to prevent electrical shock and damage to the components.
- Color Coding: Use color-coded wiring to identify the positive and negative wires, as well as the AC and DC circuits.
- Circuit Protection: Install circuit breakers or fuses to protect the components from overcurrent conditions.
- Grounding: Ensure that all components are properly grounded to prevent electrical shock and damage.
Safety Precautions
When working with electrical systems, it is essential to follow safety precautions to prevent injury or damage:
- Disconnect the Battery: Before starting work, disconnect the battery to prevent electrical shock.
- Use Personal Protective Equipment: Wear protective gloves, safety glasses, and a face mask when working with electrical systems.
- Follow Manufacturer Instructions: Follow the manufacturer’s instructions for each component, including the solar panels, charge controller, and inverter/charger.
- Test the System: Test the system thoroughly before connecting it to your RV’s electrical system.
Creating a 12V RV Solar Power Wiring Diagram
To create a 12V RV solar power wiring diagram, follow these steps:
- Determine the System Components: Identify the components you will need for your system, including the solar panels, charge controller, battery, inverter/charger, and wiring.
- Determine the Wire Gauge: Calculate the required wire gauge based on the maximum current expected in your system.
- Create a System Layout: Draw a system layout, including the location of each component and the wiring connections.
- Draw the Wiring Diagram: Draw the wiring diagram, including the wire gauge, insulation, and color coding.
- Include Circuit Protection: Include circuit breakers or fuses to protect the components from overcurrent conditions.
- Include Grounding: Ensure that all components are properly grounded to prevent electrical shock and damage.
Example 12V RV Solar Power Wiring Diagram
Here is an example of a 12V RV solar power wiring diagram:
- Solar Panels (400W):
- Positive wire (10 AWG) to Charge Controller
- Negative wire (10 AWG) to Charge Controller
- Charge Controller:
- Positive wire (10 AWG) to Battery
- Negative wire (10 AWG) to Battery
- Battery (200Ah):
- Positive wire (6 AWG) to Inverter/Charger
- Negative wire (6 AWG) to Inverter/Charger
- Inverter/Charger:
- AC output to RV electrical system
- DC input from Battery
Conclusion
Designing a 12V RV solar power wiring diagram requires careful consideration of the system components, wiring guidelines, and safety precautions. By following the steps outlined in this article, you can create a safe and efficient wiring diagram for your RV solar power system. Remember to test the system thoroughly before connecting it to your RV’s electrical system, and always follow the manufacturer’s instructions for each component. With a well-designed wiring diagram, you can enjoy the benefits of solar power and reduce your carbon footprint while on the road.
Additional Tips and Recommendations
- Always follow local electrical codes and regulations when installing a solar power system.
- Consider using a battery monitor to track the state of charge and health of your battery.
- Use a solar charge controller with a built-in display to monitor the system’s performance.
- Install a DC-DC charger to charge your battery from an external power source, such as a generator or shore power.
- Consider adding a backup power source, such as a generator or fuel cell, to provide power during periods of low sunlight.
By following these tips and recommendations, you can create a reliable and efficient 12V RV solar power system that meets your energy needs and provides years of trouble-free operation. Happy camping!