“DIY home solar wiring step-by-step instructions”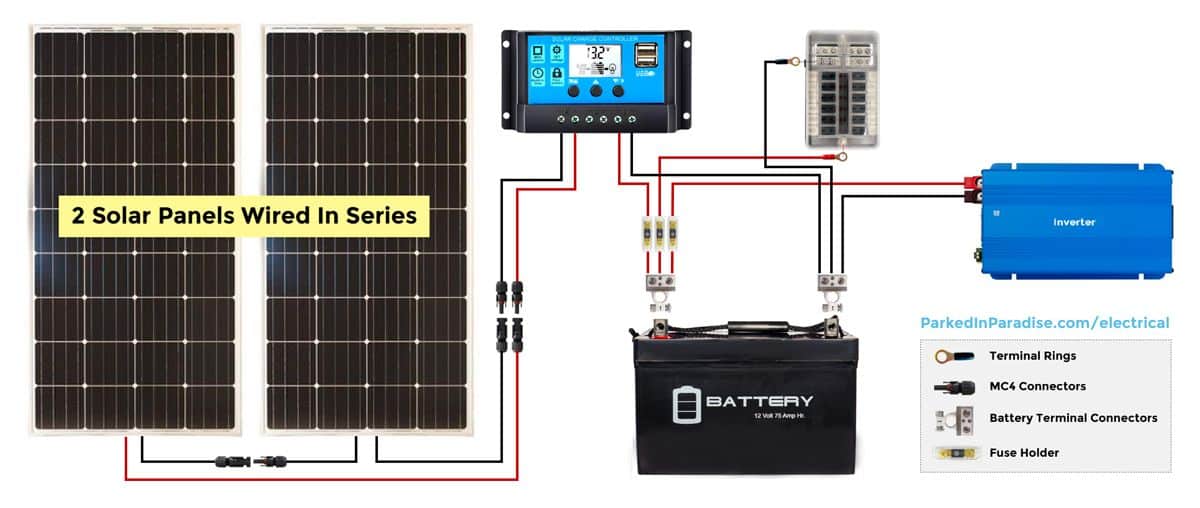
While installing a solar panel system can seem like a daunting task, DIY home solar wiring can be a cost-effective and rewarding experience with the right guidance. In this article, we will walk you through the step-by-step process of DIY home solar wiring, covering everything from preparation to final connections.
Preparation is Key
Before you begin, it’s essential to understand the basics of solar panel systems and the necessary components. A typical solar panel system consists of:
- Solar Panels: These are the photovoltaic (PV) panels that convert sunlight into electrical energy.
- Mounting System: This includes the racks, clamps, and hardware that secure the solar panels to your roof.
- Inverter: This device converts the DC power generated by the solar panels into AC power, which is usable in your home.
- Charge Controller: This component regulates the flow of energy from the solar panels to the battery bank (if you have one) and prevents overcharging.
- Battery Bank: This is an optional component that stores excess energy generated by the solar panels for later use.
- Wiring and Connectors: These are the cables, connectors, and fuses that connect the various components of the system.
To ensure a safe and successful installation, make sure you:
- Check Local Building Codes and Regulations: Familiarize yourself with local electrical codes, permits, and regulations.
- Assess Your Roof: Ensure your roof is structurally sound, free from shading, and has sufficient space for the solar panels.
- Determine Your Energy Needs: Calculate your energy requirements to determine the size of the solar panel system you need.
- Choose the Right Components: Select high-quality components that meet your energy needs and are compatible with each other.
Step 1: Plan Your System
With your preparation complete, it’s time to plan your system. This involves:
- Creating a System Design: Determine the layout of your solar panels, mounting system, and other components.
- Calculating Wire Sizes: Calculate the required wire sizes based on the distance between components, voltage, and current.
- Selecting the Right Wire Type: Choose the correct wire type (e.g., MC4, 10 AWG, or 12 AWG) for your system.
- Creating a Wiring Diagram: Draw a detailed wiring diagram to guide your installation.

Step 2: Install the Mounting System
The mounting system provides a secure foundation for your solar panels. To install the mounting system:
- Measure and Mark the Roof: Measure the space where you’ll install the mounting system and mark the locations of the solar panels.
- Drill Pilot Holes: Drill pilot holes for the mounting system’s anchor points.
- Install the Mounting System: Attach the mounting system to the roof, ensuring it’s level and secure.
- Secure the Solar Panels: Place the solar panels on the mounting system, ensuring they’re securely fastened.
Step 3: Connect the Solar Panels
Now it’s time to connect the solar panels to each other and to the rest of the system. To do this:
- Connect the Solar Panel Terminals: Connect the positive and negative terminals of each solar panel to the corresponding terminals of the next panel.
- Use MC4 Connectors: Use MC4 connectors to connect the solar panels to the rest of the system.
- Test the Connections: Verify that the connections are secure and not loose.
Step 4: Install the Inverter and Charge Controller
The inverter and charge controller are crucial components that ensure your system operates safely and efficiently. To install these components:
- Mount the Inverter and Charge Controller: Install the inverter and charge controller in a well-ventilated area, protected from the elements.
- Connect the Solar Panels to the Inverter: Connect the solar panels to the inverter, following the manufacturer’s instructions.
- Connect the Inverter to the Charge Controller: Connect the inverter to the charge controller, if you have a battery bank.
- Connect the Charge Controller to the Battery Bank: Connect the charge controller to the battery bank, if you have one.
Step 5: Install the Wiring and Connectors
With the major components installed, it’s time to install the wiring and connectors. To do this:
- Run the Wiring: Run the wiring from the solar panels to the inverter, and from the inverter to the charge controller (if applicable).
- Use the Correct Wire Size: Ensure you’re using the correct wire size for the distance and voltage of your system.
- Install Fuses and Circuit Breakers: Install fuses and circuit breakers to protect your system from overcurrent and surges.
- Connect the Wiring to the Components: Connect the wiring to the solar panels, inverter, charge controller, and battery bank (if applicable).
Step 6: Test and Commission the System
With the installation complete, it’s time to test and commission the system. To do this:
- Turn On the System: Turn on the system, starting with the solar panels.
- Monitor the System: Monitor the system’s performance, checking for any errors or issues.
- Test the Inverter and Charge Controller: Test the inverter and charge controller to ensure they’re functioning correctly.
- Verify the System’s Performance: Verify that the system is producing the expected amount of energy.
Safety Considerations
While DIY home solar wiring can be a rewarding experience, it’s essential to prioritize safety. Always:
- Follow Local Electrical Codes and Regulations: Familiarize yourself with local electrical codes and regulations.
- Use Proper Safety Equipment: Wear proper safety equipment, including gloves, safety glasses, and a hard hat.
- Ensure Proper Ventilation: Ensure proper ventilation when working with electrical components.
- Disconnect the System When Not in Use: Disconnect the system when not in use to prevent accidents.
Conclusion
DIY home solar wiring can be a cost-effective and rewarding experience, but it requires careful planning, attention to detail, and a commitment to safety. By following the steps outlined in this article, you can successfully install a solar panel system that meets your energy needs and reduces your carbon footprint. Remember to always prioritize safety and follow local electrical codes and regulations. With the right guidance and precautions, you can enjoy the benefits of solar power and take the first step towards a more sustainable future.


