“RV solar power system 12V circuit design”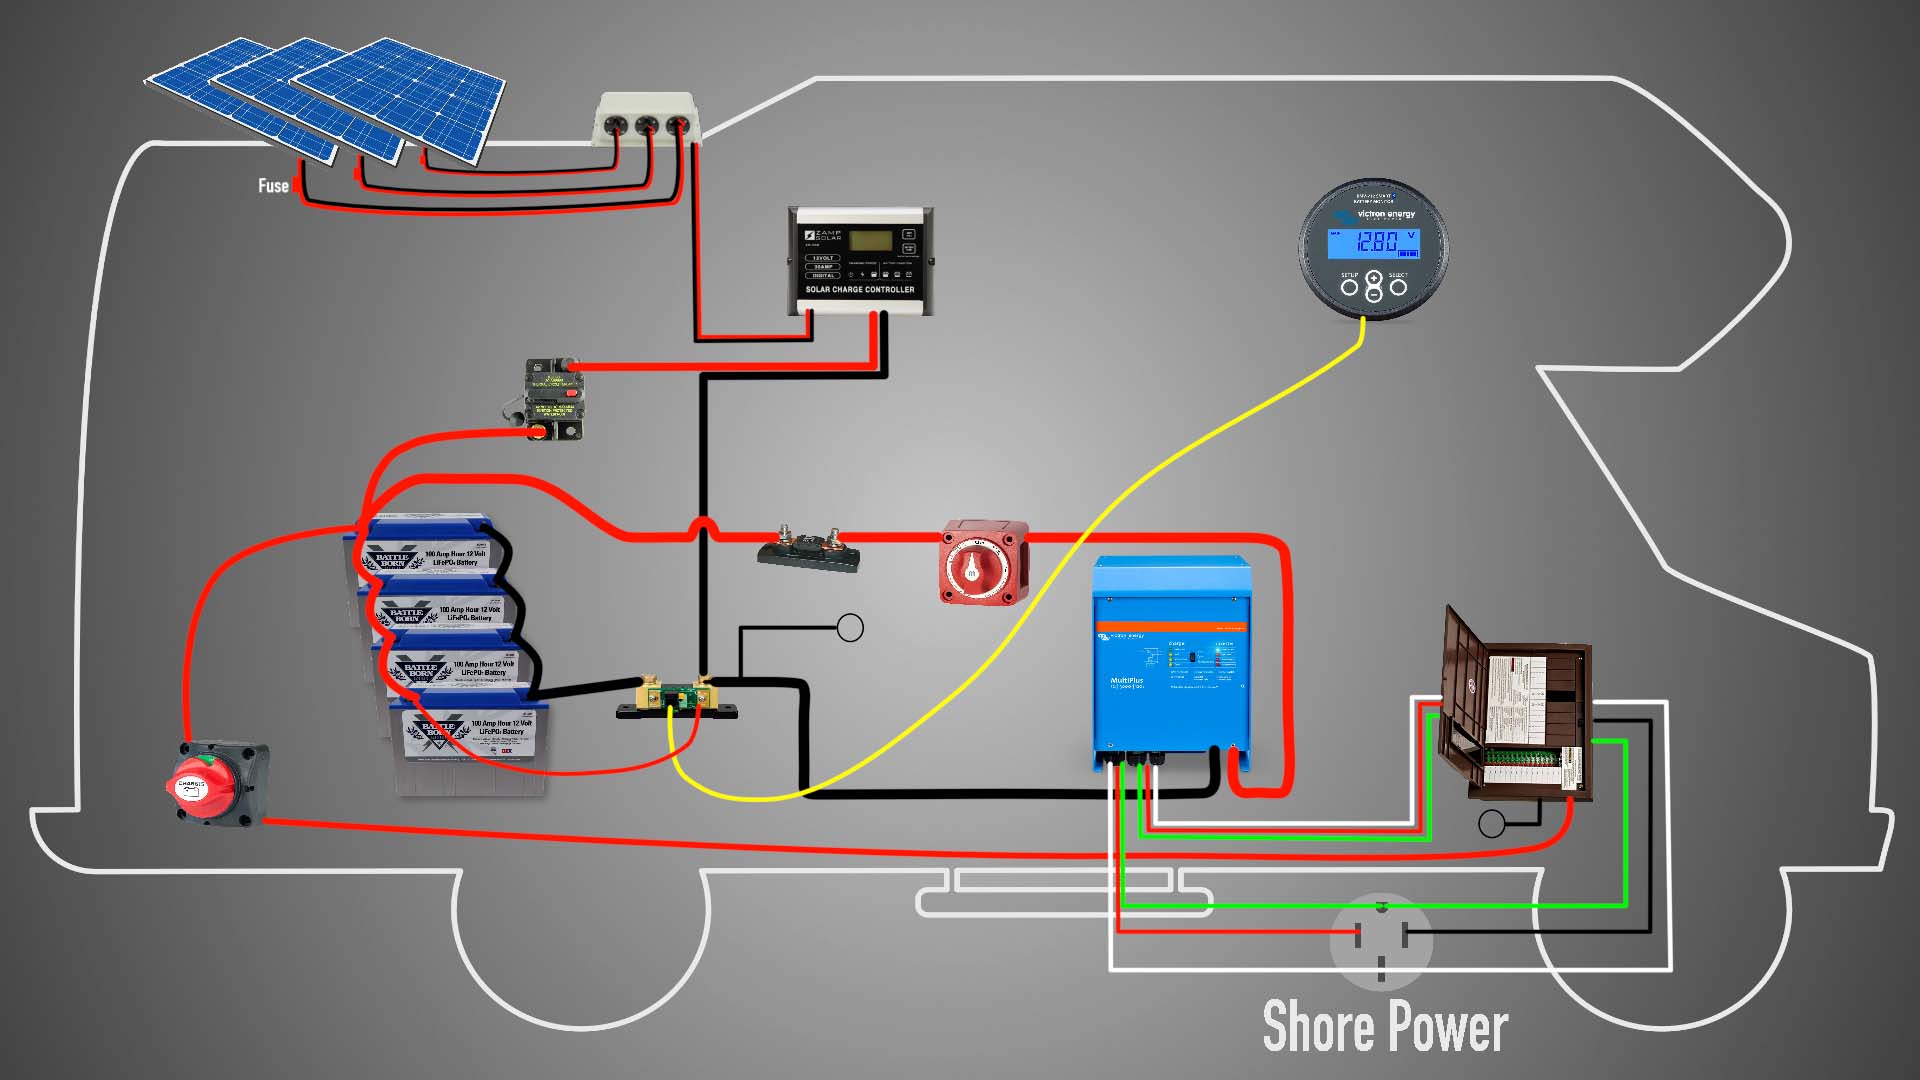
A well-designed RV solar power system can provide a reliable and sustainable source of energy, reducing reliance on generators and grid power. In this article, we’ll delve into the world of 12V circuit design for RV solar power systems, providing a comprehensive guide to help you create an efficient and effective system.
Understanding the Basics of RV Solar Power Systems
Before we dive into the nitty-gritty of circuit design, it’s essential to understand the fundamental components of an RV solar power system. A typical system consists of:
- Solar Panels: These are the primary energy generators, converting sunlight into electrical energy.
- Charge Controller: This device regulates the flow of energy from the solar panels to the battery, preventing overcharging and ensuring safe operation.
- Battery: This stores excess energy generated by the solar panels for later use.
- Inverter/Charger: This device converts DC power from the battery to AC power for use with appliances and charges the battery from an external power source (e.g., a generator or shore power).
- Distribution Panel: This is the central hub for distributing power to various loads within the RV.
12V Circuit Design Considerations
When designing a 12V circuit for your RV solar power system, several factors must be considered to ensure efficient and safe operation:
- Voltage: The system voltage is 12V, which is the standard for most RVs. However, some systems may operate at 24V or 48V, so it’s essential to verify the voltage requirements of your specific system.
- Power Requirements: Calculate the total power requirements of your RV, including lights, appliances, and other loads. This will help determine the necessary size of the solar array, battery bank, and other system components.
- Solar Panel Selection: Choose solar panels with a suitable wattage and voltage rating for your system. Consider factors like efficiency, durability, and cost when selecting panels.
- Charge Controller Selection: The charge controller should be compatible with your solar panel array and battery type. Look for a controller with features like maximum power point tracking (MPPT) and overcharge protection.
- Battery Selection: Select a deep-cycle battery designed for RV use, with a suitable amp-hour (Ah) rating and reserve capacity.
- Wiring and Cabling: Use suitable wiring and cabling for your system, considering factors like gauge, insulation, and protection from the elements.
- Fuses and Circuit Protection: Incorporate fuses and circuit protection devices to prevent overheating, overcurrent, and other potential hazards.


Designing the 12V Circuit
With the basics and considerations in mind, let’s move on to designing the 12V circuit for your RV solar power system:
- Solar Panel Array: Start by connecting the solar panels in a series-parallel configuration to achieve the desired voltage and current output. Ensure the array is securely mounted and angled for optimal energy production.
- Charge Controller Installation: Install the charge controller between the solar panel array and the battery bank. Configure the controller according to the manufacturer’s instructions and system requirements.
- Battery Bank Configuration: Connect the batteries in a series-parallel configuration to achieve the desired voltage and amp-hour rating. Ensure the battery bank is properly ventilated and maintained.
- Inverter/Charger Installation: Install the inverter/charger between the battery bank and the distribution panel. Configure the device according to the manufacturer’s instructions and system requirements.
- Distribution Panel: Connect the various loads (e.g., lights, appliances, and outlets) to the distribution panel. Ensure the panel is properly sized and configured for your system.
- Wiring and Cabling: Run wiring and cabling from the solar panel array, charge controller, battery bank, and inverter/charger to the distribution panel. Use suitable connectors and protection devices (e.g., fuses, circuit breakers) to ensure safe and reliable operation.
- Grounding and Bonding: Ensure the system is properly grounded and bonded to prevent electrical shock and ensure safe operation.
Safety Considerations and Best Practices
When designing and installing your RV solar power system, keep the following safety considerations and best practices in mind:
- Follow Manufacturer Instructions: Adhere to the manufacturer’s instructions for each component, including solar panels, charge controllers, batteries, and inverters/chargers.
- Use Suitable Materials: Use suitable materials for wiring, cabling, and connectors, considering factors like insulation, protection, and durability.
- Protect Against Overcurrent: Incorporate fuses, circuit breakers, and other protection devices to prevent overcurrent and potential hazards.
- Ensure Proper Ventilation: Ensure the battery bank and electrical components are properly ventilated to prevent overheating and potential hazards.
- Monitor System Performance: Regularly monitor system performance, including voltage, current, and temperature, to identify potential issues and ensure optimal operation.
- Perform Regular Maintenance: Perform regular maintenance tasks, such as cleaning solar panels, checking battery water levels, and inspecting wiring and connections, to ensure the system operates efficiently and safely.
Conclusion
Designing an efficient RV solar power system with a 12V circuit requires careful consideration of various factors, including system components, power requirements, and safety considerations. By following the guidelines and best practices outlined in this article, you can create a reliable and sustainable source of energy for your RV, reducing your reliance on generators and grid power. Remember to always follow manufacturer instructions, use suitable materials, and prioritize safety to ensure optimal operation and longevity of your RV solar power system. Happy camping!


