“How to wire solar panels to a charge controller?”
However, to ensure that your solar panels are working efficiently and safely, it’s essential to wire them correctly to a charge controller. In this article, we’ll provide a step-by-step guide on how to wire solar panels to a charge controller, helping you to get the most out of your solar panel system.
Introduction to Solar Panels and Charge Controllers
Before we dive into the wiring process, let’s take a brief look at how solar panels and charge controllers work. Solar panels are designed to convert sunlight into electrical energy, which is then stored in a battery or used to power electrical devices. However, solar panels can produce a varying amount of power depending on the amount of sunlight they receive, which can lead to overcharging or undercharging of the battery.
A charge controller is an essential component of a solar panel system, as it helps to regulate the flow of energy from the solar panels to the battery. The charge controller ensures that the battery is charged safely and efficiently, preventing overcharging or undercharging, which can damage the battery or reduce its lifespan.
Types of Charge Controllers
There are several types of charge controllers available, including:
- PWM (Pulse Width Modulation) Charge Controllers: These are the most common type of charge controller and use a pulse width modulation technique to regulate the flow of energy.
- MPPT (Maximum Power Point Tracking) Charge Controllers: These charge controllers use an advanced algorithm to track the maximum power point of the solar panel, ensuring that the battery is charged with the maximum amount of energy.
- Simple Charge Controllers: These are basic charge controllers that simply regulate the flow of energy from the solar panel to the battery, without any advanced features.
Materials Needed
To wire solar panels to a charge controller, you’ll need the following materials:
- Solar panels
- Charge controller
- Battery
- Wiring (10-14 AWG)
- Connectors (MC4 or similar)
- Fuses or circuit breakers (optional)
- Grounding wire (optional)

Step-by-Step Guide to Wiring Solar Panels to a Charge Controller
- Connect the Solar Panels: Begin by connecting the solar panels in series or parallel, depending on your system’s configuration. If you’re connecting multiple solar panels in series, ensure that the positive terminal of one panel is connected to the negative terminal of the next panel. If you’re connecting multiple solar panels in parallel, ensure that the positive terminals are connected together and the negative terminals are connected together.
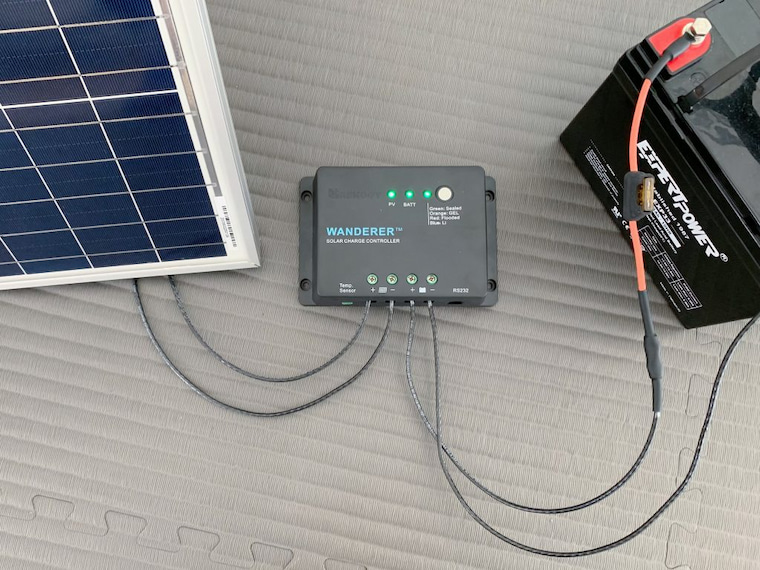
- Connect the Solar Panel Array to the Charge Controller: Once the solar panels are connected, connect the positive terminal of the solar panel array to the positive input terminal on the charge controller. Then, connect the negative terminal of the solar panel array to the negative input terminal on the charge controller.
- Connect the Charge Controller to the Battery: Next, connect the positive output terminal on the charge controller to the positive terminal on the battery. Then, connect the negative output terminal on the charge controller to the negative terminal on the battery.
- Add Fuses or Circuit Breakers (Optional): If you want to add an extra layer of protection to your system, you can install fuses or circuit breakers between the solar panels and the charge controller, or between the charge controller and the battery.
- Ground the System (Optional): If you want to ground your system, connect a grounding wire from the negative terminal of the solar panel array to a grounding point, such as a grounding rod or a metallic pipe.
- Test the System: Once the wiring is complete, test the system to ensure that it’s working correctly. Use a multimeter to measure the voltage and current output of the solar panels, and check that the charge controller is regulating the flow of energy to the battery.
Wiring Diagrams
To help illustrate the wiring process, here are some simplified wiring diagrams:
Series Connection
Solar Panel 1 (+) -> Solar Panel 2 (-)
Solar Panel 2 (+) -> Solar Panel 3 (-)
…
Solar Panel N (+) -> Charge Controller (+)
Solar Panel N (-) -> Charge Controller (-)
Parallel Connection
Solar Panel 1 (+) -> Solar Panel 2 (+)
Solar Panel 1 (-) -> Solar Panel 2 (-)
…
Solar Panel N (+) -> Charge Controller (+)
Solar Panel N (-) -> Charge Controller (-)
Charge Controller to Battery
Charge Controller (+) -> Battery (+)
Charge Controller (-) -> Battery (-)
Tips and Precautions
- Use the Correct Wiring: Use the correct gauge and type of wiring for your system, as specified in the manufacturer’s instructions.
- Avoid Overheating: Ensure that the wiring is not exposed to excessive heat, as this can cause damage to the insulation and increase the risk of electrical shock.
- Use Connectors: Use connectors, such as MC4 connectors, to connect the solar panels to the charge controller, as these can help to prevent damage to the wiring and ensure a secure connection.
- Test the System Regularly: Regularly test the system to ensure that it’s working correctly and that the battery is being charged safely and efficiently.
- Consult the Manufacturer’s Instructions: Consult the manufacturer’s instructions for specific guidance on wiring and installing your solar panel system.
Conclusion
Wiring solar panels to a charge controller is a crucial step in ensuring that your solar panel system is working safely and efficiently. By following the steps outlined in this guide, you can ensure that your system is configured correctly and that you’re getting the most out of your solar panels. Remember to always follow the manufacturer’s instructions and take necessary precautions to avoid electrical shock or damage to the system. With the right wiring and configuration, you can enjoy a reliable and efficient solar panel system that provides you with clean, renewable energy for years to come.
Additional Resources
If you’re looking for more information on solar panels and charge controllers, here are some additional resources:
- National Renewable Energy Laboratory (NREL): NREL provides a wealth of information on solar energy, including guides on solar panel installation and maintenance.
- Solar Energy Industries Association (SEIA): SEIA is a trade association that provides information and resources on solar energy, including guides on solar panel installation and maintenance.
- Manufacturer’s Instructions: Always consult the manufacturer’s instructions for specific guidance on wiring and installing your solar panel system.
By following the steps outlined in this guide and consulting additional resources, you can ensure that your solar panel system is working safely and efficiently, providing you with clean, renewable energy for years to come.
:max_bytes(150000):strip_icc()/GettyImages-1306175466-5fea06cef4d6421993ed4385257eba50.jpg)


