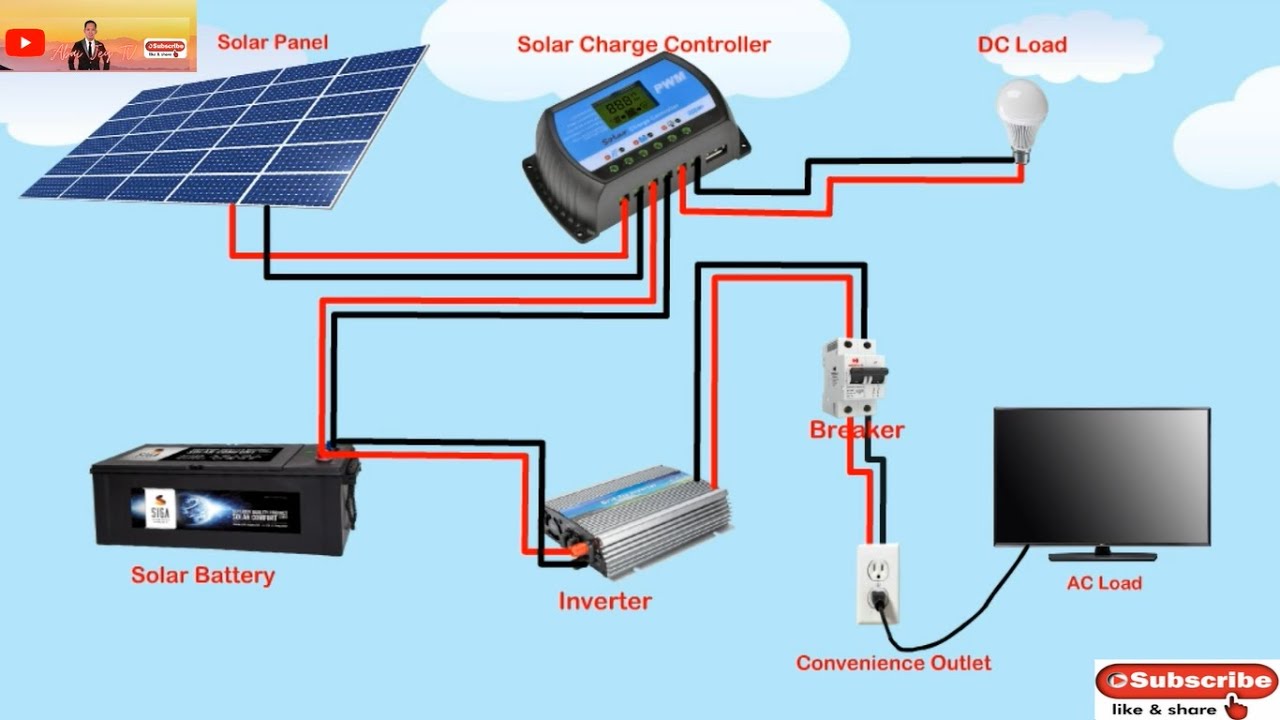
“12V RV solar setup with charge controller and inverter”
For a 12V RV solar setup, you will typically need one or more solar panels with a total wattage of 100-400 Watts. The number and size of the solar panels will depend on your energy needs and the amount of sunlight available.
Benefits of a 12V RV Solar Setup
- Renewable Energy: A 12V RV solar setup harnesses the power of the sun, reducing your reliance on fossil fuels and minimizing your carbon footprint.
- Off-Grid Camping: With a 12V RV solar setup, you can enjoy the freedom of off-grid camping, without the need for a noisy generator or expensive campground hookups.
- Increased Energy Independence: A 12V RV solar setup provides a reliable source of energy, even in areas with limited access to grid power.
- Cost Savings: A 12V RV solar setup can save you money in the long run, by reducing your energy costs and minimizing the need for expensive campground hookups.
Installation Process
Installing a 12V RV solar setup requires careful planning and attention to detail. Here are the general steps involved in the installation process:
- Assess Your Energy Needs: Determine your energy needs by calculating the total wattage of your appliances and devices.
- Choose Your Solar Panels: Select one or more solar panels with a total wattage that meets your energy needs.
- Mount the Solar Panels: Mount the solar panels on the roof of your RV, ensuring that they are securely fastened and angled for maximum energy production.
- Install the Charge Controller: Install the charge controller in a convenient location, such as near the battery bank or in a storage compartment.
- Connect the Solar Panels to the Charge Controller: Connect the solar panels to the charge controller, ensuring that the wiring is secure and protected from the elements.
- Install the Battery Bank: Install the battery bank in a convenient location, such as in a storage compartment or under the RV.
- Connect the Battery Bank to the Inverter/Charger: Connect the battery bank to the inverter/charger, ensuring that the wiring is secure and protected from the elements.
- Connect the Inverter/Charger to Your Appliances: Connect the inverter/charger to your appliances, ensuring that they are powered by the solar system.


Charge Controller Options
There are several charge controller options available for a 12V RV solar setup, including:
- PWM (Pulse Width Modulation) Charge Controllers: PWM charge controllers are simple and inexpensive, but may not provide the most efficient charging.
- MPPT (Maximum Power Point Tracking) Charge Controllers: MPPT charge controllers are more efficient than PWM charge controllers, but may be more expensive.
- Smart Charge Controllers: Smart charge controllers offer advanced features, such as remote monitoring and automatic generator start, but may be more expensive.
Inverter/Charger Options
There are several inverter/charger options available for a 12V RV solar setup, including:
- Pure Sine Wave Inverters: Pure sine wave inverters provide clean, pure sine wave AC power, which is suitable for most appliances.
- Modified Sine Wave Inverters: Modified sine wave inverters provide a modified sine wave AC power, which may not be suitable for all appliances.
- Hybrid Inverters: Hybrid inverters offer a combination of pure sine wave and modified sine wave AC power, providing flexibility and efficiency.
Conclusion
A 12V RV solar setup with a charge controller and inverter is an excellent way to harness the power of the sun and enjoy the freedom of off-grid camping. By understanding the components, benefits, and installation process of a 12V RV solar setup, you can create a reliable and sustainable source of energy for your RV. Whether you’re a seasoned RVer or just starting out, a 12V RV solar setup is an excellent investment for anyone looking to reduce their energy costs and minimize their environmental impact.
Recommendations
- Start with a Small System: Begin with a small solar system and gradually expand as needed.
- Choose High-Quality Components: Select high-quality components, such as solar panels and charge controllers, to ensure efficient and reliable performance.
- Monitor Your Energy Usage: Monitor your energy usage to optimize your solar system and minimize energy waste.
- Consider a Battery Monitor: Consider installing a battery monitor to track your battery state of charge and ensure optimal performance.
By following these recommendations and understanding the components and installation process of a 12V RV solar setup, you can create a reliable and sustainable source of energy for your RV and enjoy the freedom of off-grid camping.