“House solar system wiring with charge controller”
A properly installed solar system can provide significant cost savings, reduce carbon emissions, and increase energy independence. However, to ensure a safe and efficient system, it’s essential to understand the importance of solar system wiring and the role of a charge controller. In this article, we’ll delve into the world of house solar system wiring with a charge controller, exploring the basics, benefits, and best practices for a reliable and efficient solar-powered home.
Introduction to Solar System Wiring
Solar system wiring refers to the electrical connections between the solar panels, charge controller, battery bank, and inverter/charger. The primary goal of solar system wiring is to ensure a safe and efficient transfer of energy from the solar panels to the electrical loads in your home. A well-designed wiring system is crucial to prevent electrical shocks, fires, and system malfunctions.
Components of a Solar System
Before diving into the wiring aspects, let’s review the basic components of a solar system:
- Solar Panels: Convert sunlight into DC (direct current) electricity.
- Charge Controller: Regulates the flow of energy from the solar panels to the battery bank, preventing overcharging and damage.
- Battery Bank: Stores excess energy generated by the solar panels for later use.
- Inverter/Charger: Converts DC power from the battery bank to AC (alternating current) power for your home’s electrical loads.
The Role of a Charge Controller
A charge controller is a critical component in a solar system, responsible for:
- Regulating Charge: Prevents overcharging of the battery bank by limiting the flow of energy from the solar panels.
- Preventing Over-Discharge: Stops the battery bank from being overly discharged, which can damage the batteries.
- Monitoring System Performance: Provides valuable insights into system performance, including voltage, current, and temperature.
Types of Charge Controllers
There are two primary types of charge controllers:
- Pulse Width Modulation (PWM) Charge Controllers: Simple, cost-effective, and widely used. However, they can be less efficient and may not provide advanced features.
- Maximum Power Point Tracking (MPPT) Charge Controllers: More efficient and advanced, MPPT charge controllers can optimize energy harvesting and provide features like data monitoring and system integration.
Wiring Considerations
When designing your solar system wiring, consider the following factors:
- Wire Sizing: Choose wire sizes that can handle the maximum current output of your solar panels and charge controller.
- Insulation and Protection: Use insulated wires and protect them from environmental factors like sunlight, moisture, and extreme temperatures.
- Grounding and Bonding: Ensure proper grounding and bonding of your solar system to prevent electrical shocks and system malfunctions.
- Connectors and Terminals: Use high-quality connectors and terminals to prevent corrosion and ensure reliable connections.
Best Practices for Solar System Wiring
To ensure a safe and efficient solar system, follow these best practices:
- Hire a Professional: If you’re not experienced in electrical work, hire a licensed electrician to design and install your solar system.
- Follow Local Electrical Codes: Comply with local electrical codes and regulations to ensure a safe and approved installation.
- Use High-Quality Components: Invest in reputable brands and high-quality components to ensure reliability and efficiency.
- Monitor System Performance: Regularly monitor your system’s performance to identify potential issues and optimize energy harvesting.
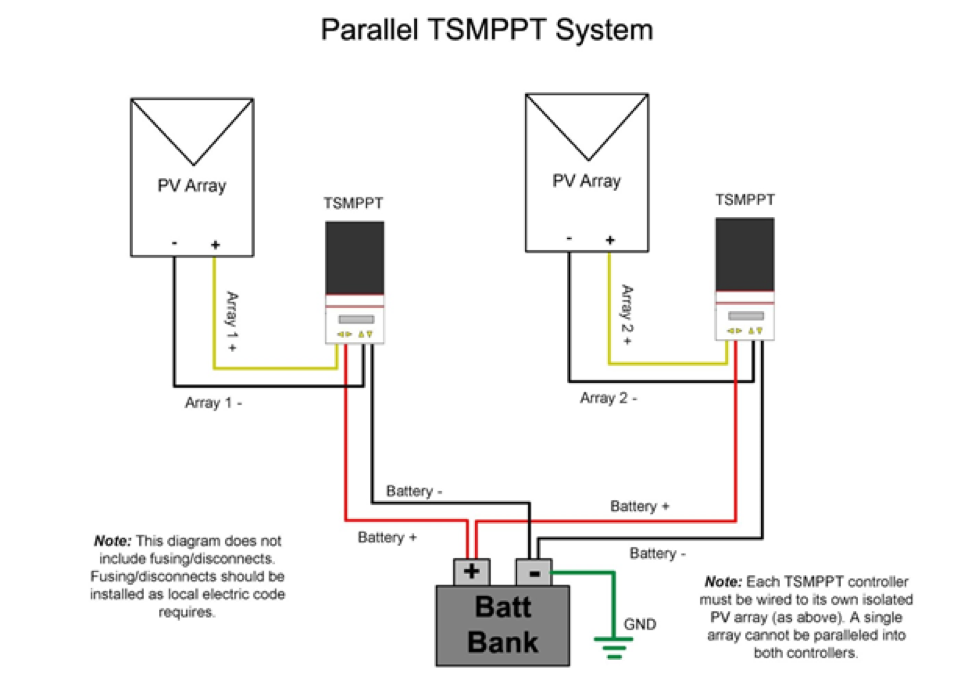
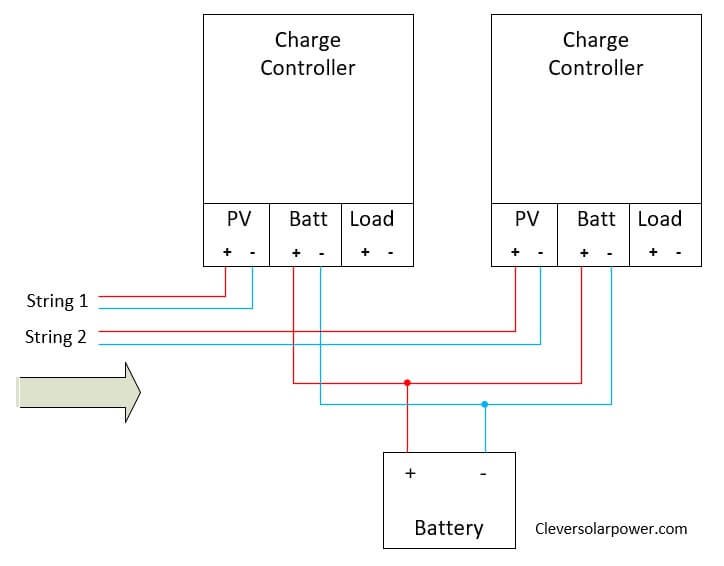
Charge Controller Wiring
When wiring your charge controller, follow these steps:
- Connect Solar Panels: Connect the solar panels to the charge controller, ensuring the correct polarity and voltage.
- Connect Battery Bank: Connect the battery bank to the charge controller, following the manufacturer’s instructions.
- Connect Inverter/Charger: Connect the inverter/charger to the charge controller, ensuring the correct configuration and settings.
- Configure Charge Controller: Configure the charge controller according to the manufacturer’s instructions, setting parameters like voltage, current, and charging modes.
Troubleshooting Common Issues
If you encounter issues with your solar system, consult the following troubleshooting guide:
- Low Voltage: Check the solar panel voltage, charge controller settings, and battery bank condition.
- Overcharging: Verify the charge controller settings and adjust the charging parameters if necessary.
- System Malfunctions: Check the wiring connections, grounding, and bonding to ensure a safe and reliable system.
Conclusion
In conclusion, house solar system wiring with a charge controller requires careful planning, design, and installation to ensure a safe and efficient system. By understanding the basics of solar system wiring, the role of a charge controller, and following best practices, you can create a reliable and efficient solar-powered home. Remember to hire a professional if you’re not experienced in electrical work, and always follow local electrical codes and regulations. With a well-designed solar system, you can enjoy significant cost savings, reduce your carbon footprint, and increase your energy independence.
Additional Resources
For further information on solar system wiring and charge controllers, consult the following resources:
- National Electric Code (NEC): Guidelines for electrical installations, including solar systems.
- International Association of Electrical Inspectors (IAEI): Resources and training for electrical inspectors and professionals.
- Solar Energy Industries Association (SEIA): Industry guidelines and best practices for solar system installations.
- Manufacturer Instructions: Consult the manufacturer’s instructions for specific charge controller and solar system components.
By following this comprehensive guide, you’ll be well on your way to creating a safe, efficient, and reliable solar-powered home. Happy installing!


