“RV solar panel wiring diagram for 12V battery bank”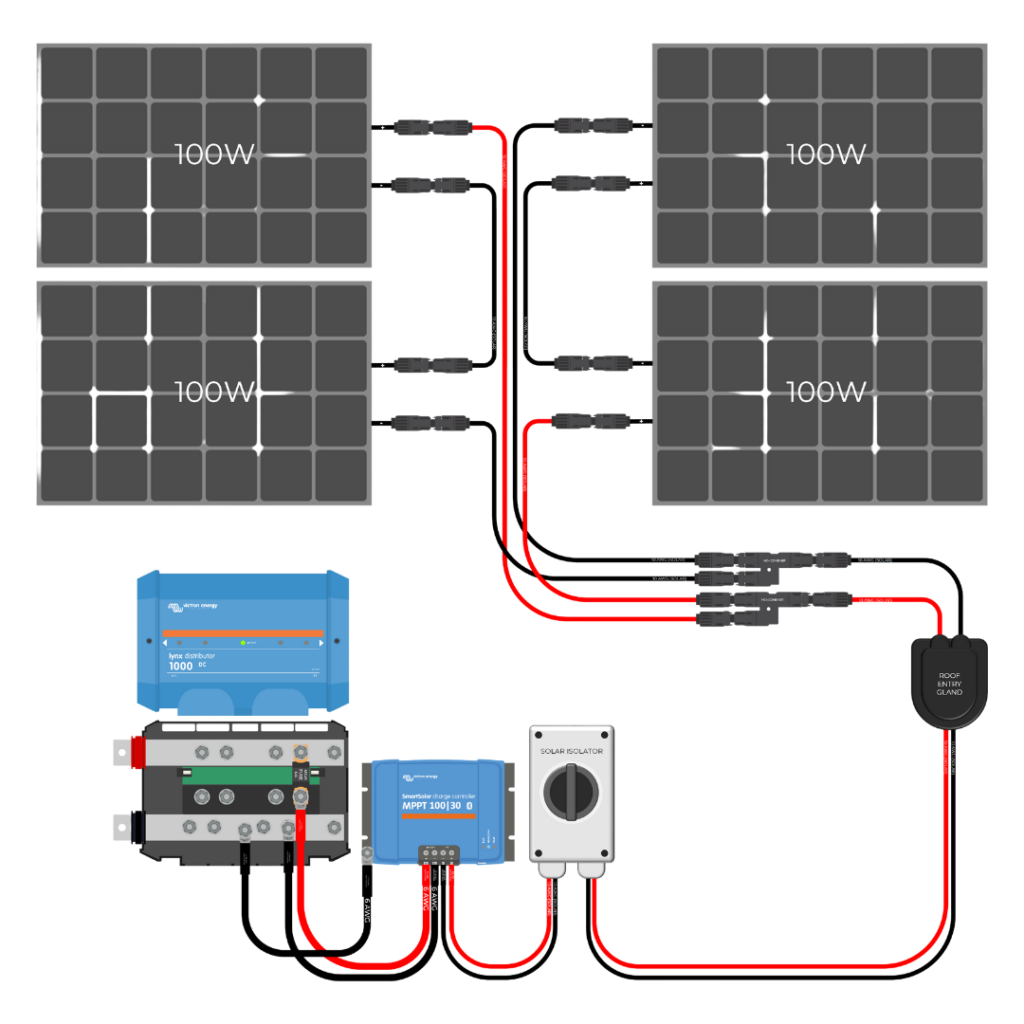
Installing solar panels on your RV can provide a reliable and sustainable source of energy, reducing your reliance on generators and shore power. However, designing and installing a solar panel system can be a complex task, especially when it comes to wiring. In this article, we will provide a comprehensive guide to creating an RV solar panel wiring diagram for a 12V battery bank.
Introduction to Solar Panel Systems
A solar panel system consists of several components, including solar panels, a charge controller, a battery bank, and an inverter/charger. The solar panels convert sunlight into DC power, which is then fed into the charge controller. The charge controller regulates the flow of energy to the battery bank, ensuring that the batteries are charged safely and efficiently. The battery bank stores excess energy for later use, and the inverter/charger converts the DC power from the batteries into AC power for use in the RV.
Understanding the 12V Battery Bank
A 12V battery bank is a series of deep cycle batteries connected together to provide a 12V DC power source. The most common configuration is a series of 6V batteries connected in series and parallel to create a 12V system. The capacity of the battery bank is measured in ampere-hours (Ah), which represents the amount of energy the batteries can store.
Designing the RV Solar Panel Wiring Diagram
When designing an RV solar panel wiring diagram for a 12V battery bank, there are several factors to consider:
- Solar Panel Array: Determine the size and configuration of the solar panel array. This will depend on the amount of energy required to charge the battery bank and the available space on the RV roof.
- Charge Controller: Choose a charge controller that is compatible with the solar panel array and the battery bank. The charge controller should be able to handle the maximum power output of the solar panels and regulate the flow of energy to the batteries.
- Battery Bank: Determine the size and configuration of the battery bank. This will depend on the amount of energy required to power the RV systems and the desired depth of discharge (DOD).
- Inverter/Charger: Choose an inverter/charger that is compatible with the battery bank and the RV systems. The inverter/charger should be able to handle the maximum power output of the battery bank and convert the DC power to AC power for use in the RV.
Creating the RV Solar Panel Wiring Diagram
Once the components have been selected, the next step is to create the RV solar panel wiring diagram. The diagram should include the following components:
- Solar Panel Array: Represent the solar panel array as a series of parallel lines, with each line representing a single solar panel.
- Charge Controller: Represent the charge controller as a box or rectangle, with input and output connections.
- Battery Bank: Represent the battery bank as a series of parallel lines, with each line representing a single battery.
- Inverter/Charger: Represent the inverter/charger as a box or rectangle, with input and output connections.
- Wiring: Use lines to connect the components, indicating the flow of energy through the system.


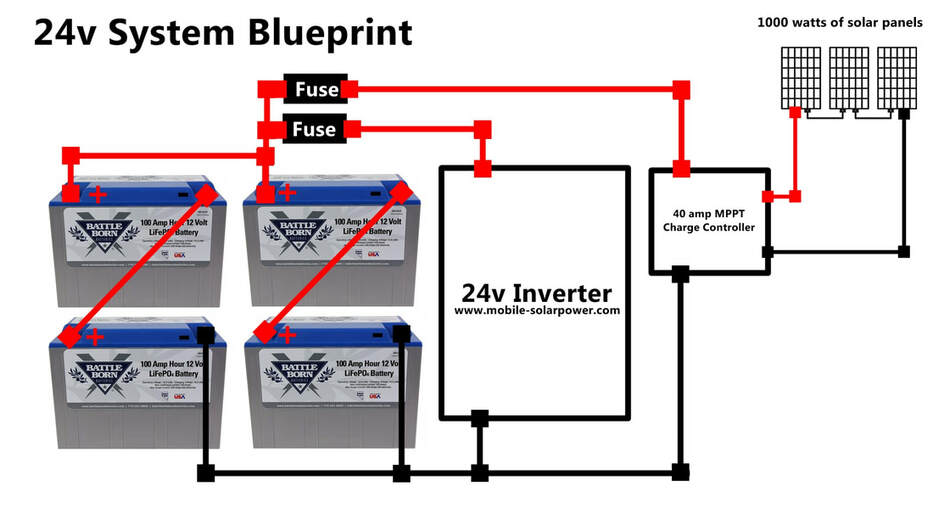
Example RV Solar Panel Wiring Diagram
Here is an example RV solar panel wiring diagram for a 12V battery bank:
- Solar Panel Array: 2 x 200W solar panels in series (400W total)
- Charge Controller: 40A MPPT charge controller
- Battery Bank: 4 x 6V deep cycle batteries in series and parallel (12V, 440Ah)
- Inverter/Charger: 2000W pure sine wave inverter/charger
Wiring Diagram:
- Solar Panel Array -> Charge Controller (positive and negative connections)
- Charge Controller -> Battery Bank (positive and negative connections)
- Battery Bank -> Inverter/Charger (positive and negative connections)
- Inverter/Charger -> RV Systems (120V AC output)
Tips and Considerations
When creating an RV solar panel wiring diagram, there are several tips and considerations to keep in mind:
- Use proper wiring and connectors: Use heavy-duty wiring and connectors to ensure safe and reliable connections.
- Follow safety protocols: Follow safety protocols when working with electrical systems, including wearing protective gear and ensuring the system is disconnected from the power source.
- Consider system monitoring: Consider installing a system monitor to track the performance of the solar panel system and ensure that it is operating efficiently.
- Plan for expansion: Plan for future expansion of the solar panel system, including adding more solar panels or batteries.
Conclusion
Creating an RV solar panel wiring diagram for a 12V battery bank requires careful planning and attention to detail. By following the steps outlined in this article and considering the tips and considerations, you can design a safe and efficient solar panel system for your RV. Remember to always follow safety protocols and use proper wiring and connectors to ensure a reliable and long-lasting system. With a well-designed solar panel system, you can enjoy the freedom and convenience of renewable energy on the road.
Additional Resources
For more information on RV solar panel systems and wiring diagrams, check out the following resources:
- National Renewable Energy Laboratory (NREL) – www.nrel.gov
- RV Solar Panel Installation Guide – www.rvsolarpanelinstallation.com
- Solar Panel Wiring Diagram Software – www.solarpanelwiringdiagram.com
Glossary of Terms
- Ampere-hours (Ah): A unit of measurement for the capacity of a battery.
- Deep cycle battery: A type of battery designed for deep discharge and recharge cycles.
- Inverter/charger: A device that converts DC power to AC power and charges the battery bank.
- MPPT charge controller: A type of charge controller that uses maximum power point tracking (MPPT) to optimize energy harvesting from the solar panel array.
- Pure sine wave inverter: A type of inverter that produces a pure sine wave output, suitable for sensitive electronic devices.
- Series and parallel configuration: A configuration of batteries or solar panels connected in series and parallel to increase the overall voltage and capacity.