“Solar panel to battery 12V RV wiring setup”
A well-designed solar panel to battery 12V RV wiring setup is crucial to ensure safe, efficient, and reliable power generation. In this article, we will delve into the world of solar panel wiring, exploring the key components, design considerations, and best practices for creating a robust and efficient system.
Introduction to Solar Panel Systems
A solar panel system consists of several key components, including:
- Solar Panels: These are the photovoltaic (PV) panels that convert sunlight into electrical energy. RV owners typically use monocrystalline or polycrystalline panels, which offer high efficiency and durability.
- Charge Controller: This device regulates the flow of energy from the solar panels to the battery, preventing overcharging and ensuring safe operation.
- Battery: A deep cycle battery, such as a lead-acid or lithium-ion battery, stores the energy generated by the solar panels for later use.
- Inverter/Charger: An inverter converts DC power from the battery to AC power, while a charger converts AC power from an external source (e.g., a generator or shore power) to DC power to charge the battery.
Designing a Solar Panel to Battery 12V RV Wiring Setup
When designing a solar panel to battery 12V RV wiring setup, several factors must be considered to ensure a safe, efficient, and reliable system.
- Solar Panel Array Size: Determine the total wattage required to charge your battery bank. A general rule of thumb is to size the solar panel array to provide 5-10% of the battery bank’s total ampere-hour (Ah) capacity.
- Charge Controller Selection: Choose a charge controller that can handle the maximum power output of your solar panel array. Consider a controller with a built-in maximum power point tracking (MPPT) feature, which optimizes energy harvesting from the solar panels.
- Battery Bank Configuration: Determine the required battery bank size and configuration (e.g., series, parallel, or series-parallel) to meet your energy needs.
- Wiring and Cabling: Select suitable wiring and cabling for your system, considering factors like voltage drop, current capacity, and insulation.

Key Components and Their Functions
- Solar Panel Connectors: Use MC4 or similar connectors to connect the solar panels to the charge controller. These connectors provide a secure, waterproof connection and simplify system installation.
- Charge Controller: The charge controller is the brain of your solar panel system, regulating energy flow and preventing overcharging. Popular charge controllers include the Renogy Rover, Victron SmartSolar, and OutBack FX.
- Battery Monitor: A battery monitor, such as the Victron BMV-700 or Renogy Battery Monitor, provides valuable insights into your battery bank’s state of charge, voltage, and current.
- Fuses and Circuit Breakers: Fuses and circuit breakers protect your system from overcurrent conditions, ensuring safe operation and preventing damage to components.
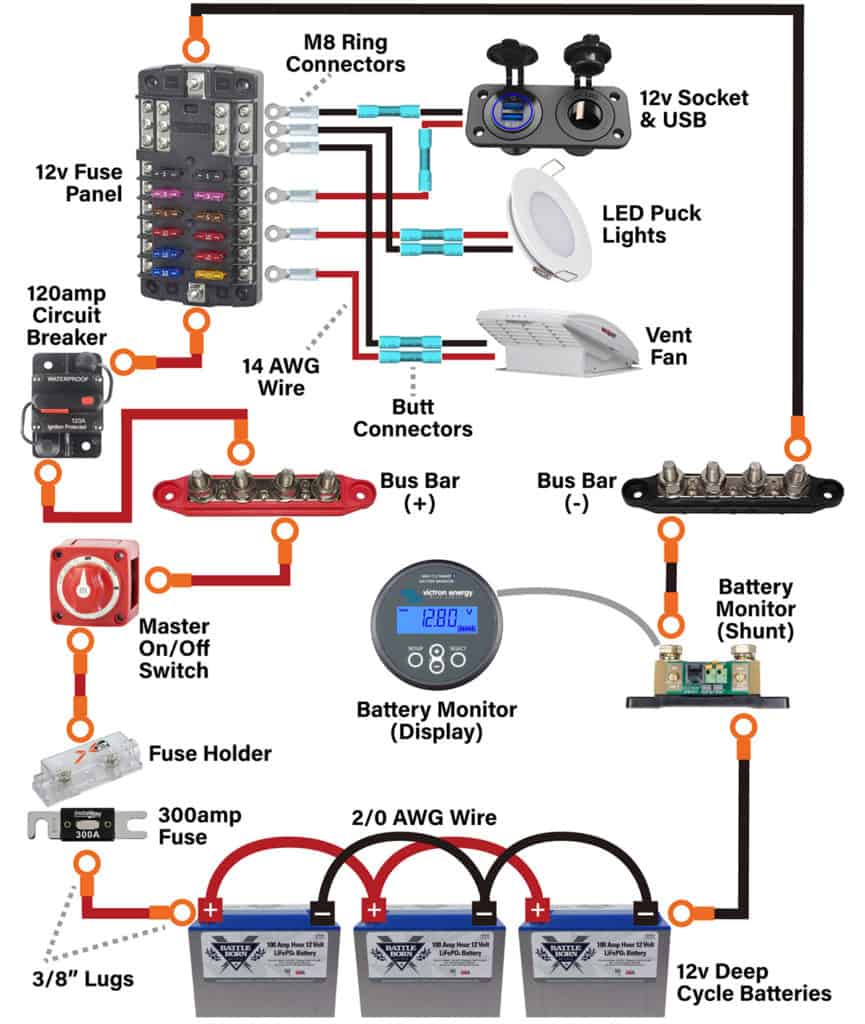
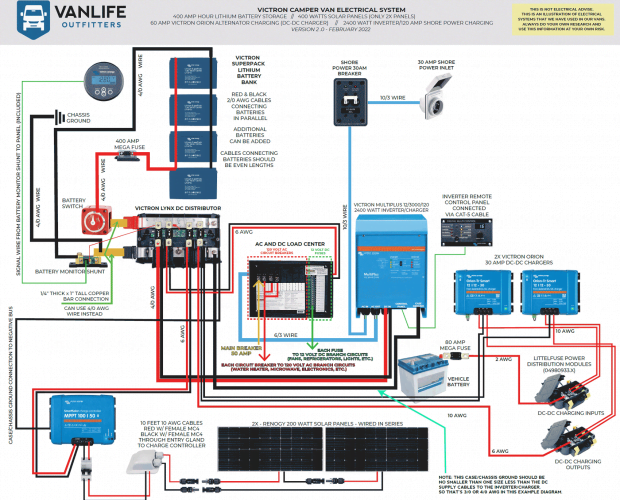
Wiring Diagram and Connection
The following wiring diagram illustrates a basic solar panel to battery 12V RV wiring setup:
- Solar Panel Array: Connect the solar panels in series and/or parallel to achieve the desired voltage and current output.
- Charge Controller: Connect the solar panel array to the charge controller, following the manufacturer’s instructions for wiring and configuration.
- Battery Bank: Connect the charge controller to the battery bank, ensuring the correct polarity (positive to positive, negative to negative).
- Load Connection: Connect the load (e.g., lights, fridge, or inverter) to the battery bank, using a suitable fuse or circuit breaker to protect against overcurrent conditions.
Best Practices and Safety Considerations
- Follow Manufacturer Instructions: Adhere to the manufacturer’s instructions for each component, ensuring correct installation and configuration.
- Use Suitable Wiring and Cabling: Select wiring and cabling that can handle the maximum current and voltage of your system, considering factors like insulation, voltage drop, and current capacity.
- Protect Against Overcurrent Conditions: Use fuses, circuit breakers, or other protective devices to prevent overcurrent conditions, which can damage components or pose a fire hazard.
- Monitor System Performance: Regularly monitor your system’s performance, using tools like a battery monitor or multimeter to ensure optimal operation and identify potential issues.
Troubleshooting Common Issues
- Low Charge Controller Efficiency: Check the charge controller’s settings, ensuring it is configured correctly for your solar panel array and battery bank.
- High Voltage Drop: Verify that the wiring and cabling are suitable for the system’s current and voltage, and consider upgrading to heavier-gauge wiring or using a voltage drop compensator.
- Inconsistent Battery State of Charge: Check the battery monitor’s calibration and ensure the battery bank is properly configured and maintained.
- Frequent Overcurrent Tripping: Investigate the cause of overcurrent conditions, adjusting the system’s configuration or adding protective devices as needed.
Conclusion
Creating a solar panel to battery 12V RV wiring setup requires careful consideration of several key components, design factors, and safety considerations. By following the guidelines outlined in this article, RV owners can design and install a robust, efficient, and reliable solar panel system, harnessing the power of the sun to charge their batteries and power their adventures. Remember to always follow manufacturer instructions, use suitable wiring and cabling, and monitor system performance to ensure optimal operation and troubleshoot potential issues. Happy camping!