“How do I wire a solar panel system for my house?”
However, wiring a solar panel system can be a complex and daunting task, requiring careful planning and attention to detail. In this article, we will provide a step-by-step guide on how to wire a solar panel system for your house, ensuring a safe and efficient installation.
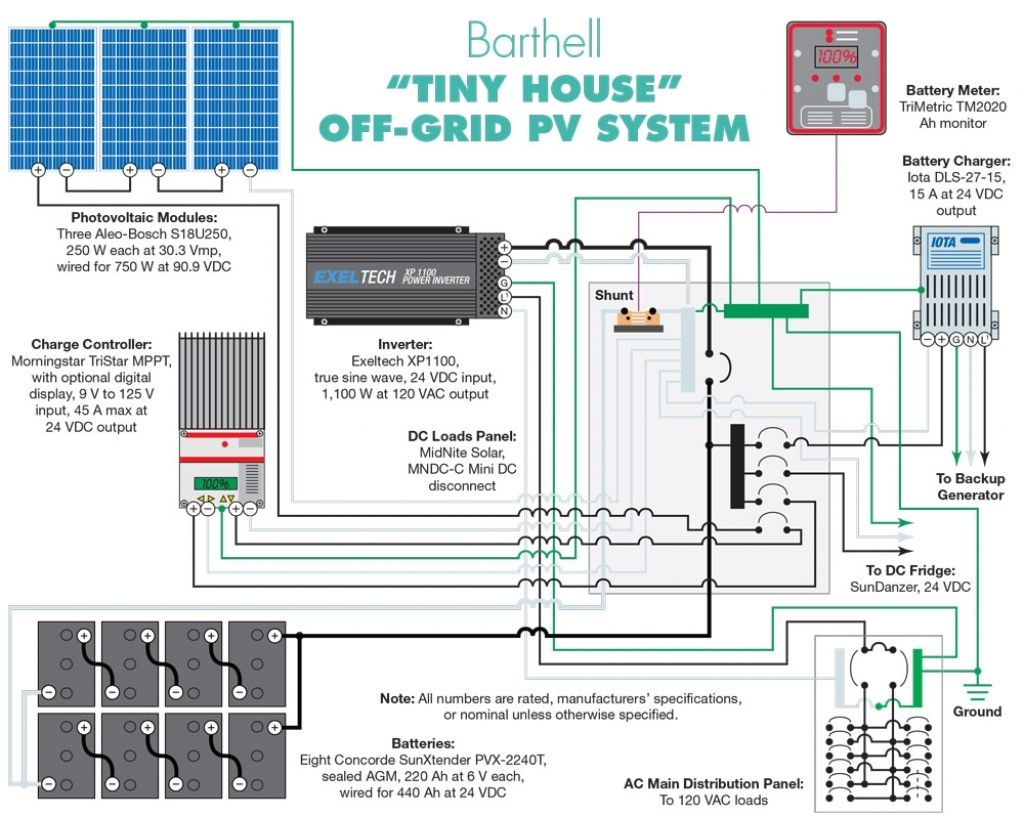
Understanding the Components of a Solar Panel System
Before we dive into the wiring process, it’s essential to understand the components of a solar panel system. A typical solar panel system consists of:
- Solar Panels: These are the photovoltaic (PV) panels that convert sunlight into electrical energy.
- Mounting System: This is the structure that holds the solar panels in place, typically consisting of a racking system and clamps.
- Inverter: This device converts the DC power generated by the solar panels into AC power, which is usable in your home.
- Charge Controller: This component regulates the flow of energy from the solar panels to the battery bank, preventing overcharging and damage to the system.
- Battery Bank: This is the storage system that holds excess energy generated by the solar panels for later use.
- Electrical Panel: This is the main electrical panel in your home, where the solar panel system is connected to the grid.
Wiring a Solar Panel System: Pre-Installation Checks
Before starting the wiring process, it’s crucial to perform the following pre-installation checks:
- Ensure Compliance with Local Building Codes and Regulations: Check with your local authorities to ensure that your solar panel system complies with all relevant building codes and regulations.
- Determine the System Size and Configuration: Calculate the size and configuration of your solar panel system based on your energy needs and available space.
- Choose the Correct Wire Size and Type: Select the correct wire size and type for your system, considering factors such as voltage, current, and temperature.
- Verify the Integrity of the Roof: Ensure that your roof is structurally sound and able to support the weight of the solar panel system.
Wiring the Solar Panel Array
The solar panel array is the heart of the solar panel system, and wiring it correctly is crucial for safe and efficient operation. Follow these steps to wire the solar panel array:
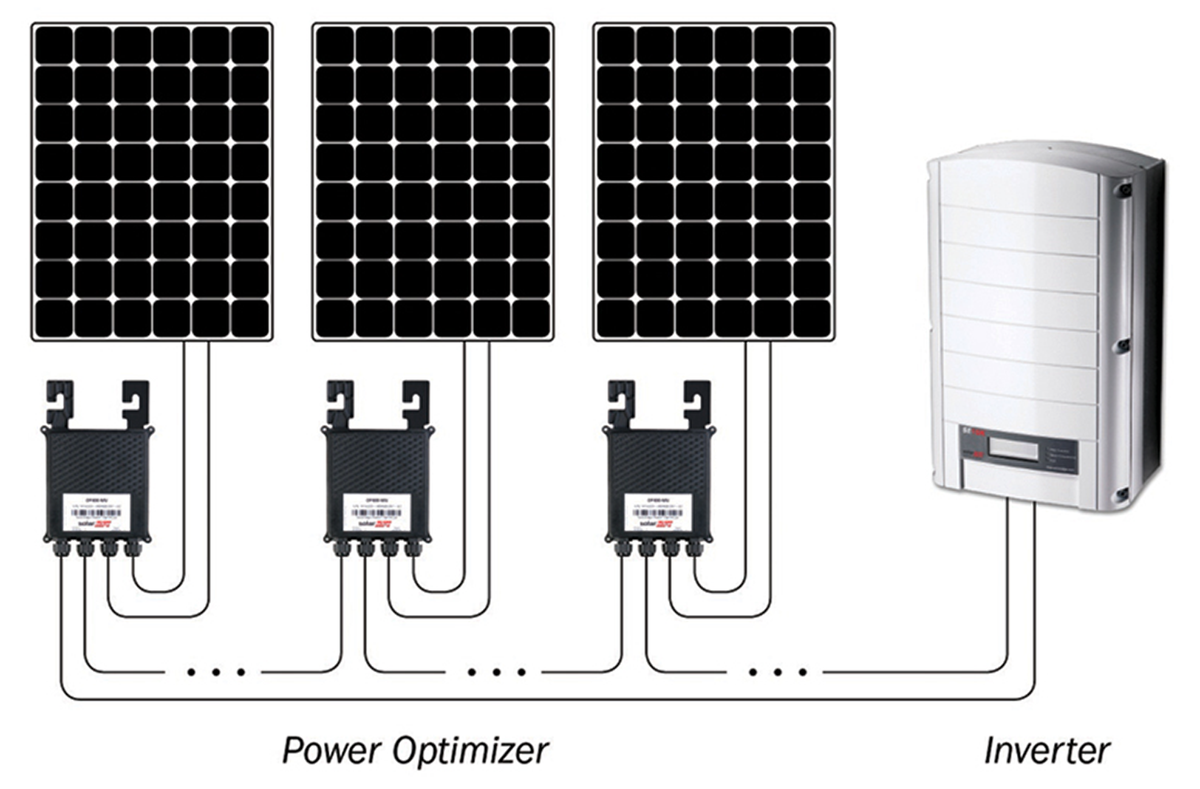
- Connect the Solar Panels in Series: Connect the solar panels in series, using MC4 connectors or lugs, to create a string.
- Connect the Strings in Parallel: Connect the strings in parallel, using a combiner box, to create the solar panel array.
- Use the Correct Wire Size and Type: Use the correct wire size and type for the solar panel array, considering factors such as voltage, current, and temperature.
- Ensure Proper Grounding: Ensure that the solar panel array is properly grounded, using a grounding rod or busbar.
Wiring the Inverter and Charge Controller
The inverter and charge controller are critical components of the solar panel system, responsible for converting DC power to AC power and regulating the flow of energy to the battery bank. Follow these steps to wire the inverter and charge controller:
- Connect the Solar Panel Array to the Inverter: Connect the solar panel array to the inverter, using the correct wire size and type.
- Connect the Inverter to the Electrical Panel: Connect the inverter to the electrical panel, using a dedicated circuit breaker or fuse.
- Connect the Charge Controller to the Battery Bank: Connect the charge controller to the battery bank, using the correct wire size and type.
- Connect the Charge Controller to the Solar Panel Array: Connect the charge controller to the solar panel array, using the correct wire size and type.
Wiring the Battery Bank
The battery bank is a critical component of the solar panel system, storing excess energy generated by the solar panels for later use. Follow these steps to wire the battery bank:
- Connect the Batteries in Series: Connect the batteries in series, using the correct wire size and type, to create a string.
- Connect the Strings in Parallel: Connect the strings in parallel, using a busbar or combiner box, to create the battery bank.
- Use the Correct Wire Size and Type: Use the correct wire size and type for the battery bank, considering factors such as voltage, current, and temperature.
- Ensure Proper Grounding: Ensure that the battery bank is properly grounded, using a grounding rod or busbar.
Wiring the Electrical Panel
The electrical panel is the main distribution point for the solar panel system, connecting the system to the grid and providing power to your home. Follow these steps to wire the electrical panel:
- Connect the Inverter to the Electrical Panel: Connect the inverter to the electrical panel, using a dedicated circuit breaker or fuse.
- Connect the Battery Bank to the Electrical Panel: Connect the battery bank to the electrical panel, using a dedicated circuit breaker or fuse.
- Use the Correct Wire Size and Type: Use the correct wire size and type for the electrical panel, considering factors such as voltage, current, and temperature.
- Ensure Proper Grounding: Ensure that the electrical panel is properly grounded, using a grounding rod or busbar.
Testing and Commissioning the Solar Panel System
Once the wiring process is complete, it’s essential to test and commission the solar panel system to ensure safe and efficient operation. Follow these steps to test and commission the system:
- Perform a Visual Inspection: Perform a visual inspection of the system, checking for any signs of damage or wear.
- Test the System: Test the system, using a multimeter or other testing equipment, to ensure that it is operating correctly.
- Verify the System’s Performance: Verify the system’s performance, using a monitoring system or other tools, to ensure that it is generating the expected amount of energy.
- Commission the System: Commission the system, by connecting it to the grid and turning it on, to start generating clean and renewable energy.
Conclusion
Wiring a solar panel system for your house requires careful planning and attention to detail, but with the right guidance, it can be a rewarding and cost-effective way to reduce your carbon footprint and energy bills. By following the steps outlined in this article, you can ensure a safe and efficient installation, and start generating clean and renewable energy for your home. Remember to always follow local building codes and regulations, and consult with a professional if you’re unsure about any aspect of the installation process.
Additional Resources
For further information and guidance, we recommend the following resources:
- National Electrical Code (NEC): The NEC provides guidelines and standards for electrical installations, including solar panel systems.
- Underwriters Laboratories (UL): UL provides certification and testing services for electrical equipment, including solar panel systems.
- International Association of Electrical Inspectors (IAEI): IAEI provides training and resources for electrical inspectors, including guidance on solar panel system installations.
- Local Building Codes and Regulations: Check with your local authorities to ensure compliance with all relevant building codes and regulations.
By following the guidelines and best practices outlined in this article, you can ensure a safe and efficient installation of your solar panel system, and start generating clean and renewable energy for your home.


