“Step-by-step solar panel to electrical panel wiring”
One of the most critical aspects of a solar panel installation is the wiring between the solar panel array and the electrical panel. Proper wiring is essential to ensure safe and efficient energy transfer. In this article, we will provide a step-by-step guide on how to wire a solar panel system to an electrical panel.
Introduction to Solar Panel Wiring
Before we dive into the wiring process, it’s essential to understand the basics of solar panel systems. A typical solar panel system consists of:
- Solar Panels: Photovoltaic (PV) panels that convert sunlight into DC electricity.
- Charge Controller: Regulates the flow of energy from the solar panels to the battery bank.
- Battery Bank: Stores excess energy generated by the solar panels for later use.
- Inverter: Converts DC electricity from the solar panels or battery bank to AC electricity for use in the home or business.
- Electrical Panel: The main distribution point for electrical power in the building.
Wiring Components and Tools
To complete the wiring process, you’ll need the following components and tools:
- Solar Panel Connectors: MC4 or similar connectors for connecting solar panels to the charge controller.
- Charge Controller Connectors: Compatible connectors for connecting the charge controller to the battery bank and inverter.
- Battery Bank Connectors: Terminal lugs or connectors for connecting the battery bank to the inverter.
- Inverter Connectors: Compatible connectors for connecting the inverter to the electrical panel.
- Wiring: 10 AWG or 12 AWG copper wire for connecting the solar panels, charge controller, battery bank, and inverter.
- Circuit Breakers: 15-20 amp circuit breakers for protecting the wiring and electrical panel.
- Wire Strippers: For stripping insulation from the wiring.
- Wire Nuts: For securing wiring connections.
- Electrical Tape: For insulating wiring connections.

Step-by-Step Wiring Instructions
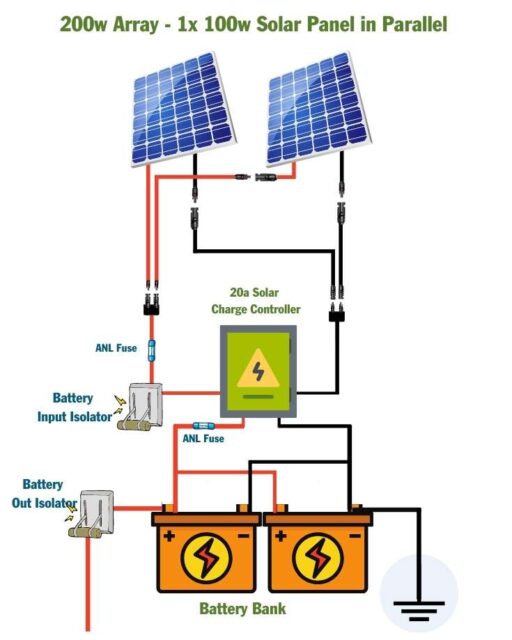
Step 1: Connect Solar Panels to Charge Controller
- Connect the positive (red) wire from the solar panel to the positive terminal on the charge controller.
- Connect the negative (black) wire from the solar panel to the negative terminal on the charge controller.
- Secure the connections using wire nuts or solder.
Step 2: Connect Charge Controller to Battery Bank
- Connect the positive (red) wire from the charge controller to the positive terminal on the battery bank.
- Connect the negative (black) wire from the charge controller to the negative terminal on the battery bank.
- Secure the connections using wire nuts or solder.
Step 3: Connect Battery Bank to Inverter
- Connect the positive (red) wire from the battery bank to the positive terminal on the inverter.
- Connect the negative (black) wire from the battery bank to the negative terminal on the inverter.
- Secure the connections using wire nuts or solder.
Step 4: Connect Inverter to Electrical Panel
- Connect the output wires from the inverter to the electrical panel.
- Connect the neutral (white) wire from the inverter to the neutral bus bar in the electrical panel.
- Connect the ground (green) wire from the inverter to the ground bus bar in the electrical panel.
- Secure the connections using wire nuts or solder.
Step 5: Install Circuit Breakers
- Install 15-20 amp circuit breakers in the electrical panel to protect the wiring and electrical panel.
- Connect the output wires from the inverter to the circuit breakers.
Step 6: Test the System
- Turn off the main circuit breaker in the electrical panel.
- Connect a multimeter to the output wires from the inverter.
- Turn on the solar panel system and check the voltage and current output.
- Verify that the system is functioning correctly and producing the expected amount of power.
Safety Precautions and Considerations
- Always turn off the main circuit breaker in the electrical panel before starting work on the solar panel system.
- Use proper personal protective equipment (PPE) such as gloves, safety glasses, and a hard hat when working with electrical systems.
- Ensure that all wiring connections are secure and meet local electrical codes and regulations.
- Consider hiring a licensed electrician if you’re not experienced with electrical wiring.
Conclusion
Wiring a solar panel system to an electrical panel requires careful planning and attention to detail. By following these step-by-step instructions and taking necessary safety precautions, you can ensure a safe and efficient energy transfer from your solar panel system to your electrical panel. Remember to always follow local electrical codes and regulations, and consider hiring a licensed electrician if you’re not experienced with electrical wiring. With proper installation and maintenance, your solar panel system can provide years of clean and reliable energy for your home or business.
Additional Resources
For more information on solar panel systems and electrical wiring, refer to the following resources:
- National Electric Code (NEC): A comprehensive guide to electrical wiring and safety standards.
- International Association of Electrical Inspectors (IAEI): A non-profit organization providing education and training for electrical inspectors and professionals.
- Solar Energy Industries Association (SEIA): A trade association providing information and resources on solar energy and solar panel systems.
By following these guidelines and resources, you can ensure a successful and safe solar panel installation that provides years of clean and reliable energy for your home or business.


