“Solar panel and battery connection guide”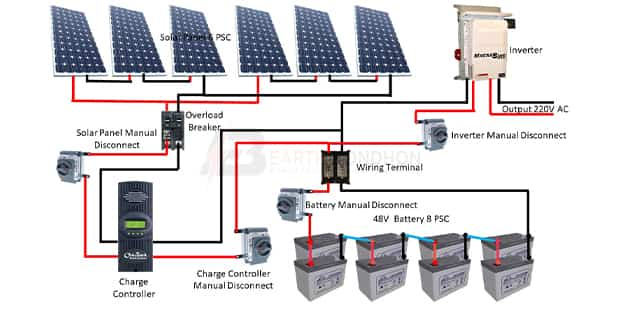
One of the most critical components of a solar power system is the connection between the solar panels and the battery bank. A proper connection ensures that the energy generated by the solar panels is stored safely and efficiently in the batteries, providing a reliable source of power when needed.
In this article, we will provide a comprehensive guide on how to connect solar panels and batteries, including the necessary equipment, safety precautions, and step-by-step instructions.
Understanding the Basics
Before we dive into the connection guide, it’s essential to understand the basics of solar panels and batteries.
- Solar Panels: Solar panels convert sunlight into electrical energy through a process known as photovoltaics (PV). The energy generated by the solar panels is in the form of direct current (DC) electricity.
- Batteries: Batteries store electrical energy in the form of chemical energy. In a solar power system, batteries are used to store excess energy generated by the solar panels during the day for use during the night or on cloudy days.
- Charge Controller: A charge controller is an essential component that regulates the flow of energy between the solar panels and the batteries. It prevents overcharging and over-discharging of the batteries, ensuring a safe and efficient charging process.
Equipment Needed
To connect solar panels and batteries, you’ll need the following equipment:
- Solar Panels: Choose the right type and size of solar panels for your system, considering factors such as wattage, voltage, and efficiency.
- Batteries: Select deep cycle batteries designed for solar power systems, with the right capacity and voltage rating for your needs.
- Charge Controller: Choose a charge controller that matches the voltage and current rating of your solar panels and batteries.
- Battery Management System (BMS): Optional, but recommended for larger systems, to monitor and control the battery bank.
- Cables and Connectors: Use high-quality, UV-resistant cables and connectors to connect the solar panels, charge controller, and batteries.
- Fuses and Breakers: Install fuses and breakers to protect the system from overcurrent and short circuits.

Safety Precautions
When working with electrical systems, safety is paramount. Follow these precautions to avoid accidents and injuries:
- Disconnect the grid: Ensure that the solar power system is disconnected from the grid before starting any work.
- Wear protective gear: Wear safety glasses, gloves, and a hard hat when working with electrical components.
- Use proper tools: Use insulated tools and test equipment to prevent electrical shock.
- Follow manufacturer instructions: Read and follow the manufacturer’s instructions for each component.
Step-by-Step Connection Guide
Now that we’ve covered the basics and safety precautions, let’s proceed with the step-by-step connection guide:
Step 1: Connect the Solar Panels
- Mount the solar panels: Mount the solar panels in a suitable location, considering factors such as sunlight exposure, wind direction, and accessibility.
- Connect the solar panels in series: Connect multiple solar panels in series to achieve the desired voltage rating. Use MC4 connectors or similar connectors to connect the panels.
- Connect the solar panels in parallel: If you’re using multiple solar panels with the same voltage rating, connect them in parallel to increase the total current output.
Step 2: Connect the Charge Controller
- Mount the charge controller: Mount the charge controller in a shaded area, protected from the elements.
- Connect the solar panels to the charge controller: Connect the positive and negative terminals of the solar panels to the charge controller’s input terminals.
- Configure the charge controller: Configure the charge controller according to the manufacturer’s instructions, setting parameters such as voltage, current, and charging mode.
Step 3: Connect the Batteries
- Mount the batteries: Mount the batteries in a well-ventilated area, protected from the elements.
- Connect the batteries in series: Connect multiple batteries in series to achieve the desired voltage rating. Use cables with the correct gauge and length to connect the batteries.
- Connect the batteries in parallel: If you’re using multiple batteries with the same voltage rating, connect them in parallel to increase the total capacity.
Step 4: Connect the Charge Controller to the Batteries
- Connect the charge controller to the batteries: Connect the positive and negative terminals of the charge controller to the batteries’ terminals.
- Configure the battery settings: Configure the charge controller’s battery settings, such as voltage, current, and charging mode.
Step 5: Connect the Load
- Connect the load: Connect the load, such as an inverter or a DC-DC converter, to the batteries’ terminals.
- Configure the load settings: Configure the load settings, such as voltage, current, and operating mode.
Monitoring and Maintenance
To ensure the longevity and efficiency of your solar power system, regular monitoring and maintenance are crucial:
- Monitor the system’s performance: Use a monitoring system to track the system’s performance, including energy production, battery state of charge, and system voltage.
- Perform routine maintenance: Perform routine maintenance tasks, such as cleaning the solar panels, checking the battery connections, and updating the charge controller’s firmware.
Conclusion
Connecting solar panels and batteries requires careful planning, attention to detail, and adherence to safety precautions. By following this comprehensive guide, you’ll be able to create a safe and efficient solar power system that meets your energy needs. Remember to regularly monitor and maintain your system to ensure optimal performance and longevity.
Additional Tips and Recommendations
- Hire a professional: If you’re not experienced with electrical systems, consider hiring a professional to connect your solar panels and batteries.
- Use high-quality components: Use high-quality components, such as solar panels, batteries, and charge controllers, to ensure optimal performance and reliability.
- Follow local regulations: Follow local regulations and codes when installing a solar power system.
- Consider energy storage: Consider adding energy storage systems, such as batteries, to your solar power system to provide backup power during outages and to optimize energy efficiency.
By following these tips and recommendations, you’ll be able to create a reliable and efficient solar power system that provides clean energy for years to come.


