“How to wire solar panels for off-grid home use”
Harnessing the energy from the sun to power your home can be a cost-effective and environmentally friendly way to reduce your reliance on traditional grid power. However, wiring solar panels for off-grid home use requires careful planning and execution to ensure a safe and efficient system. In this article, we will provide a step-by-step guide on how to wire solar panels for off-grid home use.
Understanding the Basics of Solar Panel Systems
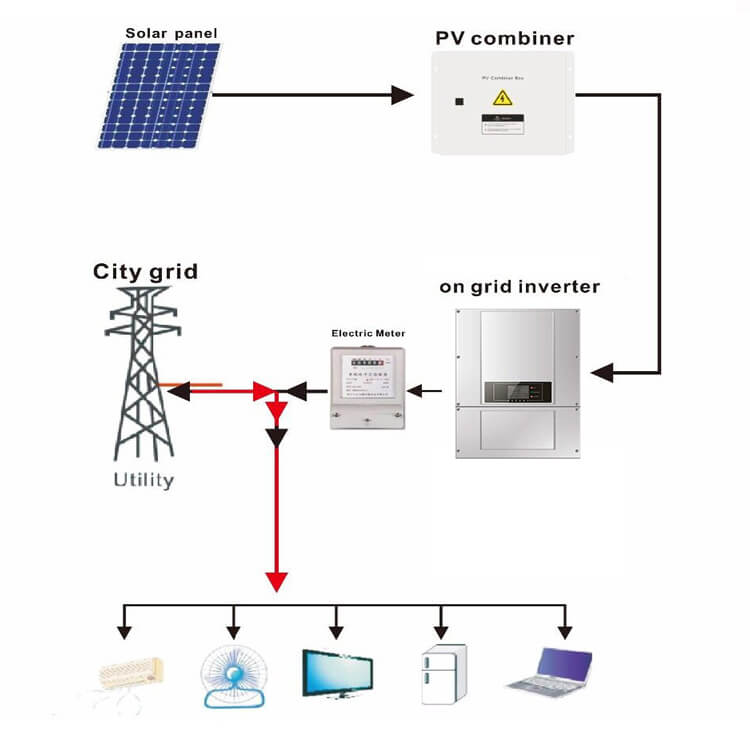
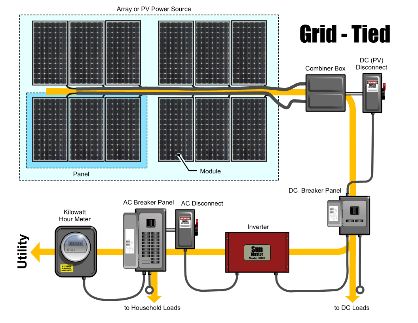
Before we dive into the wiring process, it’s essential to understand the basic components of a solar panel system. A typical solar panel system consists of:
- Solar Panels: These are the photovoltaic (PV) panels that convert sunlight into electrical energy.
- Charge Controller: This device regulates the energy generated by the solar panels and controls the charging of the battery bank.
- Battery Bank: This is a collection of deep cycle batteries that stores excess energy generated by the solar panels for later use.
- Inverter: This device converts the DC power from the battery bank into AC power, which is usable in your home.
- Mounting Hardware: This includes the racks, clamps, and other hardware used to secure the solar panels to your roof or a ground-mounted array.
Planning Your Solar Panel System
Before you start wiring your solar panels, it’s crucial to plan your system carefully. Consider the following factors:
- Energy Requirements: Calculate your daily energy needs by adding up the wattage of all the appliances and devices you plan to power.
- Solar Panel Size and Quantity: Determine the number and size of solar panels needed to meet your energy requirements.
- Battery Bank Size: Calculate the size of the battery bank required to store excess energy for later use.
- Inverter Size: Choose an inverter that can handle the total wattage of your appliances and devices.
- System Voltage: Decide on the system voltage, which is typically 12, 24, or 48 volts.

Wiring Solar Panels
Wiring solar panels involves connecting the panels to the charge controller, battery bank, and inverter. Here’s a step-by-step guide:
- Connect Solar Panels in Series: Connect the positive terminal of one solar panel to the negative terminal of the next panel. This creates a series circuit, which increases the voltage of the system.
- Connect Solar Panels in Parallel: Connect the positive terminals of multiple solar panels together, and the negative terminals together. This creates a parallel circuit, which increases the current of the system.
- Connect Solar Panels to the Charge Controller: Connect the positive and negative terminals of the solar panel array to the charge controller. Make sure to follow the manufacturer’s instructions for the correct connection.
- Connect the Charge Controller to the Battery Bank: Connect the output terminals of the charge controller to the battery bank. Ensure that the polarity is correct, and the voltage is matched.
- Connect the Battery Bank to the Inverter: Connect the positive and negative terminals of the battery bank to the inverter. Follow the manufacturer’s instructions for the correct connection.
Wiring Considerations
When wiring your solar panel system, keep the following considerations in mind:
- Use the Correct Wire Size: Use wire that is rated for the maximum current and voltage of your system. Undersized wire can cause overheating, fires, and system failure.
- Use Insulated Wire: Use insulated wire to prevent electrical shock and short circuits.
- Keep Wire Runs Short: Keep wire runs as short as possible to minimize voltage drop and energy loss.
- Use Fuses and Circuit Breakers: Install fuses and circuit breakers to protect your system from overcurrent and short circuits.
- Grounding: Ensure that your system is properly grounded to prevent electrical shock and equipment damage.
Safety Precautions
When working with electrical systems, safety is paramount. Always follow these precautions:
- Disconnect the Power Source: Disconnect the power source before starting work on the system.
- Use Personal Protective Equipment: Wear protective gear, such as gloves and safety glasses, when working with electrical systems.
- Avoid Overreaching: Avoid overreaching or stretching when working with electrical systems, as this can cause accidents.
- Follow Manufacturer Instructions: Follow the manufacturer’s instructions for the correct installation and wiring of your solar panel system.
Testing and Commissioning
After completing the wiring, test and commission your solar panel system to ensure it’s functioning correctly. Follow these steps:
- Check the Voltage and Current: Check the voltage and current output of the solar panel array, charge controller, and inverter.
- Check the Battery Bank: Check the state of charge and voltage of the battery bank.
- Check the Inverter Output: Check the AC output of the inverter to ensure it’s within the specified range.
- Load Test: Perform a load test to ensure the system can handle the maximum load.
Conclusion
Wiring solar panels for off-grid home use requires careful planning, execution, and attention to safety. By following the steps outlined in this article, you can create a reliable and efficient solar panel system that meets your energy needs. Remember to always follow the manufacturer’s instructions, use the correct wire size and insulation, and take necessary safety precautions to prevent electrical shock and system damage. With a well-designed and installed solar panel system, you can enjoy the benefits of renewable energy and reduce your reliance on traditional grid power.