“House solar panel to service panel connection diagram”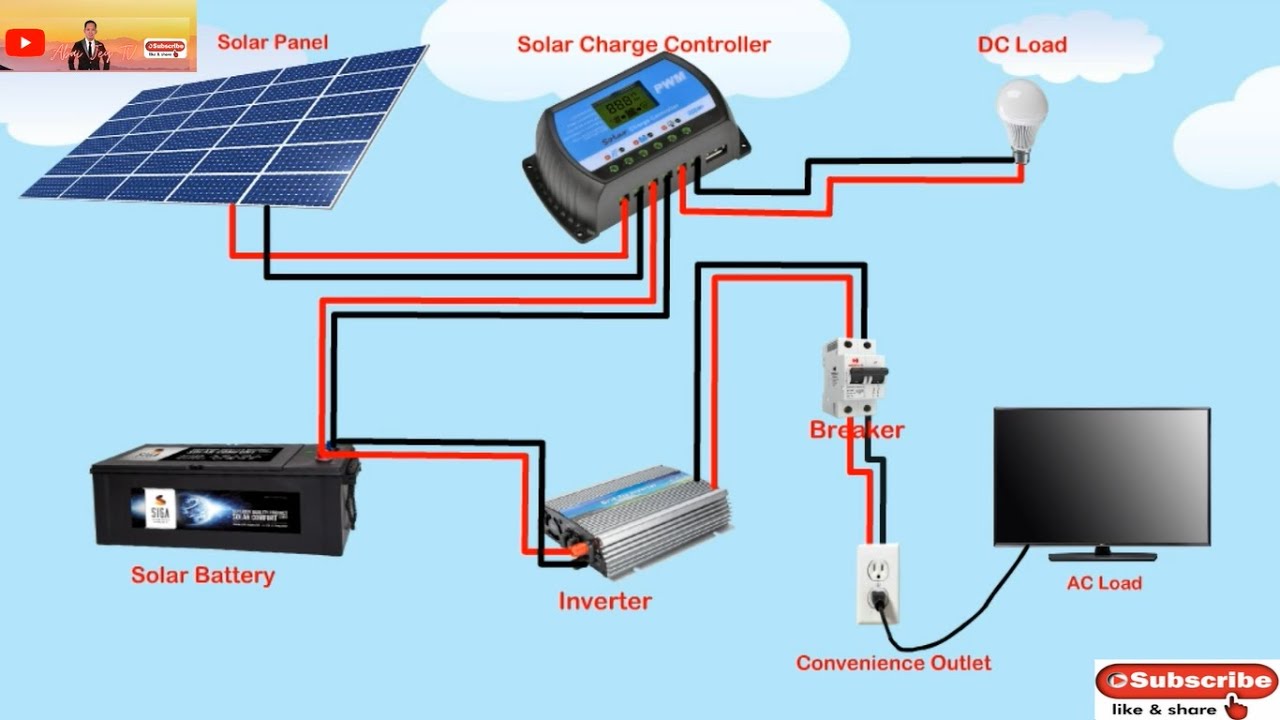
However, installing a solar panel system can be a complex process, especially when it comes to connecting it to the service panel of your house. In this article, we will provide a comprehensive guide on how to connect your house solar panel to the service panel, including a detailed connection diagram.
Understanding the Components
Before we dive into the connection diagram, it’s essential to understand the components involved in a solar panel system and their roles. The key components include:
- Solar Panels: These are the photovoltaic (PV) panels that convert sunlight into electrical energy.
- Charge Controller: This device regulates the flow of energy from the solar panels to the battery bank, preventing overcharging and ensuring the batteries are charged safely.
- Inverter: The inverter converts the DC power generated by the solar panels into AC power, which is usable in your home.
- Battery Bank: This is a collection of deep cycle batteries that store excess energy generated by the solar panels for later use.
- Service Panel: This is the main electrical panel in your house that distributes power to all the circuits.
- Grounding System: This is a critical safety component that provides a path to ground for fault currents and helps protect against electrical shocks.
House Solar Panel to Service Panel Connection Diagram
The following is a simplified connection diagram for a house solar panel system connected to the service panel:
+---------------+ | Solar Panels | +---------------+ | | v +---------------+ | Charge Controller |
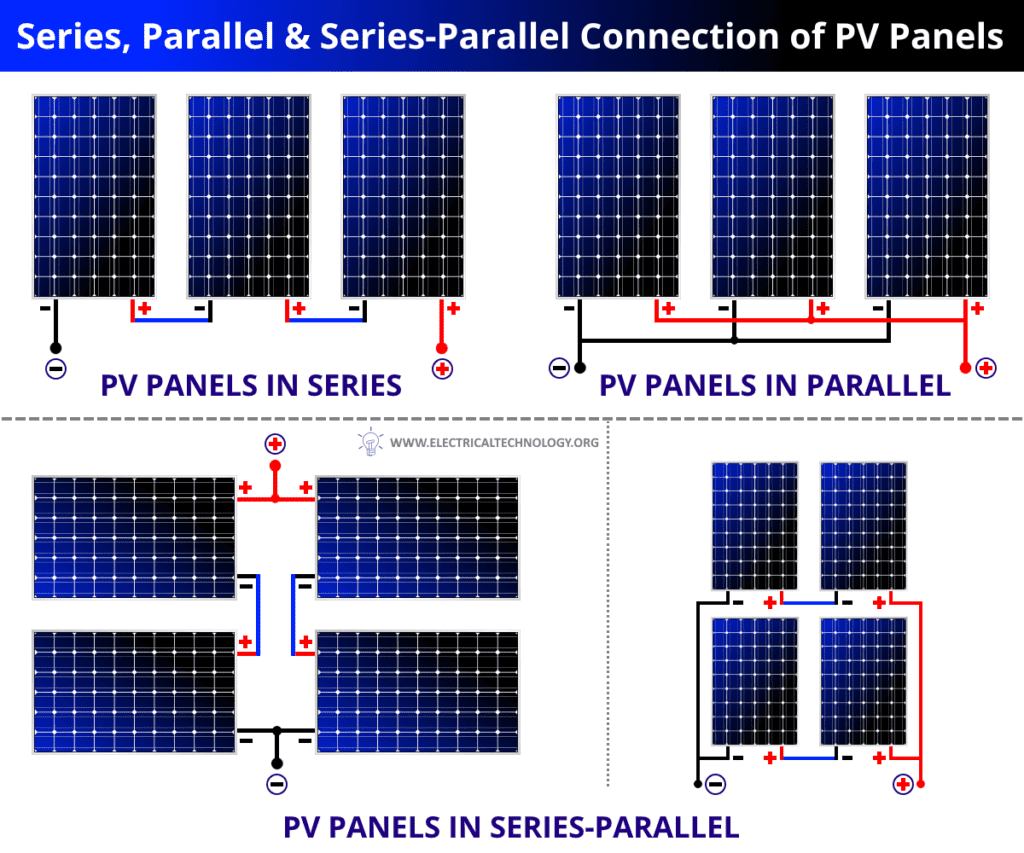 +---------------+ | | v +---------------+ | Battery Bank | +---------------+ | | v +---------------+ | Inverter | +---------------+ | | v +---------------+ | AC Disconnect | +---------------+ | | v +---------------+ | Service Panel | +---------------+ | | v +---------------+ | Grounding System | +---------------+
Step-by-Step Connection Process
Now that we have a basic understanding of the components and the connection diagram, let’s walk through the step-by-step process of connecting your house solar panel system to the service panel:
- Mount and Connect the Solar Panels: Mount the solar panels on your roof or in a designated area, ensuring they are securely fastened and angled for optimal energy production. Connect the solar panels in series or parallel, depending on your system’s configuration.
- Install the Charge Controller: Install the charge controller near the battery bank, following the manufacturer’s instructions. Connect the solar panels to the charge controller, ensuring the polarity is correct.
- Connect the Battery Bank: Connect the battery bank to the charge controller, following the manufacturer’s instructions. Ensure the batteries are properly sized and configured for your system.
- Install the Inverter: Install the inverter near the service panel, following the manufacturer’s instructions. Connect the battery bank to the inverter, ensuring the polarity is correct.
- Connect the AC Disconnect: Connect the AC disconnect to the inverter and the service panel. The AC disconnect is a critical safety component that allows you to disconnect the solar panel system from the grid in case of an emergency.
- Connect to the Service Panel: Connect the AC output from the inverter to the service panel, ensuring the polarity is correct. You may need to install a dedicated circuit breaker or fuse for the solar panel system.
- Grounding System: Connect the grounding system to the service panel, ensuring all components are properly grounded. This includes the solar panels, charge controller, battery bank, inverter, and AC disconnect.
Safety Considerations
When connecting your house solar panel system to the service panel, it’s essential to follow all safety guidelines to avoid electrical shocks, fires, or other hazards. Some key safety considerations include:
- Hiring a Licensed Electrician: If you’re not experienced in electrical installations, it’s highly recommended to hire a licensed electrician to ensure the connection is done safely and correctly.
- Following Manufacturer’s Instructions: Follow the manufacturer’s instructions for all components, including the solar panels, charge controller, battery bank, inverter, and AC disconnect.
- Using Proper Wiring and Connectors: Use proper wiring and connectors to ensure safe and reliable connections between components.
- Testing the System: Test the system thoroughly before connecting it to the service panel to ensure it’s functioning correctly and safely.
Conclusion
Connecting your house solar panel system to the service panel requires careful planning, attention to detail, and a thorough understanding of the components and safety considerations involved. By following the steps outlined in this article and consulting with a licensed electrician if necessary, you can ensure a safe and reliable connection that will provide you with clean, renewable energy for years to come. Remember to always follow the manufacturer’s instructions and take necessary safety precautions to avoid electrical shocks, fires, or other hazards. With a properly installed and connected solar panel system, you can enjoy the benefits of renewable energy while reducing your carbon footprint and lowering your energy bills.


