“How to connect solar panels to a home inverter?”
One of the key components of a solar power system is the inverter, which converts the DC power generated by the solar panels into AC power that can be used in the home. In this article, we will provide a step-by-step guide on how to connect solar panels to a home inverter, as well as discuss the importance of proper installation and safety precautions.
Understanding the Basics
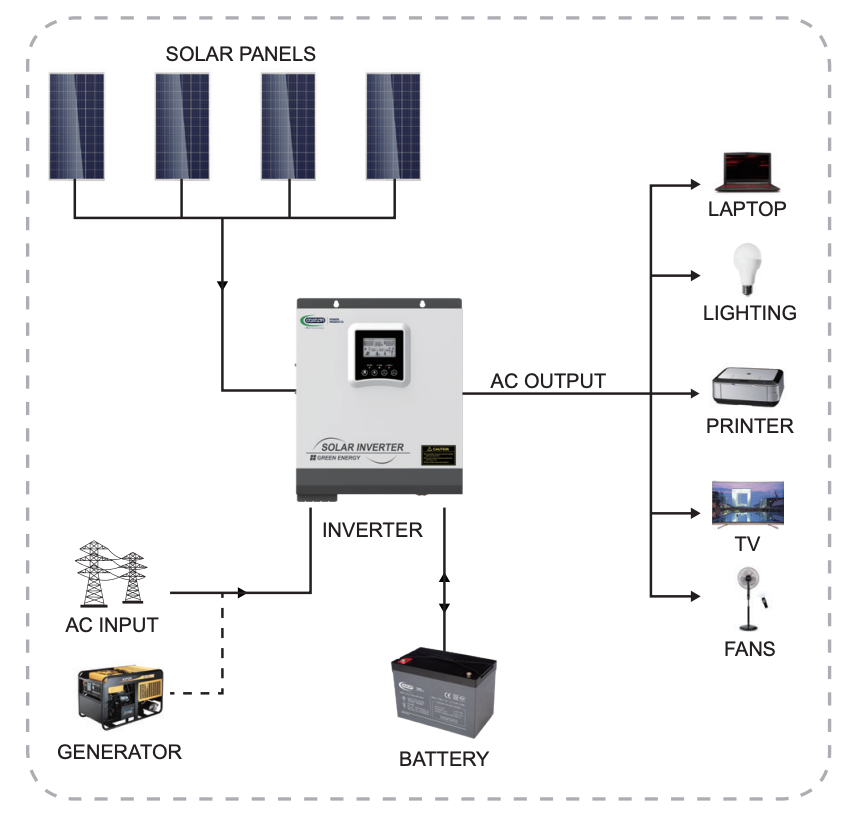
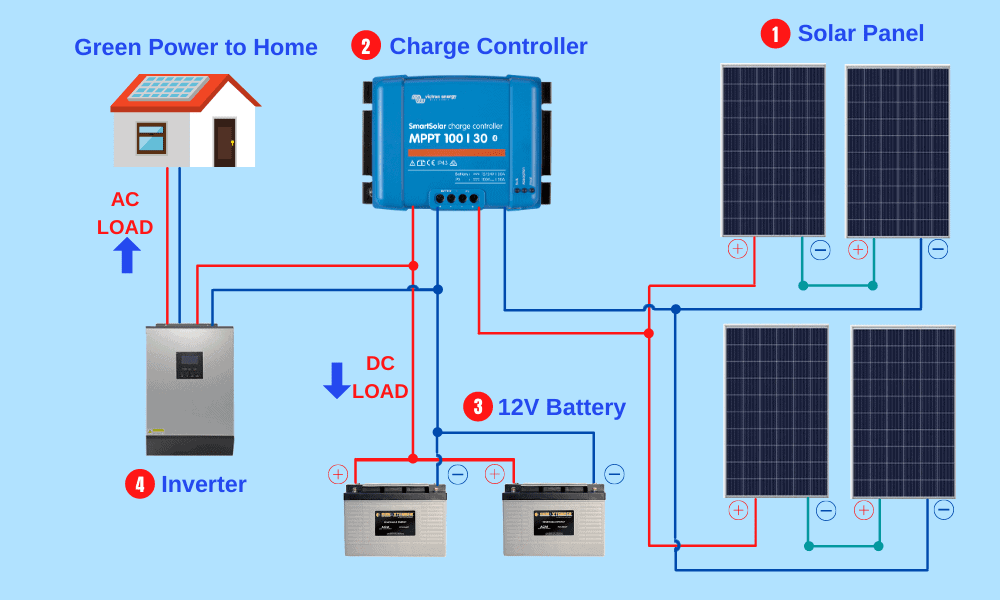
Before we dive into the installation process, it’s essential to understand the basic components of a solar power system and how they work together. A typical solar power system consists of:
- Solar Panels: These are the photovoltaic (PV) panels that convert sunlight into DC power.
- Inverter: This device converts the DC power generated by the solar panels into AC power that can be used in the home.
- Mounting System: This includes the frames, brackets, and clamps that secure the solar panels to the roof or ground.
- Wiring and Connectors: These connect the solar panels to the inverter and the inverter to the home’s electrical panel.
Pre-Installation Checklist
Before connecting the solar panels to the home inverter, it’s crucial to ensure that the system is properly designed and installed. Here are some key considerations:
- System Size: Determine the size of the solar power system needed to meet your energy requirements. This will depend on factors such as your energy usage, roof size, and local solar radiation levels.
- Panel Selection: Choose solar panels that are compatible with your inverter and meet your energy needs.
- Inverter Selection: Select an inverter that is compatible with your solar panels and meets your energy needs.
- Mounting System: Ensure that the mounting system is sturdy and can support the weight of the solar panels.
- Electrical Panel: Ensure that your home’s electrical panel can handle the additional power generated by the solar power system.
Connecting Solar Panels to the Inverter
Now that we have covered the basics and pre-installation checklist, let’s move on to the step-by-step process of connecting solar panels to a home inverter:
Step 1: Prepare the Solar Panels

- Unpack and inspect the solar panels: Carefully unpack the solar panels and inspect them for any damage or defects.
- Clean the solar panels: Clean the solar panels to ensure maximum energy production.
- Connect the solar panel cables: Connect the solar panel cables to the positive and negative terminals of the solar panels.
Step 2: Connect the Solar Panels to the Inverter
- Locate the inverter input terminals: Identify the input terminals on the inverter where the solar panel cables will be connected.
- Connect the solar panel cables to the inverter: Connect the solar panel cables to the inverter input terminals, ensuring that the positive and negative cables are connected correctly.
- Tighten the connections: Tighten the connections to ensure that they are secure and will not come loose over time.
Step 3: Configure the Inverter
- Read the inverter manual: Read the inverter manual to understand the configuration process.
- Set the inverter parameters: Set the inverter parameters, such as the maximum power point tracking (MPPT) settings and the grid connection settings.
- Save the configuration: Save the configuration settings to ensure that the inverter operates correctly.
Step 4: Connect the Inverter to the Home Electrical Panel
- Locate the electrical panel: Identify the home electrical panel where the inverter will be connected.
- Connect the inverter output cables: Connect the inverter output cables to the electrical panel, ensuring that the cables are connected to the correct terminals.
- Tighten the connections: Tighten the connections to ensure that they are secure and will not come loose over time.
Step 5: Test the System
- Turn on the inverter: Turn on the inverter and ensure that it is operating correctly.
- Monitor the system performance: Monitor the system performance, including the energy production and any error messages.
- Perform safety checks: Perform safety checks to ensure that the system is operating safely and efficiently.
Safety Precautions
When connecting solar panels to a home inverter, it’s essential to take safety precautions to avoid electrical shock or injury. Here are some key safety considerations:
- Turn off the power: Turn off the power to the inverter and electrical panel before starting the installation process.
- Use personal protective equipment: Use personal protective equipment, such as gloves and safety glasses, when handling electrical components.
- Ensure proper grounding: Ensure that the system is properly grounded to prevent electrical shock.
- Follow manufacturer instructions: Follow the manufacturer instructions for the inverter and solar panels to ensure that the system is installed correctly.
Conclusion
Connecting solar panels to a home inverter is a complex process that requires careful planning and attention to detail. By following the steps outlined in this article and taking safety precautions, you can ensure that your solar power system is installed correctly and operates efficiently. Remember to always follow the manufacturer instructions and consult with a professional if you are unsure about any aspect of the installation process. With proper installation and maintenance, your solar power system can provide clean and renewable energy for your home for many years to come.
Additional Tips and Considerations
- Regular maintenance: Regularly inspect and maintain the solar power system to ensure that it continues to operate efficiently.
- Monitor energy production: Monitor energy production to ensure that the system is operating correctly and identify any issues.
- Consider energy storage: Consider adding energy storage, such as batteries, to store excess energy generated by the solar power system.
- Check local building codes: Check local building codes and regulations to ensure that the solar power system meets all requirements.
By following these tips and considerations, you can ensure that your solar power system is installed correctly and operates efficiently, providing you with clean and renewable energy for years to come.