“Home solar panel wiring instructions”
However, installing solar panels requires careful planning and execution, particularly when it comes to wiring. In this article, we will provide a step-by-step guide on home solar panel wiring instructions to ensure a safe and efficient installation.
Introduction to Solar Panel Wiring
Before we dive into the wiring instructions, it’s essential to understand the basics of solar panel wiring. Solar panels produce direct current (DC) electricity, which needs to be converted to alternating current (AC) electricity to power homes. This is done using an inverter, which is typically installed near the main electrical panel. The wiring system connects the solar panels to the inverter, and then to the main electrical panel, allowing the solar-powered electricity to be used in the home.
Materials Needed
To complete the wiring installation, you will need the following materials:
- Solar panels
- Inverter
- Mounting hardware (e.g., clamps, screws)
- Wiring harness (including MC4 connectors, SolarLoxx, or similar)
- AC/DC disconnects
- Grounding equipment (e.g., grounding rods, clamps)
- Electrical conduit (e.g., PVC, metal)
- Wire nuts and connectors
- Multimeter
- Safety gear (e.g., hard hat, gloves, safety glasses)

Pre-Installation Checklist
Before starting the installation, ensure that:
- You have obtained all necessary permits and approvals from local authorities.
- You have chosen a suitable location for the solar panels, taking into account shading, orientation, and structural integrity.
- You have selected a compatible inverter and wiring system for your solar panel array.
- You have read and understood the manufacturer’s instructions for the solar panels, inverter, and wiring system.

Step 1: Installing the Solar Panels
- Mount the solar panels to the roof or a ground-mounted racking system, following the manufacturer’s instructions.
- Ensure the panels are securely fastened and aligned to the desired angle and orientation.
- Connect the solar panels in series or parallel, depending on the system design, using the wiring harness and connectors provided.
Step 2: Installing the Inverter
- Locate the inverter near the main electrical panel, ensuring easy access and adequate ventilation.
- Mount the inverter to a wall or a racking system, following the manufacturer’s instructions.
- Connect the DC output from the solar panels to the inverter’s DC input, using the wiring harness and connectors provided.
Step 3: Installing the AC/DC Disconnects
- Install AC/DC disconnects between the inverter and the main electrical panel, as required by local electrical codes.
- Connect the inverter’s AC output to the AC/DC disconnects, ensuring proper polarity and torque.
Step 4: Grounding the System
- Drive a grounding rod into the earth, at least 8 feet deep, to provide a safe path to ground for the solar panel system.
- Connect the grounding rod to the solar panel frame, inverter, and main electrical panel, using grounding clamps and wire.
- Ensure all equipment is properly bonded and grounded to prevent electrical shock.
Step 5: Installing the Wiring Harness
- Run the wiring harness from the solar panels to the inverter, using electrical conduit to protect the wires from damage.
- Connect the wiring harness to the inverter’s DC input, ensuring proper polarity and torque.
- Secure the wiring harness to the roof or racking system, using cable ties or clips.
Step 6: Connecting to the Main Electrical Panel
- Run the AC output from the inverter to the main electrical panel, using electrical conduit to protect the wires from damage.
- Connect the AC output to a dedicated circuit breaker or fuse, ensuring proper polarity and torque.
- Ensure the circuit breaker or fuse is rated for the inverter’s output and meets local electrical codes.
Step 7: Testing the System
- Use a multimeter to verify the voltage and current output from the solar panels and inverter.
- Test the system under various operating conditions, including daylight and nighttime, to ensure proper function.
- Monitor the system’s performance and adjust as necessary to optimize energy production.
Safety Considerations
When working with electrical systems, it’s essential to take necessary safety precautions to prevent injury or damage:
- Always wear safety gear, including a hard hat, gloves, and safety glasses.
- Ensure the system is turned off before performing any maintenance or repairs.
- Use lockout/tagout procedures to prevent accidental startup.
- Follow local electrical codes and regulations.
- Consult the manufacturer’s instructions and recommendations for specific safety guidelines.
Conclusion
Home solar panel wiring instructions require careful attention to detail and a thorough understanding of electrical systems. By following the steps outlined in this article, you can ensure a safe and efficient installation that meets local electrical codes and regulations. Remember to always consult the manufacturer’s instructions and recommendations for specific safety guidelines and system requirements. With proper installation and maintenance, your home solar panel system can provide clean, renewable energy for years to come.
Additional Tips and Recommendations
- Consider hiring a professional solar installer if you’re not experienced with electrical systems.
- Use high-quality materials and equipment to ensure system reliability and efficiency.
- Monitor system performance regularly to optimize energy production and identify potential issues.
- Follow local electrical codes and regulations, and obtain necessary permits and approvals before installation.
- Consider installing a monitoring system to track system performance and energy production.
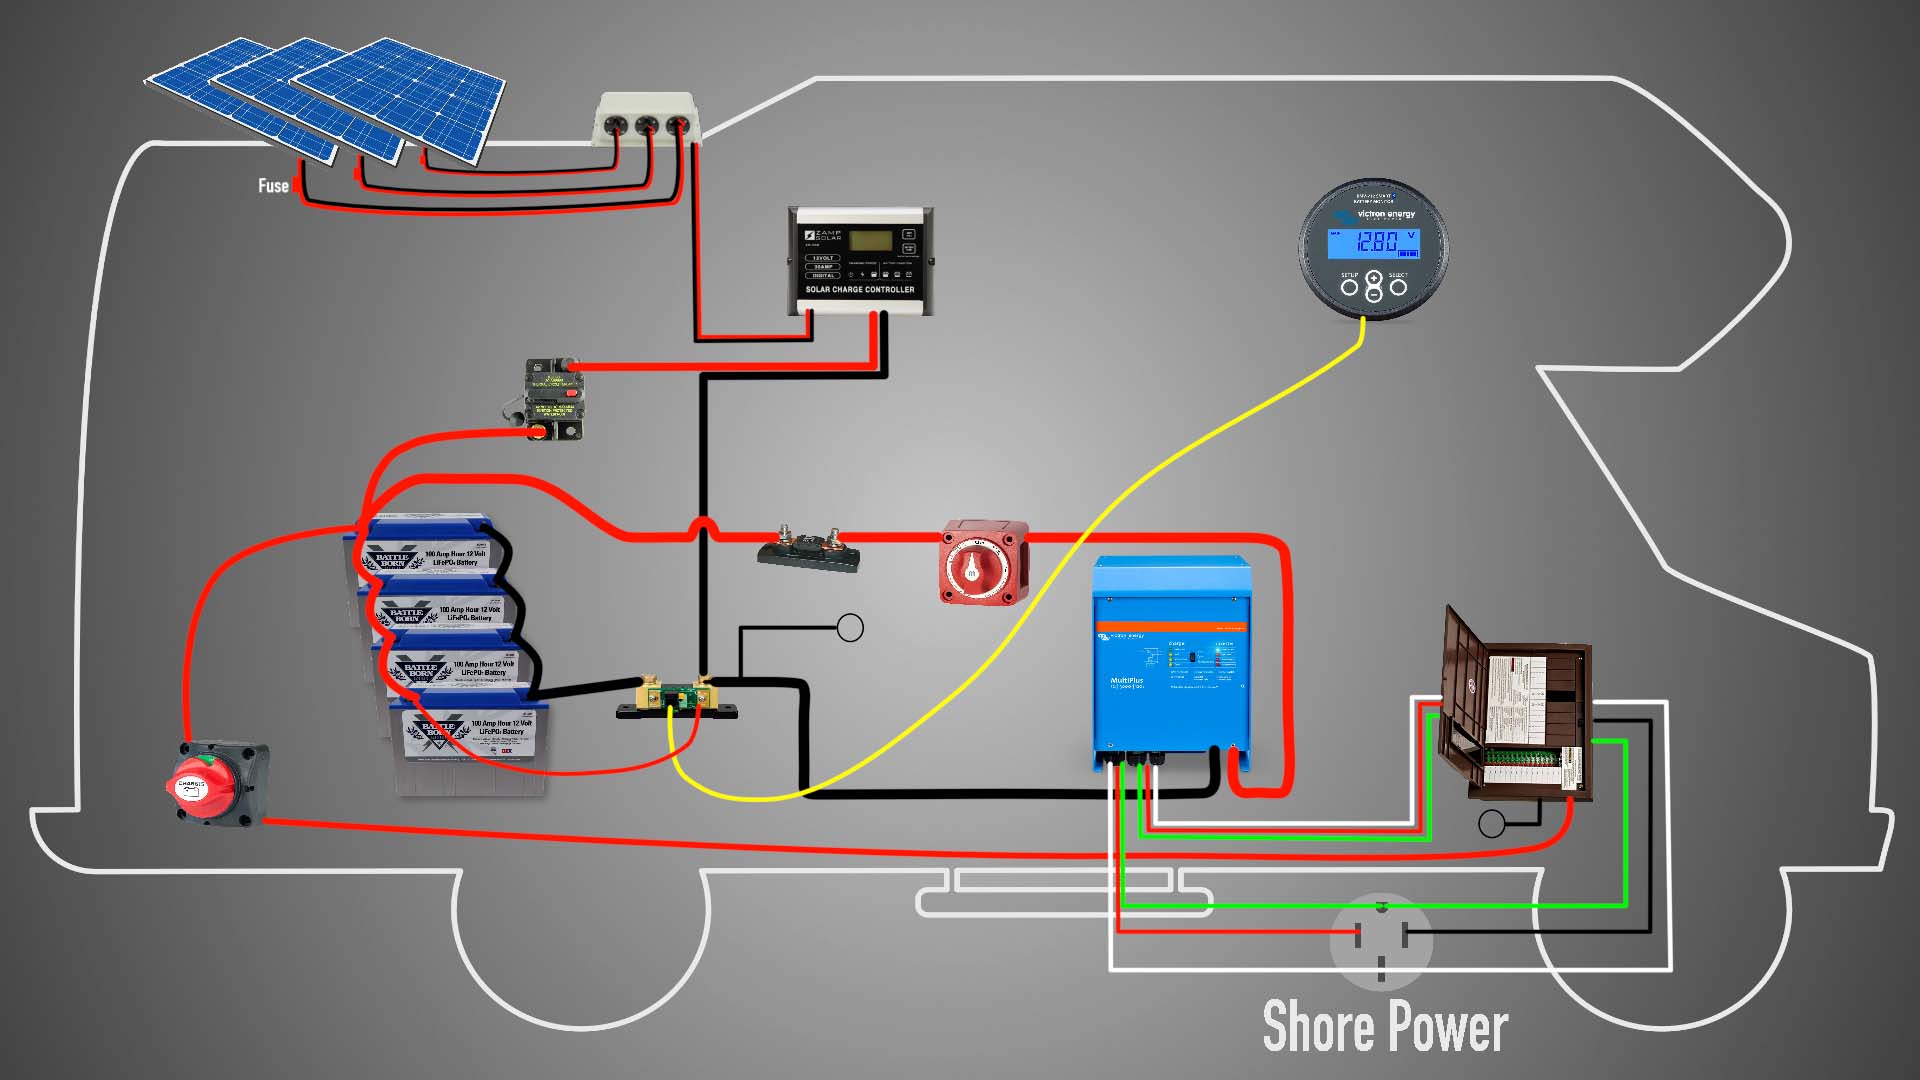
Solar Panel Wiring Diagrams
For reference, here are some common solar panel wiring diagrams:
- Series wiring: Connect the positive terminal of one solar panel to the negative terminal of the next solar panel, and so on.
- Parallel wiring: Connect the positive terminals of multiple solar panels together, and the negative terminals together.
- Combination wiring: Combine series and parallel wiring to create a more complex system.
Troubleshooting Common Issues
Common issues that may arise during or after installation include:
- Inverter malfunction: Check the inverter’s display or logs for error messages, and consult the manufacturer’s troubleshooting guide.
- Solar panel malfunction: Check the solar panels for damage, shading, or misalignment, and consult the manufacturer’s troubleshooting guide.
- Grounding issues: Verify that the grounding system is properly installed and functioning, and consult the manufacturer’s troubleshooting guide.
By following the instructions outlined in this article, you can ensure a successful and efficient home solar panel installation. Remember to always prioritize safety and consult the manufacturer’s instructions and recommendations for specific guidelines and system requirements.