“Solar wiring diagram for RV setup”
Installing a solar panel system on your RV can provide a reliable and sustainable source of energy, reducing your reliance on traditional fuel sources and minimizing your carbon footprint. However, setting up a solar panel system can be a complex process, requiring careful planning and attention to detail. In this article, we will provide a comprehensive guide to creating a solar wiring diagram for your RV setup, helping you to ensure a safe and efficient installation.
Understanding the Basics
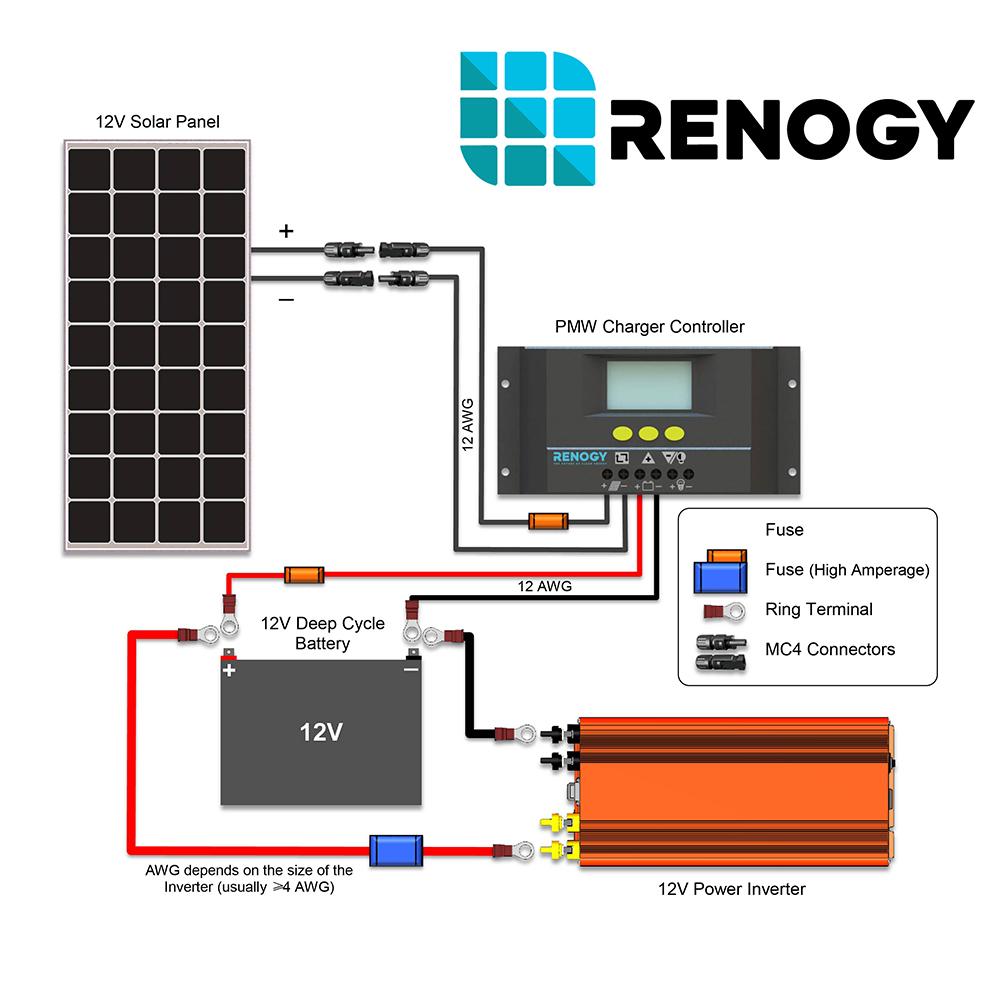
Before we dive into the specifics of creating a solar wiring diagram, it’s essential to understand the basic components of a solar panel system. A typical solar panel system consists of:
- Solar Panels: These are the photovoltaic (PV) panels that convert sunlight into electrical energy.
- Charge Controller: This device regulates the flow of energy from the solar panels to the battery bank, preventing overcharging and ensuring safe charging.
- Battery Bank: This is the storage system for the electrical energy generated by the solar panels. Deep cycle batteries are commonly used in RV solar panel systems.
- Inverter/Charger: This device converts the DC power from the battery bank into AC power, which can be used to power appliances and devices in your RV.
- Wiring and Connectors: These are the components that connect the various parts of the solar panel system together, allowing energy to flow between them.
Creating a Solar Wiring Diagram
A solar wiring diagram is a visual representation of the electrical connections between the various components of your solar panel system. It’s essential to create a detailed and accurate diagram to ensure that your system is installed correctly and functions safely. Here are the steps to follow:
- Determine the System Components: Start by identifying the components you will be using in your solar panel system, including the solar panels, charge controller, battery bank, inverter/charger, and wiring.
- Choose a Scale: Decide on a scale for your diagram, ensuring that it is large enough to be easily readable.
- Draw the Components: Use symbols or diagrams to represent each component, including the solar panels, charge controller, battery bank, inverter/charger, and wiring.
- Connect the Components: Draw lines to connect the components, representing the electrical connections between them. Ensure that the connections are correct and follow the manufacturer’s instructions.
- Label the Components: Label each component, including the solar panels, charge controller, battery bank, inverter/charger, and wiring.
- Include Safety Features: Include safety features such as fuses, circuit breakers, and grounding connections in your diagram.
Example Solar Wiring Diagram

Here is an example of a basic solar wiring diagram for an RV setup:
- Solar Panels (2 x 200W) connected in parallel to a charge controller (30A)
- Charge Controller (30A) connected to a battery bank (2 x 200Ah deep cycle batteries) in series
- Battery Bank (2 x 200Ah deep cycle batteries) connected to an inverter/charger (2000W)
- Inverter/Charger (2000W) connected to the RV’s electrical panel
- Grounding connections to the RV’s chassis and the solar panels
Tips and Considerations
When creating a solar wiring diagram for your RV setup, keep the following tips and considerations in mind:
- Follow the Manufacturer’s Instructions: Always follow the manufacturer’s instructions for each component, including the solar panels, charge controller, battery bank, inverter/charger, and wiring.
- Use the Correct Wire Size: Use the correct wire size for each connection, ensuring that it can handle the maximum current flow.
- Keep the Wiring Organized: Keep the wiring organized and tidy, using cable ties and labels to identify each connection.
- Test the System: Test the system thoroughly before using it, ensuring that it is functioning correctly and safely.
- Consider Upgrades and Expansion: Consider upgrades and expansion possibilities when designing your solar wiring diagram, ensuring that it can accommodate future additions or changes.
Safety Precautions
When working with electrical systems, it’s essential to take safety precautions to avoid injury or damage. Here are some safety precautions to keep in mind:
- Turn Off the Power: Always turn off the power to the system before making any connections or repairs.
- Use Protective Gear: Use protective gear such as gloves, safety glasses, and a face mask when working with electrical systems.
- Avoid Overload: Avoid overloading the system by connecting too many devices or appliances.
- Ground the System: Ground the system to prevent electrical shock and ensure safe operation.
Conclusion
Creating a solar wiring diagram for your RV setup is a critical step in ensuring a safe and efficient installation. By following the steps outlined in this article and considering the tips and considerations, you can create a comprehensive and accurate diagram that will help you to install and maintain your solar panel system. Remember to always follow the manufacturer’s instructions and take safety precautions when working with electrical systems. With a well-designed solar wiring diagram, you can enjoy the benefits of renewable energy and reduce your reliance on traditional fuel sources.
Additional Resources
For further information and resources on creating a solar wiring diagram for your RV setup, consider the following:
- National Electric Code (NEC): The NEC provides guidelines and standards for electrical installations, including solar panel systems.
- Solar Panel Manufacturer’s Instructions: Always follow the manufacturer’s instructions for each component, including the solar panels, charge controller, battery bank, inverter/charger, and wiring.
- Online Forums and Communities: Join online forums and communities, such as RV enthusiast groups, to connect with others who have experience with solar panel systems and RV installations.
- Professional Installation: Consider hiring a professional to install your solar panel system, ensuring that it is done correctly and safely.
By following the guidelines and tips outlined in this article, you can create a comprehensive and accurate solar wiring diagram for your RV setup, ensuring a safe and efficient installation. Happy camping!