“How to wire solar inverter to breaker box”
One of the most critical components of a solar power system is the inverter, which converts the DC power generated by the solar panels into AC power that can be used by your home or business. In this article, we will guide you through the process of wiring a solar inverter to a breaker box, ensuring a safe and efficient connection.
Introduction to Solar Inverters and Breaker Boxes
Before we dive into the wiring process, it’s essential to understand the basics of solar inverters and breaker boxes. A solar inverter is an electronic device that converts the direct current (DC) power generated by solar panels into alternating current (AC) power, which is usable by your home or business. Breaker boxes, on the other hand, are electrical panels that distribute power to various circuits within a building.
Pre-Wiring Checklist
Before starting the wiring process, ensure that you have the following:
- Solar inverter: Choose an inverter that is compatible with your solar panel system and meets your energy needs.
- Breaker box: Ensure that your breaker box has enough space to accommodate the solar inverter’s circuit.
- Wiring and connectors: Use high-quality, outdoor-rated wiring and connectors to connect the inverter to the breaker box.
- Grounding equipment: Ensure that you have the necessary grounding equipment, such as a grounding rod and clamps.
- Permits and inspections: Obtain the necessary permits and schedule inspections with your local electrical authority.
Step 1: Prepare the Breaker Box
- Turn off the main power: Switch off the main power to the breaker box to ensure your safety while working on the electrical system.
- Remove the cover plate: Take off the cover plate to access the breaker box’s internal components.
- Identify the available space: Look for available space in the breaker box to accommodate the solar inverter’s circuit.
- Install a new breaker: Install a new breaker that matches the inverter’s output rating (e.g., 20A, 30A, etc.).
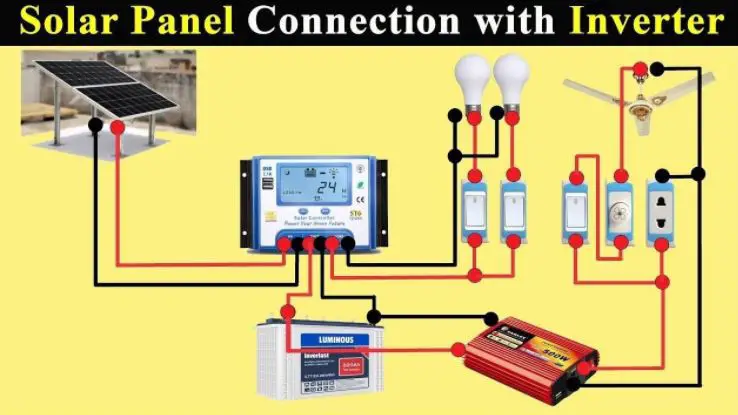
Step 2: Connect the Solar Inverter to the Breaker Box
- Determine the inverter’s output: Check the inverter’s manual or label to determine its output voltage, current, and power rating.
- Choose the correct wiring: Select wiring that matches the inverter’s output rating and is compatible with the breaker box’s voltage rating (e.g., 120/240V).
- Connect the inverter’s output: Connect the inverter’s output wires to the new breaker in the breaker box. Typically, the inverter’s output wires will be colored:
- Black (hot): Connected to the breaker’s terminal.
- White (neutral): Connected to the neutral bus bar.
- Green or bare (ground): Connected to the grounding system.
- Secure the connections: Use wire nuts or connectors to secure the connections to the breaker and neutral bus bar.

Step 3: Ground the Solar Inverter
- Determine the grounding method: Check the inverter’s manual to determine the recommended grounding method (e.g., grounding rod, grounding bus bar).
- Install a grounding rod: If required, install a grounding rod near the inverter and connect it to the inverter’s grounding terminal.
- Connect the grounding wire: Connect the grounding wire from the inverter to the grounding system (e.g., grounding rod, grounding bus bar).
Step 4: Connect the AC Wiring
- Determine the AC wiring requirements: Check the inverter’s manual to determine the AC wiring requirements (e.g., wire size, voltage rating).
- Run the AC wiring: Run the AC wiring from the inverter to the breaker box, ensuring that it is properly sized and rated for the inverter’s output.
- Connect the AC wiring to the breaker: Connect the AC wiring to the new breaker in the breaker box.
Step 5: Test the System
- Turn on the main power: Switch on the main power to the breaker box.
- Check the inverter’s display: Verify that the inverter is functioning correctly and producing power.
- Check the breaker box: Ensure that the breaker is not tripping and that the system is operating within safe parameters.
- Monitor the system: Continuously monitor the system to ensure that it is operating efficiently and safely.
Safety Precautions and Considerations
- Hire a licensed electrician: If you are not experienced with electrical work, consider hiring a licensed electrician to perform the wiring.
- Follow local electrical codes: Ensure that your wiring meets local electrical codes and regulations.
- Use proper safety equipment: Wear personal protective equipment (PPE) such as gloves, safety glasses, and a hard hat when working with electrical systems.
- Keep children and pets away: Ensure that children and pets are kept away from the work area to avoid accidents.
Conclusion
Wiring a solar inverter to a breaker box requires careful planning, attention to detail, and adherence to safety protocols. By following the steps outlined in this article, you can ensure a safe and efficient connection between your solar inverter and breaker box. Remember to always follow local electrical codes and regulations, and consider hiring a licensed electrician if you are not experienced with electrical work. With proper installation and maintenance, your solar power system will provide you with clean, renewable energy for years to come.


