“12V solar charging system diagram for RV batteries”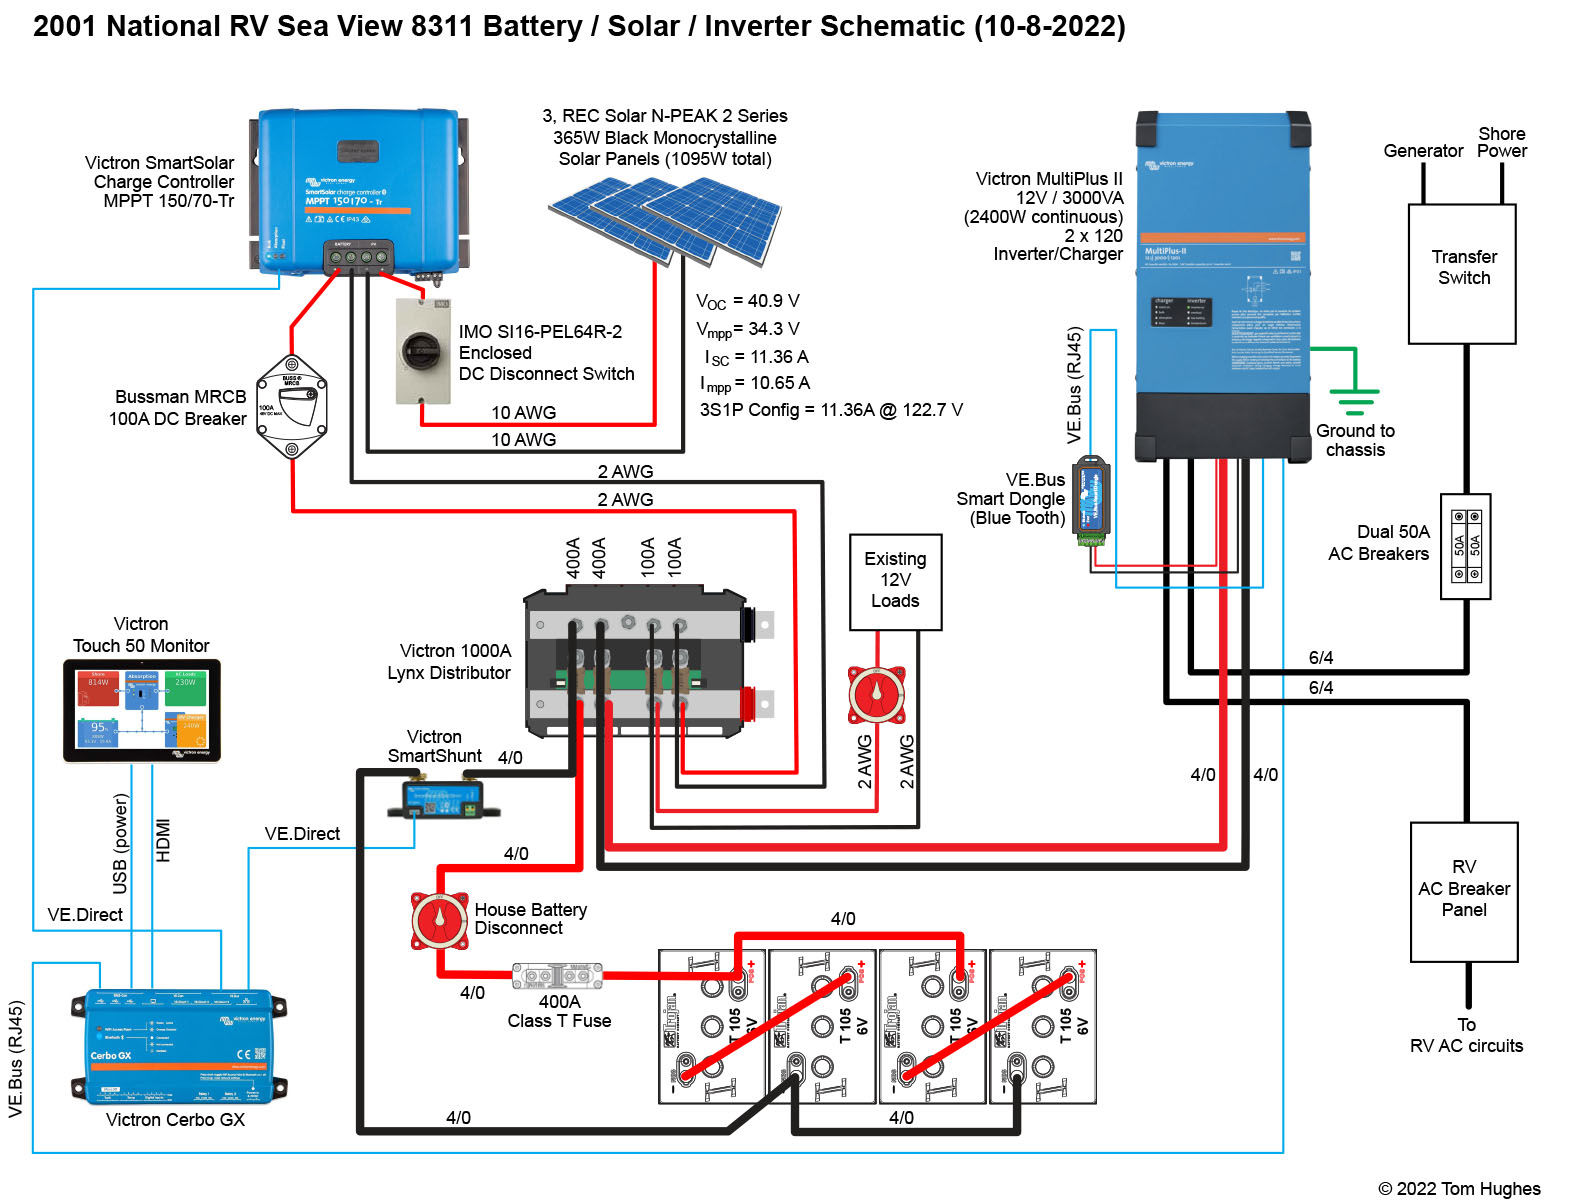
A well-designed 12V solar charging system can provide a steady supply of power, reducing reliance on traditional energy sources and minimizing the carbon footprint of your RV. In this article, we will explore the key components and design considerations for a 12V solar charging system for RV batteries, including a detailed diagram to help you visualize the setup.
Understanding the Basics of Solar Charging
Before we dive into the specifics of designing a 12V solar charging system, it’s essential to understand the basics of solar charging. Solar panels convert sunlight into electrical energy, which is then stored in a battery or used to power appliances directly. The most common type of solar panel used in RV applications is the monocrystalline or polycrystalline panel, which offers a high efficiency rate and durability.
Key Components of a 12V Solar Charging System
A typical 12V solar charging system for RV batteries consists of the following components:
- Solar Panels: These are the primary source of energy for the system, converting sunlight into electrical energy.
- Charge Controller: This device regulates the flow of energy from the solar panels to the battery, preventing overcharging and ensuring the battery is charged efficiently.
- Deep Cycle Battery: This is the energy storage component of the system, designed to provide a steady supply of power to the RV’s electrical systems.
- Inverter/Charger: This device converts the DC power from the battery into AC power, allowing you to run appliances and charge devices.
- Fuses and Wiring: These components connect the various parts of the system, providing a safe and reliable pathway for energy to flow.
Designing a 12V Solar Charging System for RV Batteries
When designing a 12V solar charging system for RV batteries, there are several key considerations to keep in mind:
- Solar Panel Size and Orientation: The size and orientation of the solar panels will significantly impact the system’s overall performance. A larger panel will generate more energy, but may not be feasible for smaller RVs. The orientation of the panels should be adjusted to maximize exposure to direct sunlight.
- Charge Controller Selection: The charge controller should be selected based on the size of the solar panel array and the type of battery being used. A MPPT (Maximum Power Point Tracking) charge controller is recommended, as it can optimize energy harvesting from the solar panels.
- Battery Selection: The deep cycle battery should be selected based on the RV’s energy requirements and the size of the solar panel array. A battery with a high Ah (Ampere-hour) rating and a low self-discharge rate is recommended.
- Inverter/Charger Selection: The inverter/charger should be selected based on the RV’s energy requirements and the size of the battery. A pure sine wave inverter is recommended, as it provides a clean and stable source of power.
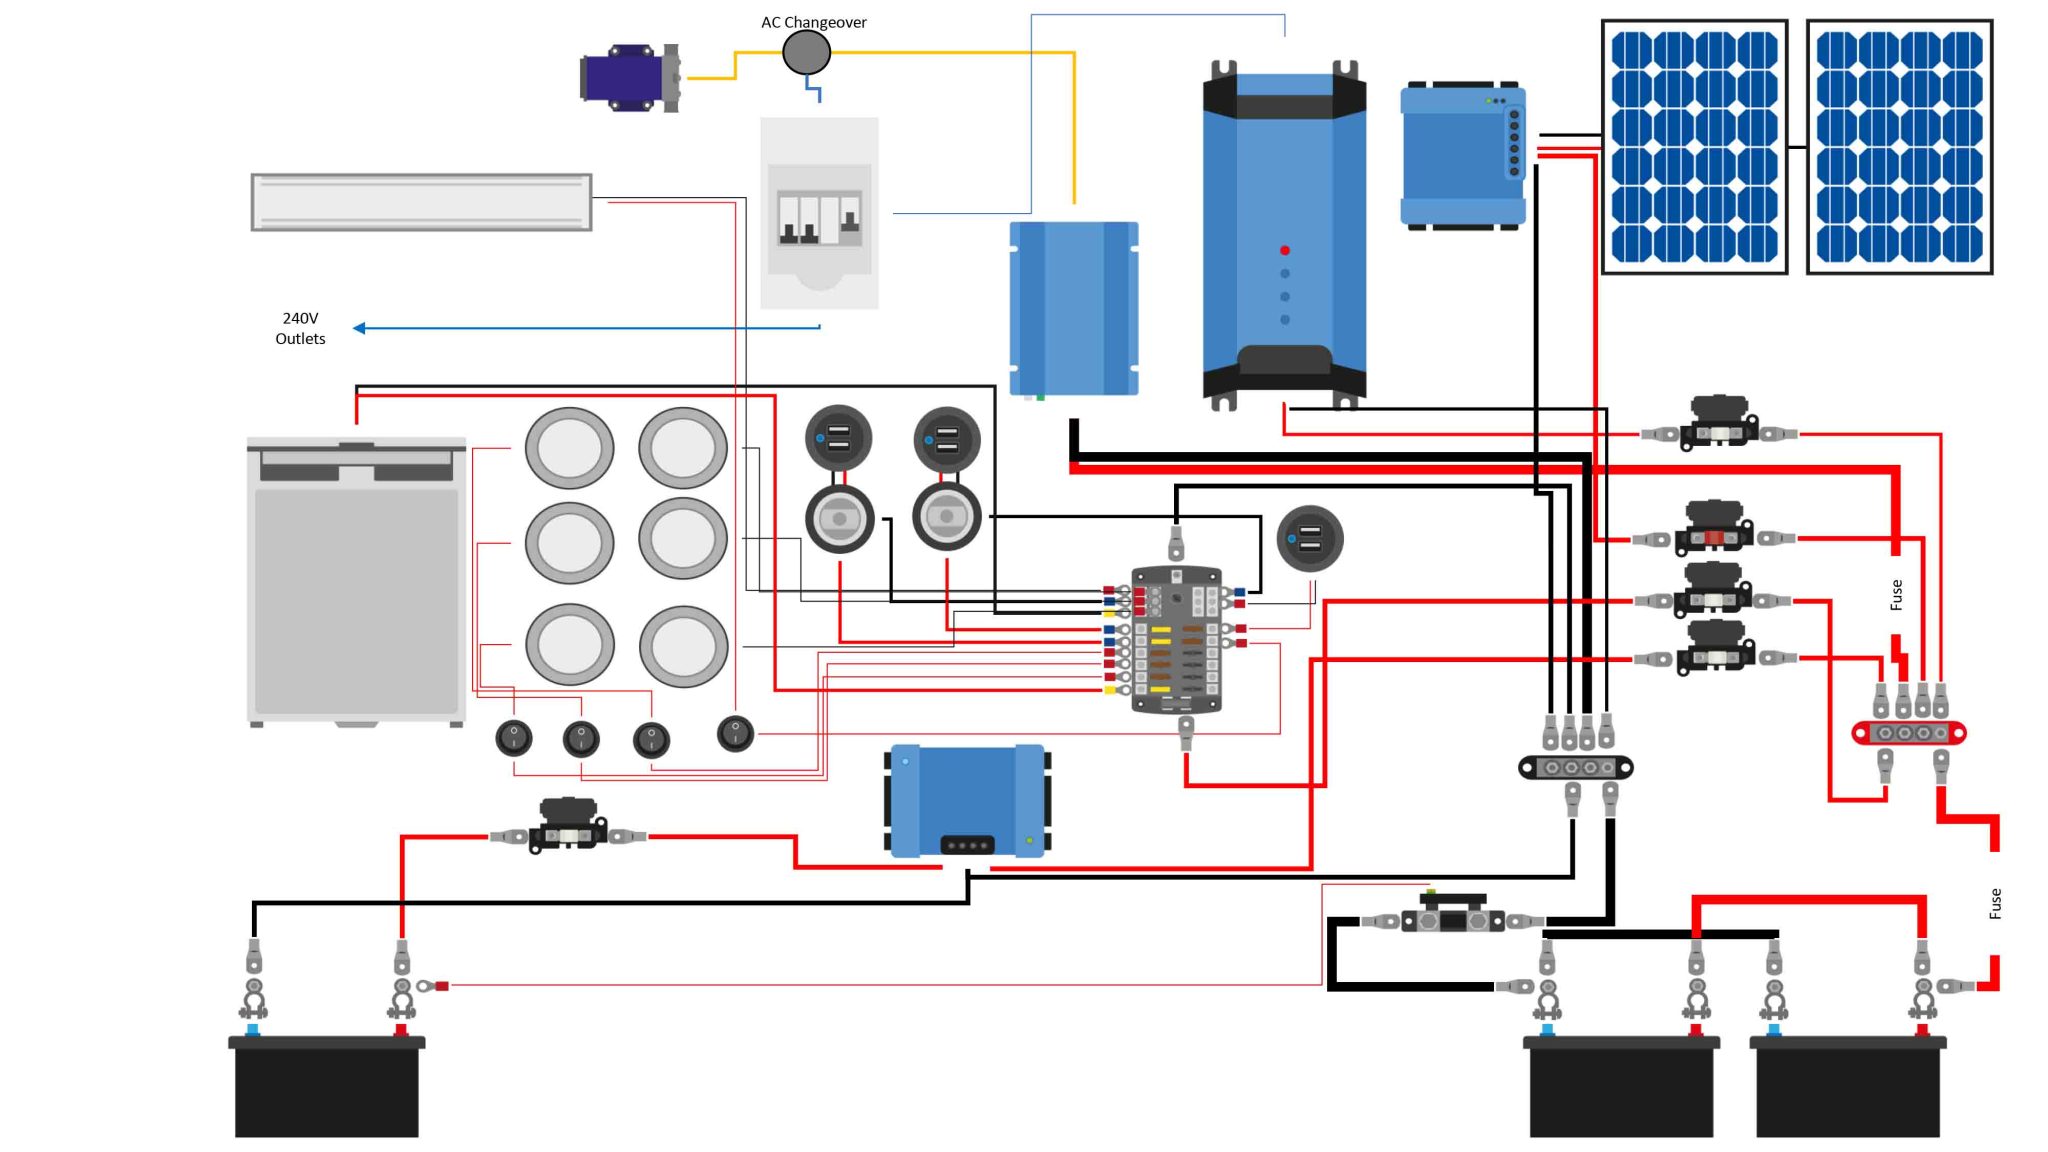
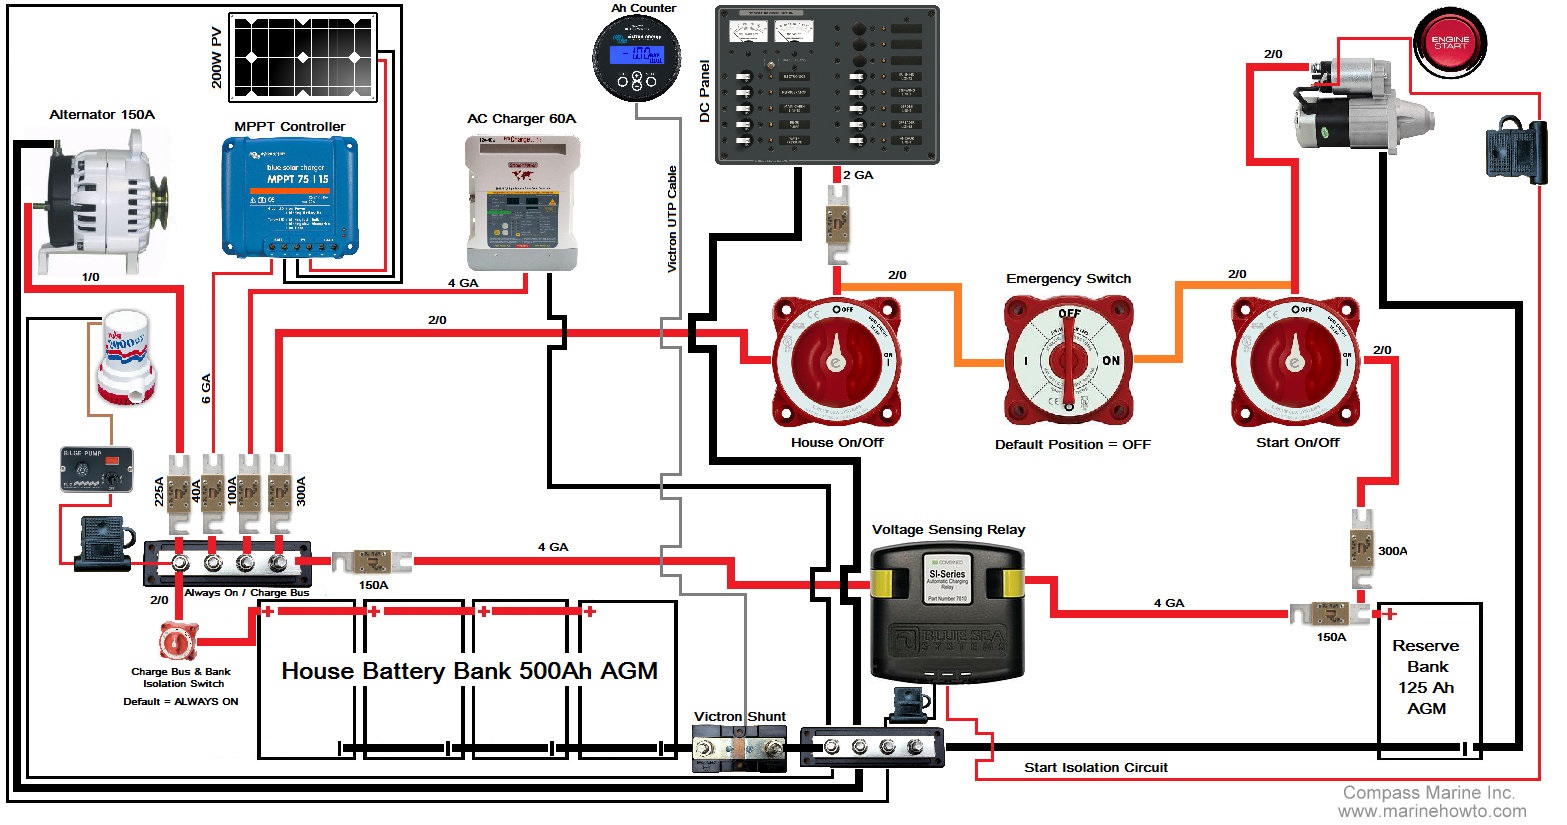
12V Solar Charging System Diagram

The following diagram illustrates a typical 12V solar charging system for RV batteries:
+---------------+ | Solar Panels | +---------------+ | | v +---------------+ | Charge Controller | +---------------+ | | v +---------------+ | Deep Cycle Battery | +---------------+ | | v +---------------+ | Inverter/Charger | +---------------+ | | v +---------------+ | RV Electrical Systems | +---------------+System Components and Wiring
The following components and wiring are used to connect the various parts of the system:
- Solar Panel Wiring: The solar panels are connected in series and/or parallel to achieve the desired voltage and current output.
- Charge Controller Wiring: The charge controller is connected to the solar panel array and the battery, using a wiring harness to provide a safe and reliable connection.
- Battery Wiring: The battery is connected to the charge controller and the inverter/charger, using a wiring harness to provide a safe and reliable connection.
- Inverter/Charger Wiring: The inverter/charger is connected to the battery and the RV’s electrical systems, using a wiring harness to provide a safe and reliable connection.
System Monitoring and Maintenance
To ensure the system operates efficiently and safely, regular monitoring and maintenance are essential. The following tasks should be performed:
- System Voltage and Current Monitoring: The system voltage and current should be monitored regularly to ensure the battery is being charged and discharged within the recommended parameters.
- Battery State of Charge Monitoring: The battery state of charge should be monitored regularly to ensure it is not being over-discharged or under-charged.
- System Cleaning and Inspection: The system should be cleaned and inspected regularly to ensure it is free from dirt, dust, and other debris that can impact performance.
Conclusion
Designing a 12V solar charging system for RV batteries requires careful consideration of several key components and design factors. By selecting the right solar panels, charge controller, battery, and inverter/charger, and ensuring proper wiring and system monitoring, you can create a reliable and sustainable source of power for your RV. Whether you’re a seasoned RVer or just starting out, a well-designed 12V solar charging system can provide a steady supply of power, reducing your reliance on traditional energy sources and minimizing your carbon footprint.