“Wiring residential solar panels with charge controller and inverter”
However, installing a solar panel system requires careful planning and execution to ensure safe and efficient operation. In this article, we will delve into the details of wiring residential solar panels with a charge controller and inverter, highlighting the key considerations and best practices for a successful installation.
Introduction to Solar Panel Systems
A typical residential solar panel system consists of several components, including:
- Solar Panels: These are the photovoltaic (PV) modules that convert sunlight into electrical energy.
- Charge Controller: This device regulates the flow of energy from the solar panels to the battery bank, preventing overcharging and ensuring safe operation.
- Battery Bank: This is the storage system that holds excess energy generated by the solar panels for later use.
- Inverter: This device converts the DC power from the solar panels and battery bank into AC power, suitable for use in the home.
- Mounting System: This includes the racking and mounting hardware that secures the solar panels to the roof or ground.
Wiring Considerations
When wiring a residential solar panel system, it is essential to consider the following factors:
- Voltage and Current: The voltage and current ratings of the solar panels, charge controller, and inverter must be compatible to ensure safe and efficient operation.
- Wire Size and Type: The wire size and type must be suitable for the system’s voltage and current requirements, as well as the environmental conditions (e.g., temperature, moisture).
- Connectors and Terminals: The connectors and terminals used to connect the components must be designed for the specific application and meet the required safety standards.
- Grounding and Bonding: The system must be properly grounded and bonded to ensure electrical safety and prevent damage from surges and lightning strikes.

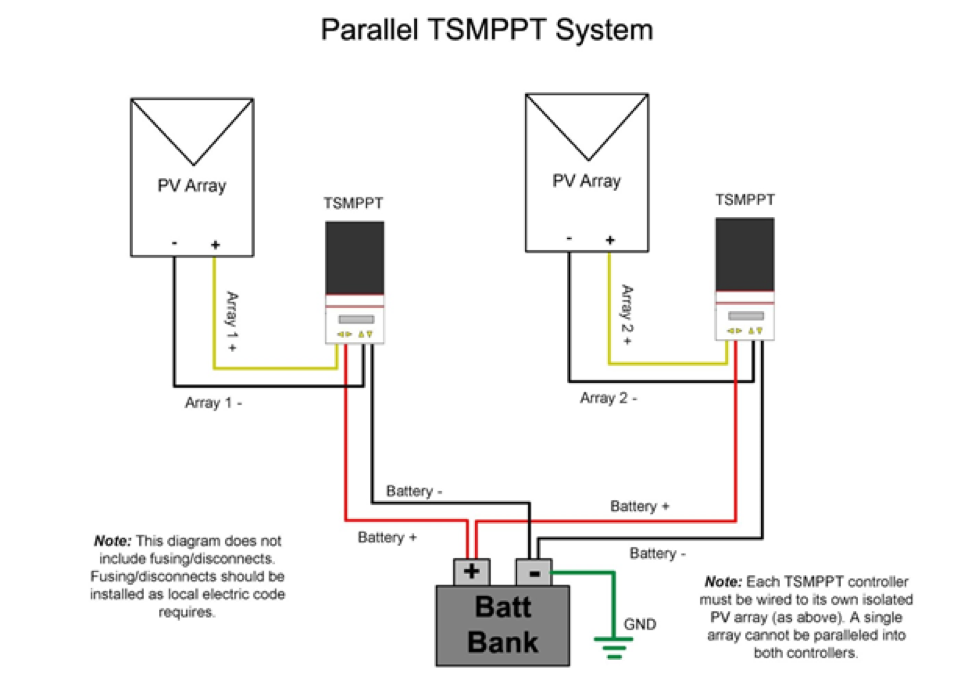
Charge Controller Wiring
The charge controller plays a critical role in regulating the flow of energy from the solar panels to the battery bank. When wiring the charge controller, follow these steps:
- Connect the Solar Panels: Connect the solar panels to the charge controller’s input terminals, using the recommended wire size and type.
- Connect the Battery Bank: Connect the battery bank to the charge controller’s output terminals, using the recommended wire size and type.
- Configure the Charge Controller: Configure the charge controller according to the manufacturer’s instructions, setting the voltage and current limits, as well as the charging parameters (e.g., bulk, absorption, float).
- Monitor the Charge Controller: Monitor the charge controller’s performance, using its built-in displays or remote monitoring systems, to ensure proper operation and adjust settings as needed.
Inverter Wiring
The inverter converts the DC power from the solar panels and battery bank into AC power, suitable for use in the home. When wiring the inverter, follow these steps:
- Connect the DC Input: Connect the DC input from the solar panels and battery bank to the inverter’s DC input terminals.
- Connect the AC Output: Connect the AC output from the inverter to the home’s electrical panel, using the recommended wire size and type.
- Configure the Inverter: Configure the inverter according to the manufacturer’s instructions, setting the output voltage and frequency, as well as the grid tie parameters (if applicable).
- Test the Inverter: Test the inverter’s performance, using its built-in displays or remote monitoring systems, to ensure proper operation and adjust settings as needed.
System Integration
Once the charge controller and inverter are wired, integrate the system by connecting the components and configuring the settings. Follow these steps:
- Connect the Charge Controller to the Inverter: Connect the charge controller’s output to the inverter’s DC input, using the recommended wire size and type.
- Configure the System Settings: Configure the system settings, including the voltage and current limits, as well as the charging and grid tie parameters.
- Test the System: Test the system’s performance, using its built-in displays or remote monitoring systems, to ensure proper operation and adjust settings as needed.
Safety Considerations
When wiring a residential solar panel system, safety is paramount. Follow these best practices to ensure a safe and successful installation:
- Follow Manufacturer Instructions: Follow the manufacturer’s instructions for each component, including the solar panels, charge controller, and inverter.
- Use Proper Wire Size and Type: Use the recommended wire size and type for each connection, considering the system’s voltage and current requirements.
- Ensure Proper Grounding and Bonding: Ensure proper grounding and bonding of the system, using the recommended connectors and terminals.
- Use Protective Equipment: Use protective equipment, such as gloves and safety glasses, when working with electrical systems.
Conclusion
Wiring residential solar panels with a charge controller and inverter requires careful planning and execution to ensure safe and efficient operation. By following the guidelines outlined in this article, homeowners and installers can create a reliable and high-performance solar panel system that meets their energy needs and reduces their carbon footprint. Remember to always follow manufacturer instructions, use proper wire size and type, ensure proper grounding and bonding, and use protective equipment when working with electrical systems. With the right knowledge and precautions, a residential solar panel system can provide years of clean and efficient energy.


