“How to wire solar panels for home use”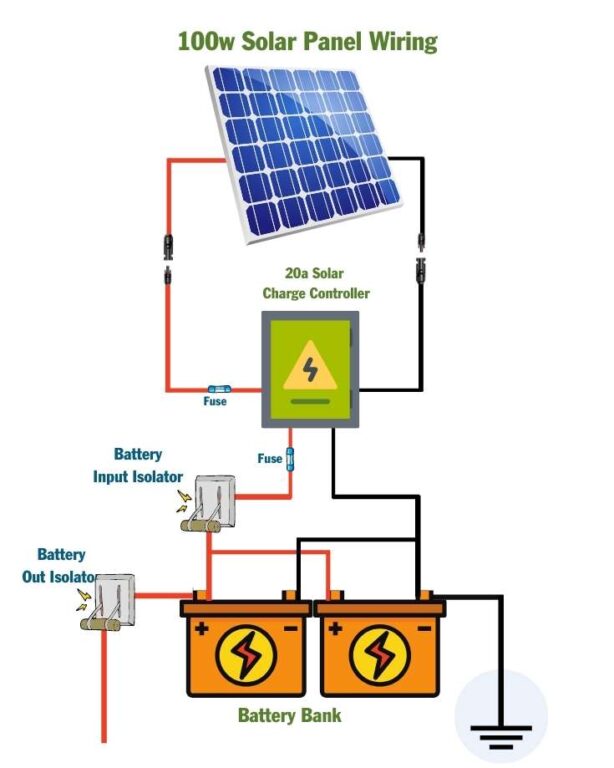
Wiring solar panels for home use can seem like a daunting task, but with the right knowledge and tools, it can be a straightforward and rewarding process. In this article, we will provide a step-by-step guide on how to wire solar panels for home use, covering the essential components, safety considerations, and best practices.
Understanding the Basics of Solar Panel Wiring
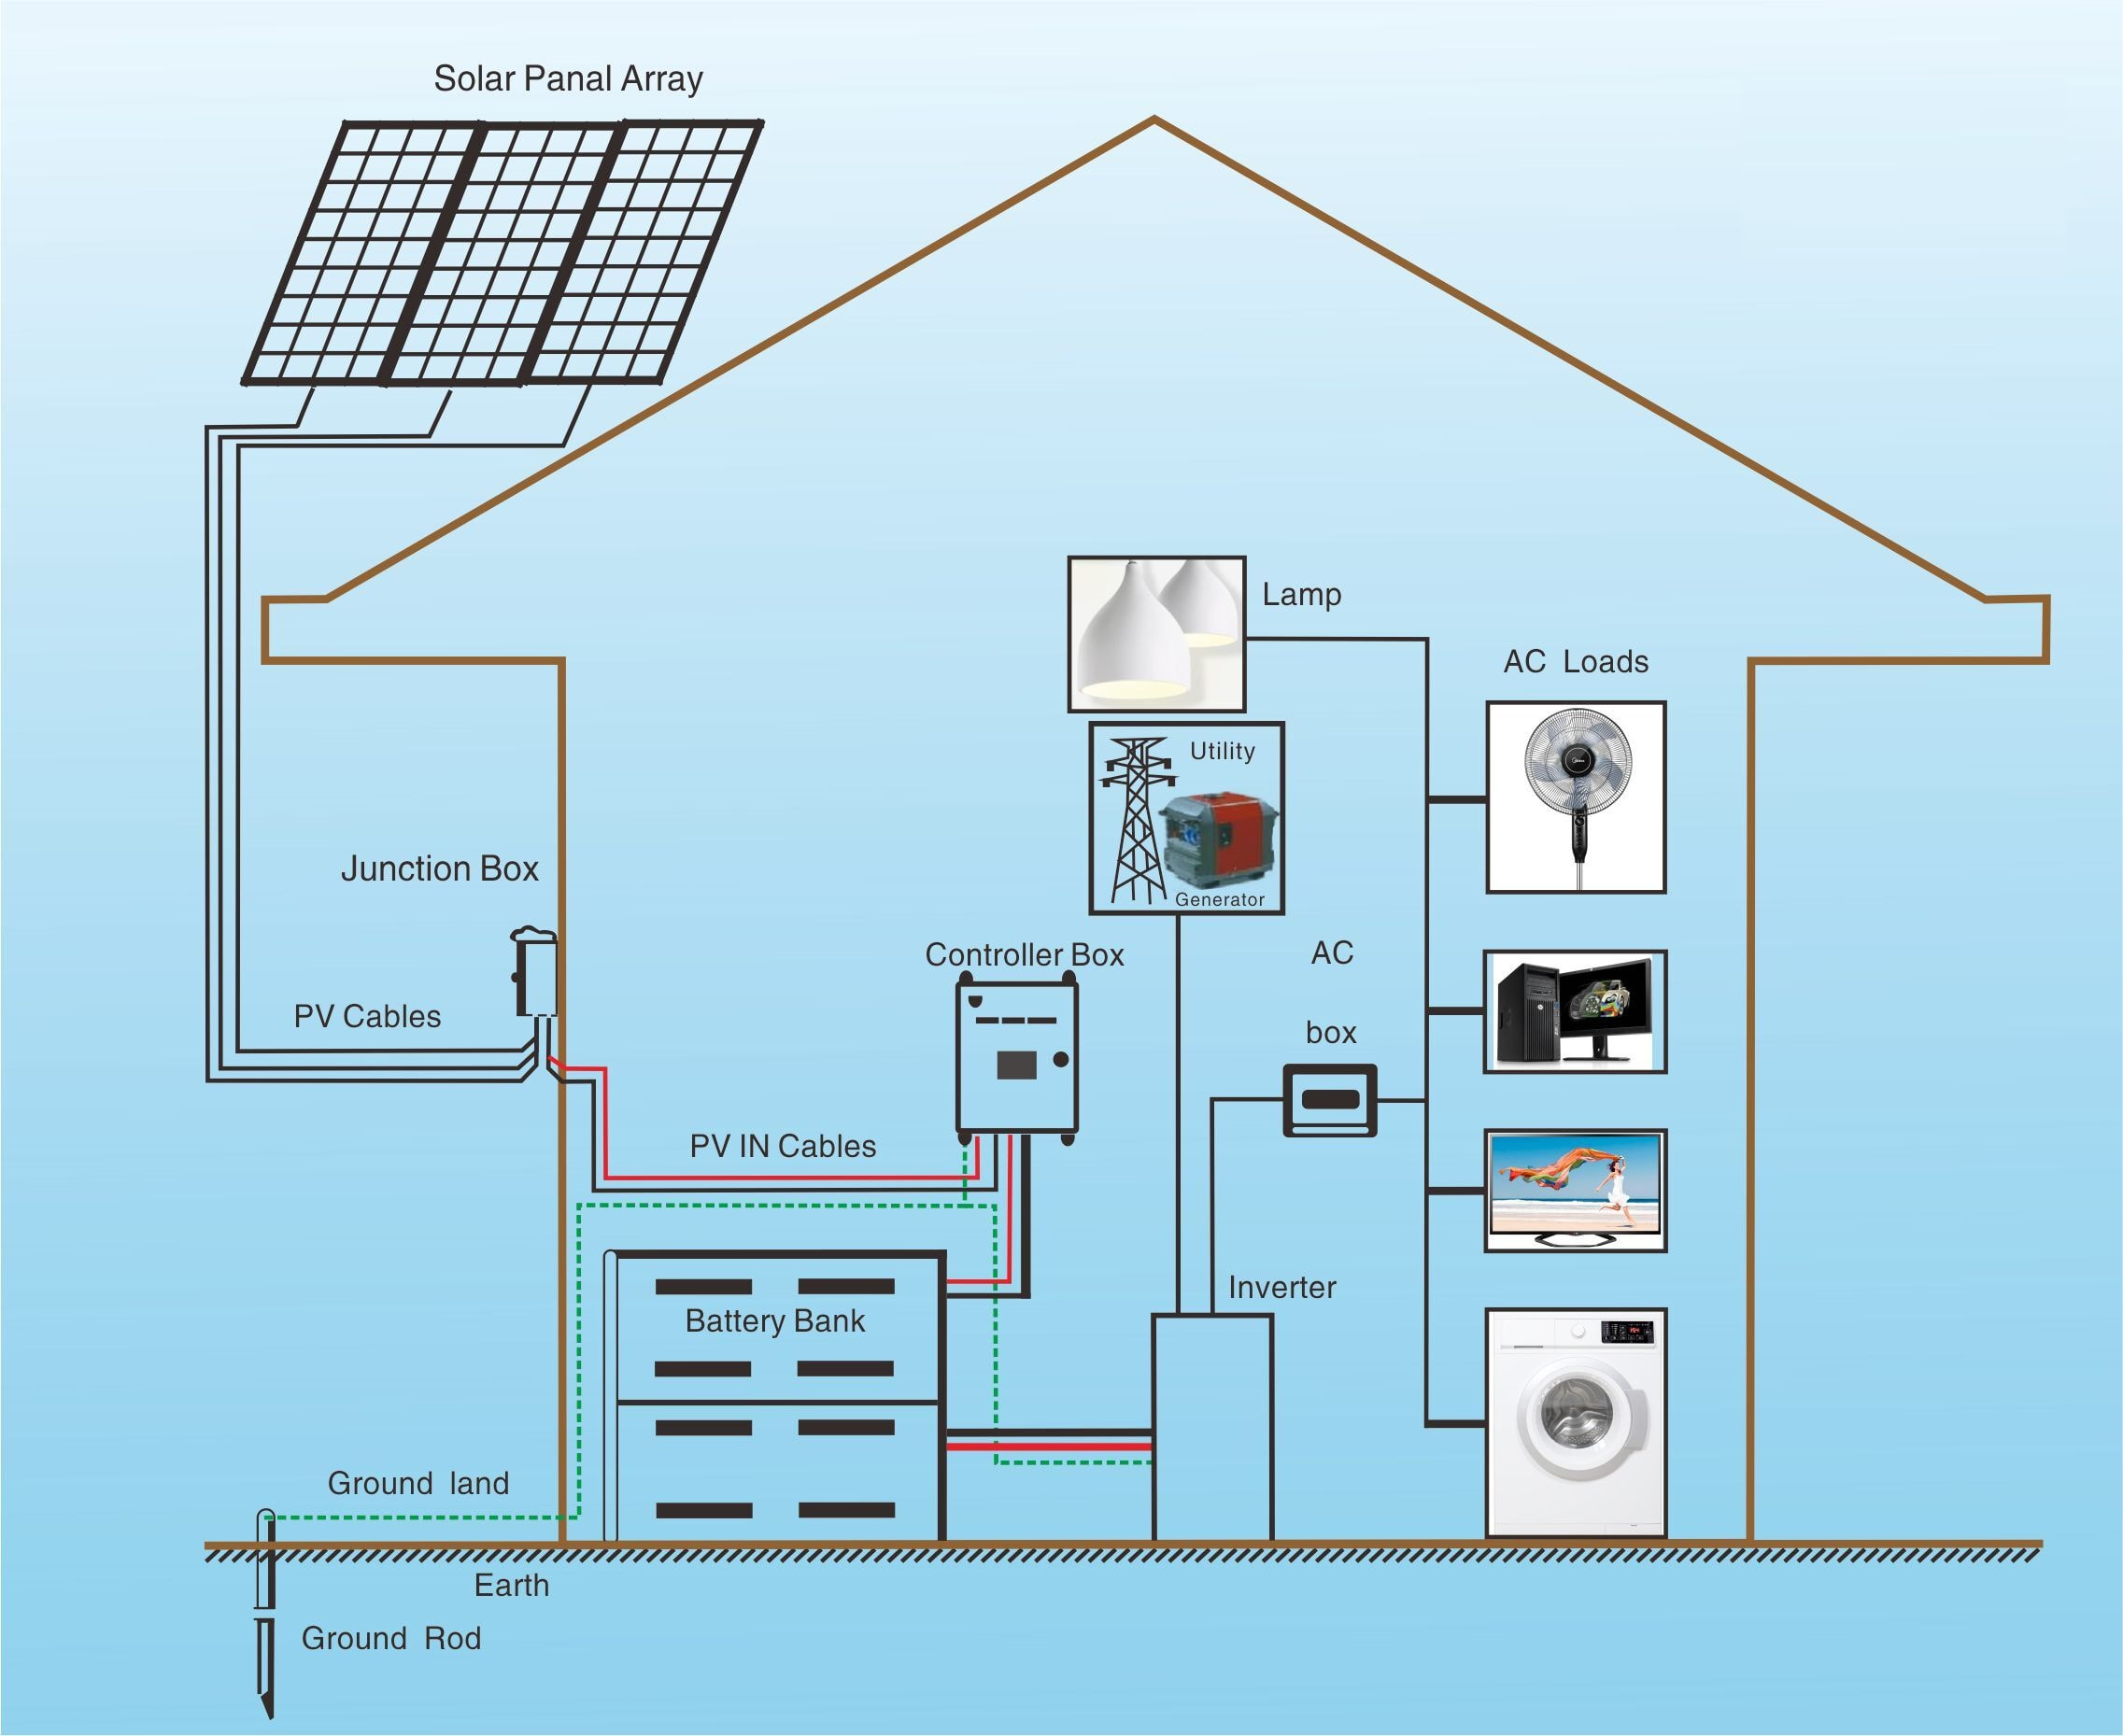
Before we dive into the nitty-gritty of wiring solar panels, it’s essential to understand the basics of how solar panels work. Solar panels convert sunlight into direct current (DC) electricity, which is then sent to an inverter that converts the DC power into alternating current (AC) electricity, suitable for use in your home. The wiring system for solar panels typically consists of the following components:
- Solar Panels: These are the photovoltaic (PV) modules that convert sunlight into DC electricity.
- Charge Controller: This device regulates the flow of energy from the solar panels to the battery bank, preventing overcharging and undercharging.
- Battery Bank: This is a collection of deep cycle batteries that store excess energy generated by the solar panels for later use.
- Inverter: This device converts the DC power from the solar panels or battery bank into AC power, suitable for use in your home.
- Mounting System: This includes the racking system, clamps, and connectors that secure the solar panels to the roof or ground.
Safety Considerations
When wiring solar panels, safety should always be your top priority. Here are some essential safety considerations to keep in mind:
- Electrical Shock: Solar panels and wiring can produce electrical shock, so it’s crucial to ensure that all connections are secure and insulated.
- Fire Hazard: Improper wiring can lead to electrical fires, so it’s essential to follow proper wiring practices and use flame-resistant materials.
- Overheating: Solar panels can produce excessive heat, which can damage wiring and other components. Ensure that all wiring is rated for high temperatures and is kept away from heat sources.
- Weather Resistance: Solar panels and wiring must be able to withstand various weather conditions, including rain, snow, and extreme temperatures.
Wiring Solar Panels: Step-by-Step Guide
Now that we’ve covered the basics and safety considerations, let’s move on to the step-by-step guide on how to wire solar panels for home use:
Step 1: Plan Your System
Before you start wiring your solar panels, it’s essential to plan your system carefully. Consider the following factors:
- Determine Your Energy Needs: Calculate your energy requirements to determine the size of your solar panel system.
- Choose Your Components: Select the right solar panels, charge controller, battery bank, and inverter for your system.
- Design Your Wiring System: Create a wiring diagram to ensure that all components are connected correctly and efficiently.
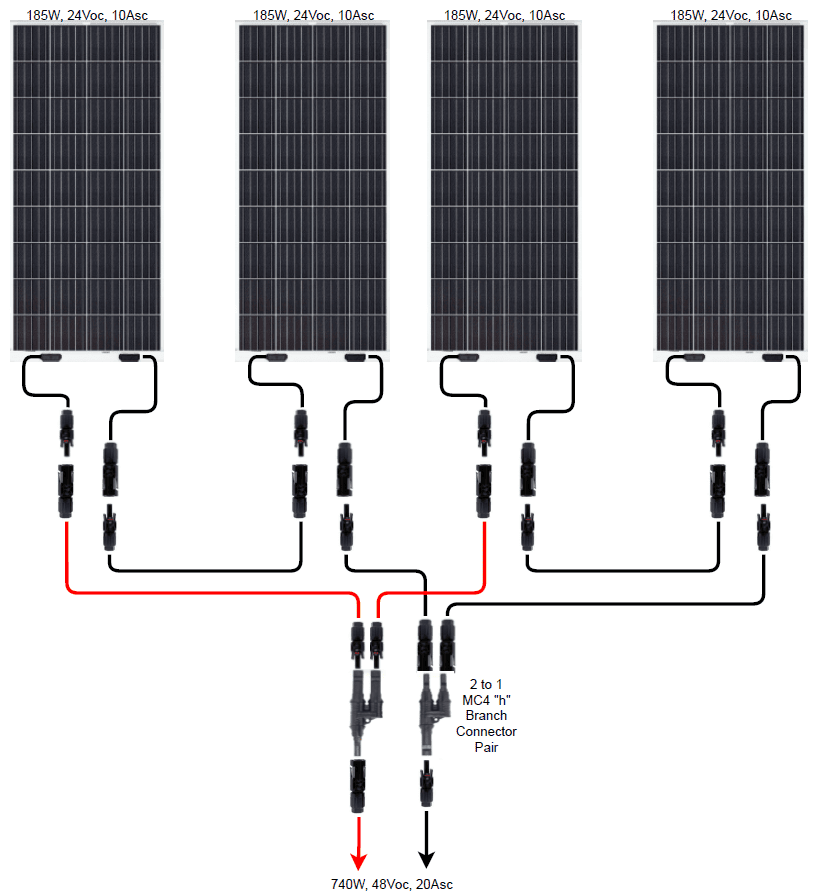
Step 2: Mount and Connect Solar Panels
- Mount Solar Panels: Secure the solar panels to the roof or ground using a mounting system.
- Connect Solar Panels: Connect the solar panels in series or parallel, depending on your system design.
- Use Connectors and Cables: Use suitable connectors and cables to connect the solar panels to the charge controller.
Step 3: Connect Charge Controller and Battery Bank
- Connect Charge Controller: Connect the charge controller to the solar panels and battery bank.
- Connect Battery Bank: Connect the battery bank to the charge controller and inverter.
- Use Fuses and Circuit Breakers: Install fuses and circuit breakers to protect the system from overcurrent and short circuits.
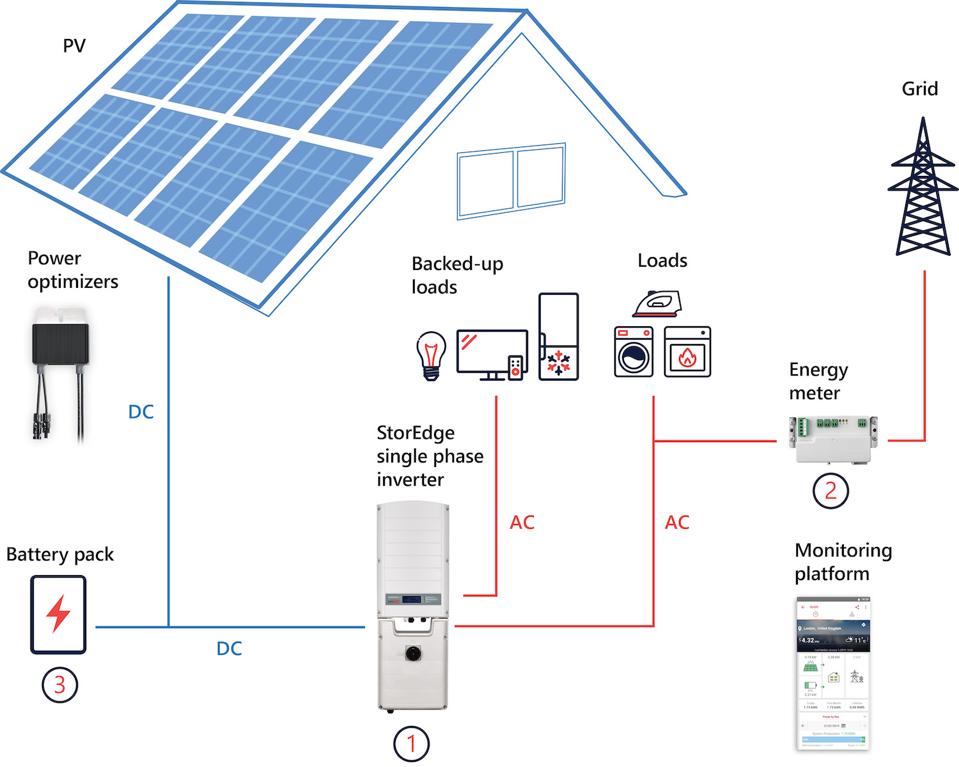
Step 4: Connect Inverter and AC Wiring
- Connect Inverter: Connect the inverter to the battery bank and AC wiring.
- Connect AC Wiring: Connect the AC wiring to the main electrical panel.
- Use Suitable Wire and Connectors: Use suitable wire and connectors to ensure safe and efficient transmission of power.
Step 5: Test and Inspect the System
- Test the System: Test the system to ensure that it’s working correctly and efficiently.
- Inspect the System: Inspect the system for any signs of damage or wear and tear.
- Make Adjustments: Make any necessary adjustments to the system to ensure optimal performance.
Best Practices and Tips
Here are some best practices and tips to keep in mind when wiring solar panels for home use:
- Use High-Quality Components: Use high-quality components that meet or exceed industry standards.
- Follow Manufacturer Instructions: Follow the manufacturer’s instructions for each component.
- Keep Wiring Organized: Keep wiring organized and labeled to ensure easy maintenance and repair.
- Monitor System Performance: Monitor system performance regularly to identify any issues or areas for improvement.
Conclusion
Wiring solar panels for home use can seem like a complex task, but with the right knowledge and tools, it can be a straightforward and rewarding process. By following the steps outlined in this article and considering safety, best practices, and tips, you can create a reliable and efficient solar panel system that meets your energy needs and helps reduce your reliance on traditional energy sources. Remember to always follow local electrical codes and regulations, and consult with a professional if you’re unsure about any aspect of the wiring process.