“Home solar system wiring guide”
Installing a solar system can significantly reduce your electricity bills and minimize your carbon footprint. However, wiring a home solar system can be a complex task, requiring careful planning and execution. In this article, we will provide a comprehensive guide on home solar system wiring, covering the basics, safety considerations, and best practices.
Introduction to Home Solar Systems
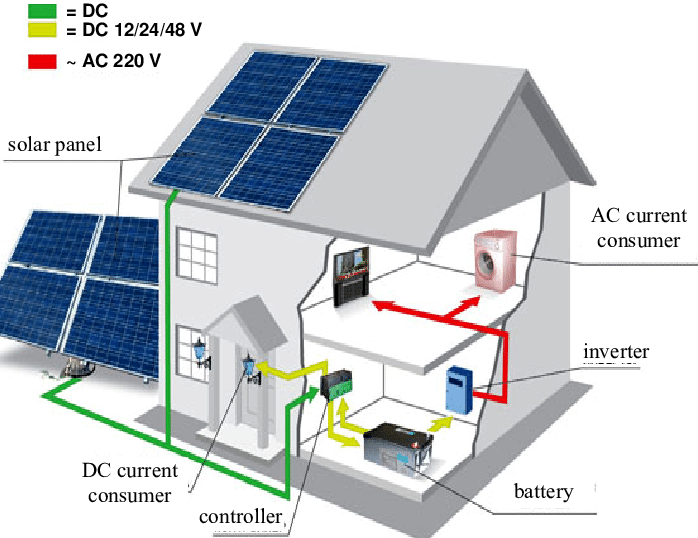
A home solar system, also known as a photovoltaic (PV) system, consists of solar panels, a mounting system, an inverter, a battery bank (optional), and a wiring system. The solar panels convert sunlight into direct current (DC) electricity, which is then converted into alternating current (AC) electricity by the inverter. The AC electricity is then fed into the electrical panel, where it is distributed to various appliances and devices in the home.
Wiring Basics
Before we dive into the wiring guide, it’s essential to understand the basics of electrical wiring. In a home solar system, there are two types of wiring: DC wiring and AC wiring. DC wiring connects the solar panels to the inverter, while AC wiring connects the inverter to the electrical panel.
- DC Wiring:
- DC wiring typically consists of two conductors: positive and negative.
- The positive conductor is usually marked with a red color, while the negative conductor is marked with a black color.
- DC wiring is typically sized between 10 AWG to 14 AWG, depending on the system’s power output.
- AC Wiring:
- AC wiring typically consists of three conductors: hot, neutral, and ground.
- The hot conductor is usually marked with a black color, while the neutral conductor is marked with a white color.
- The ground conductor is usually marked with a green color or a bare copper wire.
- AC wiring is typically sized between 10 AWG to 14 AWG, depending on the system’s power output.

Safety Considerations
Safety is a top priority when wiring a home solar system. Here are some safety considerations to keep in mind:
- Electrical Shock:
- Always turn off the main electrical panel before starting work on the wiring system.
- Use personal protective equipment, such as gloves and safety glasses, when working with electrical systems.
- Fire Hazard:
- Ensure that all wiring connections are secure and not loose.
- Use heat-resistant materials, such as PVC or Teflon, for wiring insulation.
- Overcurrent Protection:
- Install overcurrent protection devices, such as fuses or circuit breakers, to prevent electrical overloads.
Wiring Guide
Now that we have covered the basics and safety considerations, let’s move on to the wiring guide. Here’s a step-by-step guide on how to wire a home solar system:
- Solar Panel Wiring:
- Connect the solar panels in series or parallel, depending on the system’s design.
- Use DC wiring to connect the solar panels to the inverter.
- Ensure that the wiring is sized correctly and meets the system’s power output requirements.
- Inverter Wiring:
- Connect the inverter to the solar panel array using DC wiring.
- Connect the inverter to the electrical panel using AC wiring.
- Ensure that the inverter is properly grounded and bonded to the electrical panel.
- AC Wiring:
- Connect the inverter to the electrical panel using AC wiring.
- Connect the electrical panel to the main electrical service panel.
- Ensure that the wiring is sized correctly and meets the system’s power output requirements.
- Grounding and Bonding:
- Ground the inverter and the electrical panel to a grounding electrode, such as a copper rod or a grounding plate.
- Bond the inverter and the electrical panel to the grounding electrode using a bonding conductor.
- Testing and Inspection:
- Test the wiring system to ensure that it is functioning correctly.
- Inspect the wiring system to ensure that all connections are secure and meet the system’s design requirements.
Best Practices
Here are some best practices to keep in mind when wiring a home solar system:
- Use High-Quality Materials:
- Use high-quality wiring and connectors to ensure reliable connections.
- Use heat-resistant materials, such as PVC or Teflon, for wiring insulation.
- Follow Manufacturer Instructions:
- Follow the manufacturer’s instructions for wiring and installation.
- Ensure that all components are compatible with each other.
- Hire a Professional:
- If you’re not experienced in electrical wiring, hire a professional to install the system.
- Ensure that the professional has experience with home solar systems and meets local electrical codes.
Conclusion
Wiring a home solar system requires careful planning and execution. By following the guidelines outlined in this article, you can ensure a safe and reliable installation. Remember to always follow local electrical codes and regulations, and hire a professional if you’re not experienced in electrical wiring. With a well-designed and installed home solar system, you can enjoy significant energy savings and contribute to a sustainable future.
Additional Resources
For more information on home solar systems and wiring, please refer to the following resources:
- National Electric Code (NEC)
- International Association of Electrical Inspectors (IAEI)
- North American Board of Certified Energy Practitioners (NABCEP)
- Solar Energy Industries Association (SEIA)
Glossary
Here are some common terms used in home solar systems and wiring:
- Alternating Current (AC): A type of electrical current that oscillates at a specific frequency.
- Direct Current (DC): A type of electrical current that flows in one direction.
- Grounding Electrode: A metal rod or plate that provides a path to ground for electrical currents.
- Inverter: A device that converts DC electricity into AC electricity.
- Photovoltaic (PV) System: A system that converts sunlight into electricity using solar panels.
- Wiring: The system of conductors and connectors that carry electrical currents.
By following the guidelines outlined in this article, you can ensure a safe and reliable installation of your home solar system. Remember to always follow local electrical codes and regulations, and hire a professional if you’re not experienced in electrical wiring.


