“Camper solar power wiring map”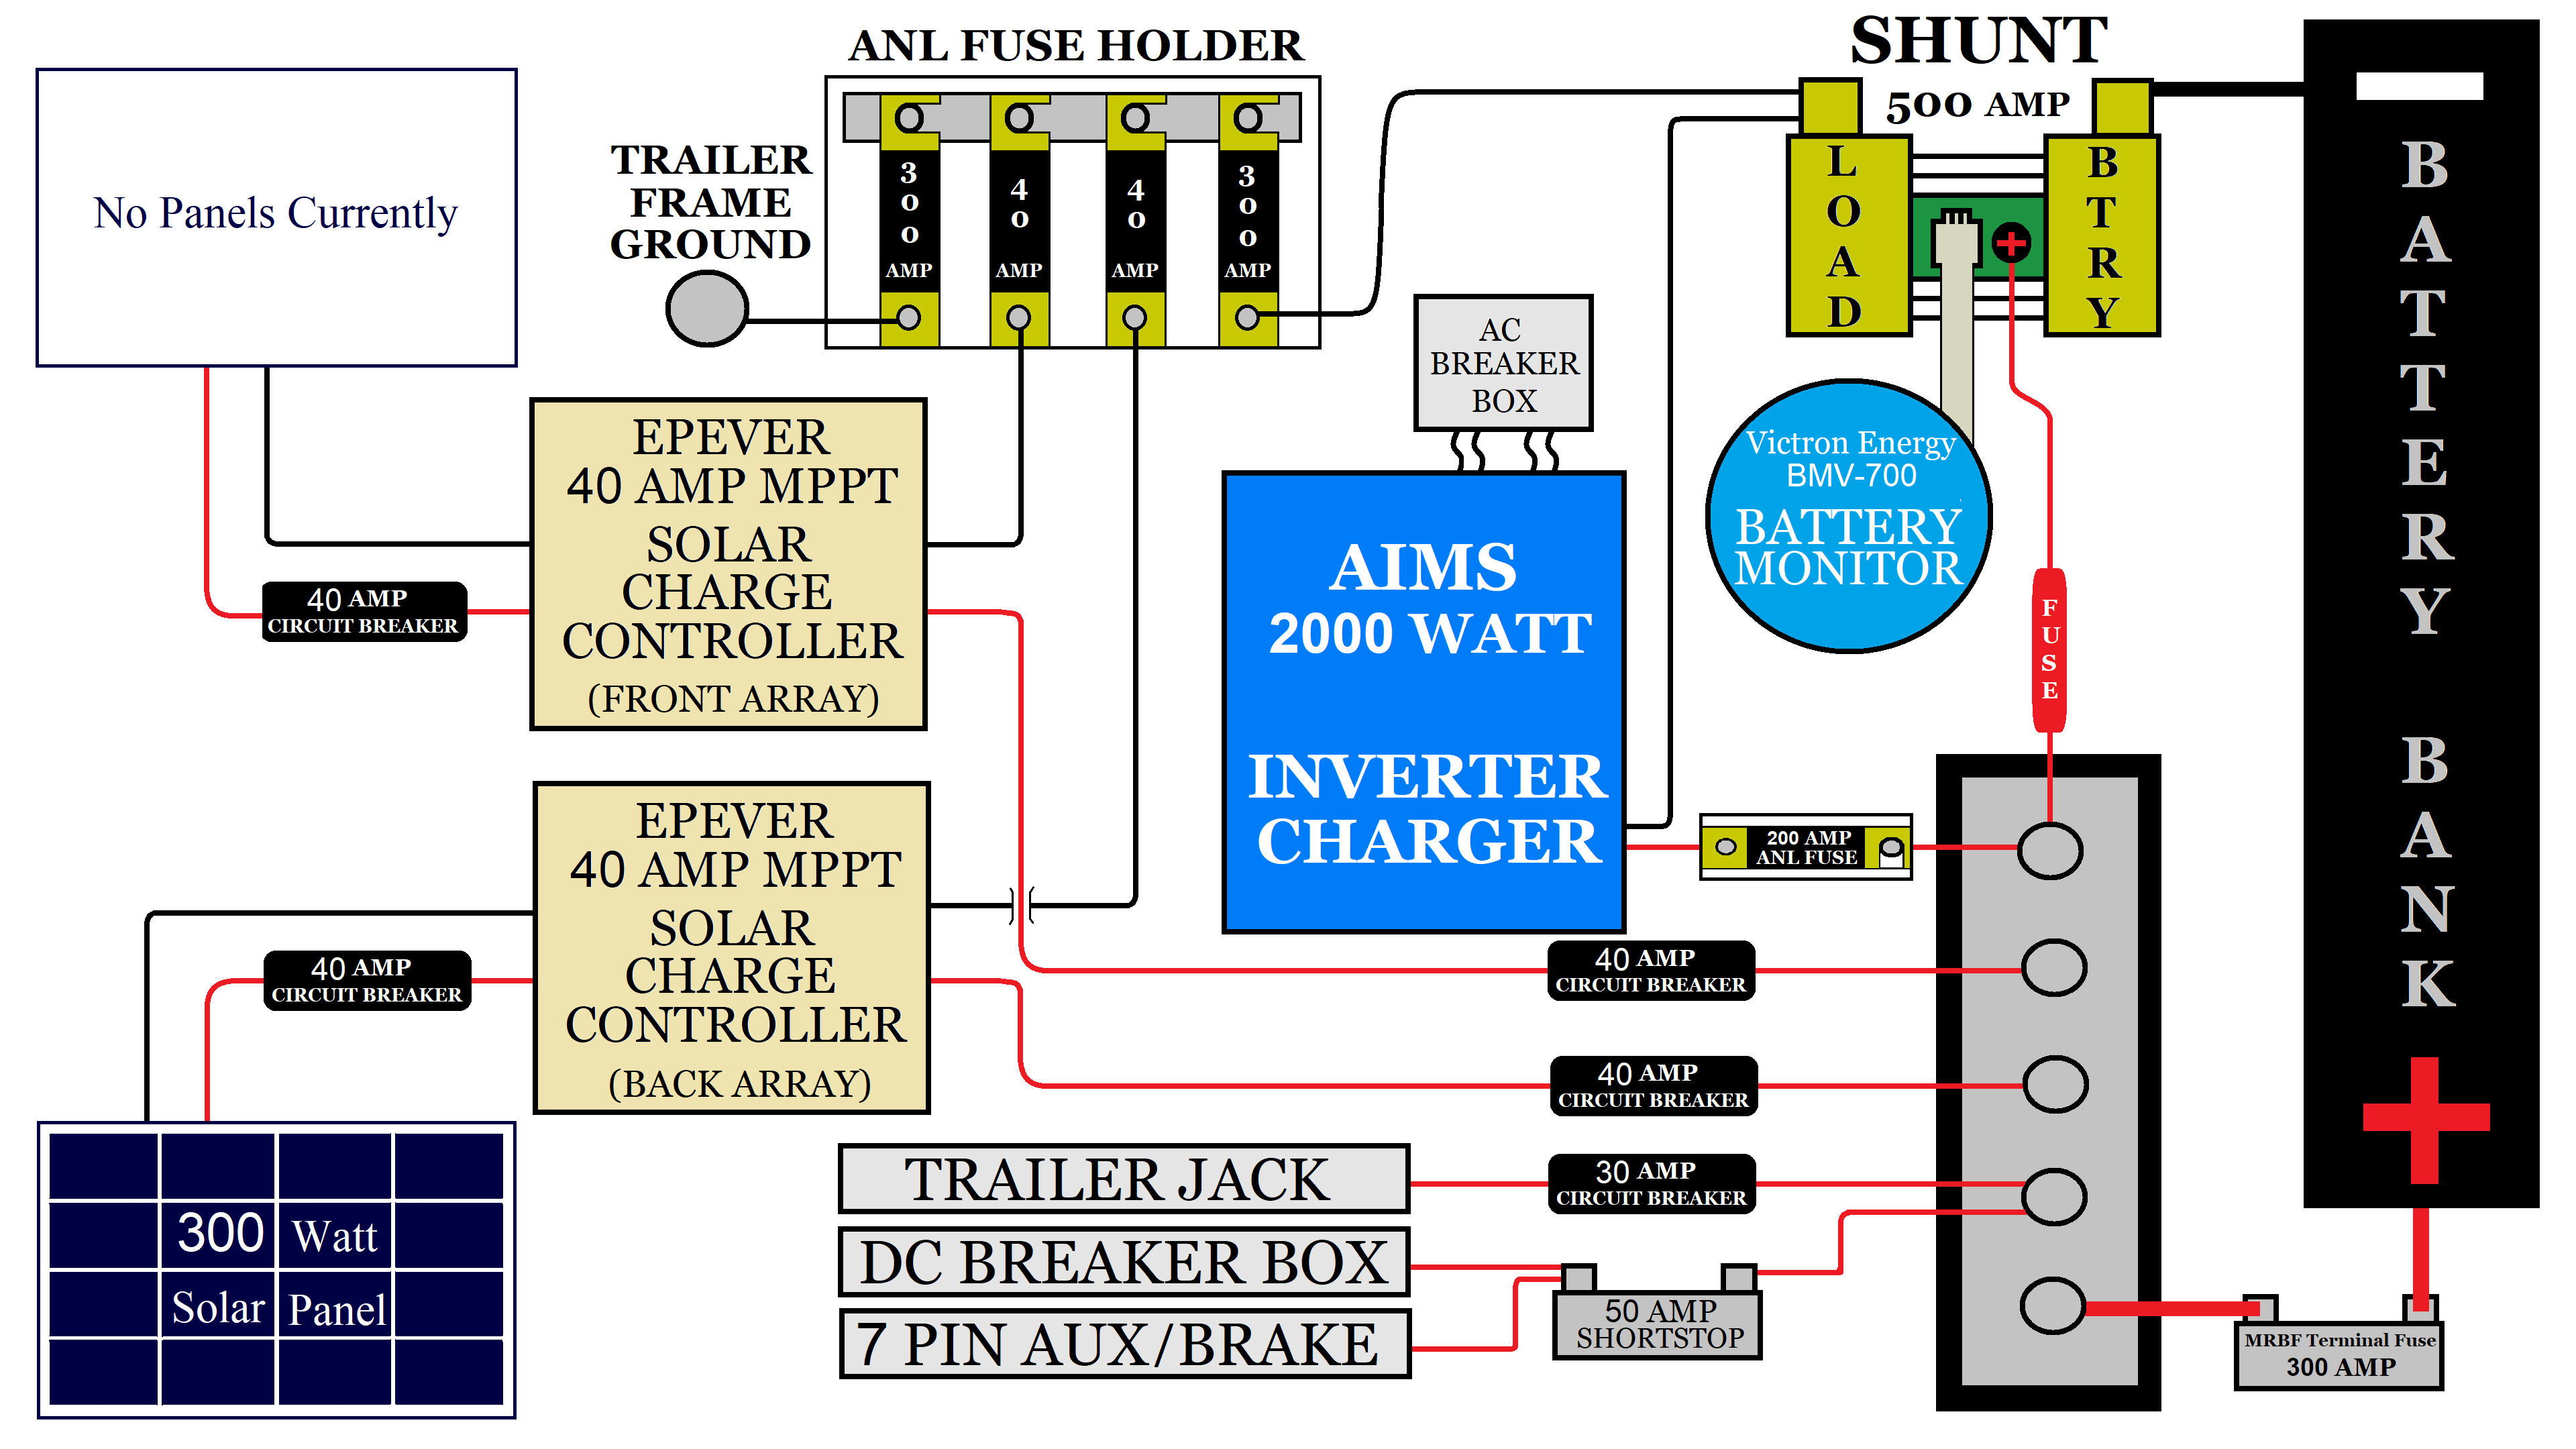
Solar power offers a clean, quiet, and reliable source of energy, making it an ideal choice for campers. However, installing a solar power system in a camper can be a complex task, requiring careful planning and attention to detail. In this article, we will provide a comprehensive guide to creating a camper solar power wiring map, helping you to design and install a safe and efficient solar power system for your camper.
Introduction to Solar Power Systems
Before we dive into the wiring map, it’s essential to understand the basics of solar power systems. A solar power system consists of several components, including:
- Solar Panels: These are the panels that convert sunlight into electrical energy.
- Charge Controller: This device regulates the flow of energy from the solar panels to the battery, preventing overcharging and ensuring the battery is charged safely.
- Battery: This is the storage unit for the electrical energy generated by the solar panels.
- Inverter: This device converts the DC power from the battery into AC power, which is used to power appliances and devices.
- Wiring and Connectors: These are the components that connect the various parts of the solar power system together.
Camper Solar Power Wiring Map
A camper solar power wiring map is a critical component of any solar power system. It provides a visual representation of the wiring diagram, helping you to understand how the various components are connected and ensuring that the system is installed safely and efficiently.
Here is a basic wiring map for a camper solar power system:
- Solar Panels: The solar panels are connected in series and/or parallel to increase the voltage and current output. The positive terminal of each panel is connected to the negative terminal of the next panel, forming a series circuit.
- Charge Controller: The charge controller is connected to the solar panels and the battery. The positive terminal of the solar panel array is connected to the positive input on the charge controller, while the negative terminal is connected to the negative input.
- Battery: The battery is connected to the charge controller and the inverter. The positive terminal of the battery is connected to the positive output on the charge controller, while the negative terminal is connected to the negative output.
- Inverter: The inverter is connected to the battery and the AC distribution panel. The positive terminal of the inverter is connected to the positive terminal of the battery, while the negative terminal is connected to the negative terminal.
- AC Distribution Panel: The AC distribution panel is connected to the inverter and the various appliances and devices in the camper. The panel distributes the AC power to the different circuits, ensuring that each device receives the required voltage and current.

Wiring Considerations
When creating a camper solar power wiring map, there are several considerations to keep in mind:
- Wire Size: The wire size should be sufficient to handle the maximum current output of the solar panels and the inverter.
- Insulation: The wiring should be insulated to prevent electrical shock and ensure safety.
- Connectors: The connectors should be designed for outdoor use and rated for the maximum current output of the system.
- Fuses and Breakers: Fuses and breakers should be installed to protect the system from overcurrent and short circuits.
- Grounding: The system should be grounded to prevent electrical shock and ensure safety.
Safety Considerations
Safety is a critical aspect of any solar power system. When creating a camper solar power wiring map, consider the following safety guidelines:
- Electrical Shock: Ensure that all wiring and connectors are insulated and protected from electrical shock.
- Overcurrent Protection: Install fuses and breakers to protect the system from overcurrent and short circuits.
- Fire Risk: Ensure that the system is designed and installed to minimize the risk of fire.
- Grounding: Ensure that the system is grounded to prevent electrical shock and ensure safety.
Best Practices
To ensure that your camper solar power wiring map is safe and efficient, follow these best practices:
- Consult the Manufacturer’s Instructions: Consult the manufacturer’s instructions for the solar panels, charge controller, battery, inverter, and other components to ensure that you understand the wiring requirements.
- Use a Wiring Diagram: Use a wiring diagram to visualize the wiring map and ensure that all components are connected correctly.
- Test the System: Test the system thoroughly before using it to ensure that it is functioning safely and efficiently.
- Regular Maintenance: Regularly inspect and maintain the system to ensure that it continues to function safely and efficiently.
Conclusion
Creating a camper solar power wiring map requires careful planning and attention to detail. By following the guidelines outlined in this article, you can design and install a safe and efficient solar power system for your camper. Remember to consult the manufacturer’s instructions, use a wiring diagram, test the system, and perform regular maintenance to ensure that your system continues to function safely and efficiently. With a well-designed solar power system, you can enjoy the freedom and convenience of solar power on your next camping adventure.
Appendix
Here is a sample wiring diagram for a camper solar power system:
+---------------+ | Solar Panels | +---------------+ | | v +---------------+ | Charge Controller | +---------------+ | | v +---------------+ | Battery | +---------------+ | | v +---------------+ | Inverter | +---------------+ | | v +---------------+ | AC Distribution Panel | +---------------+ | | v +---------------+ | Appliances and Devices | +---------------+This diagram shows the basic components of a camper solar power system and how they are connected. The solar panels are connected to the charge controller, which is connected to the battery. The battery is connected to the inverter, which is connected to the AC distribution panel. The AC distribution panel distributes the AC power to the various appliances and devices in the camper.
Recommended System Components
Here are some recommended system components for a camper solar power system:
- Solar Panels: 200W-400W solar panels with a voltage rating of 12V-24V
- Charge Controller: 30A-60A charge controller with a voltage rating of 12V-24V
- Battery: 200Ah-400Ah deep cycle battery with a voltage rating of 12V-24V
- Inverter: 1000W-2000W inverter with a voltage rating of 120V-240V
- Wiring and Connectors: 10AWG-14AWG wiring with insulated connectors rated for outdoor use
Note: The specific system components will depend on the size and type of camper, as well as the energy requirements of the appliances and devices. It’s essential to consult with a professional to determine the best system components for your specific needs.


