“Complete 12V RV solar wiring diagram with inverter and battery”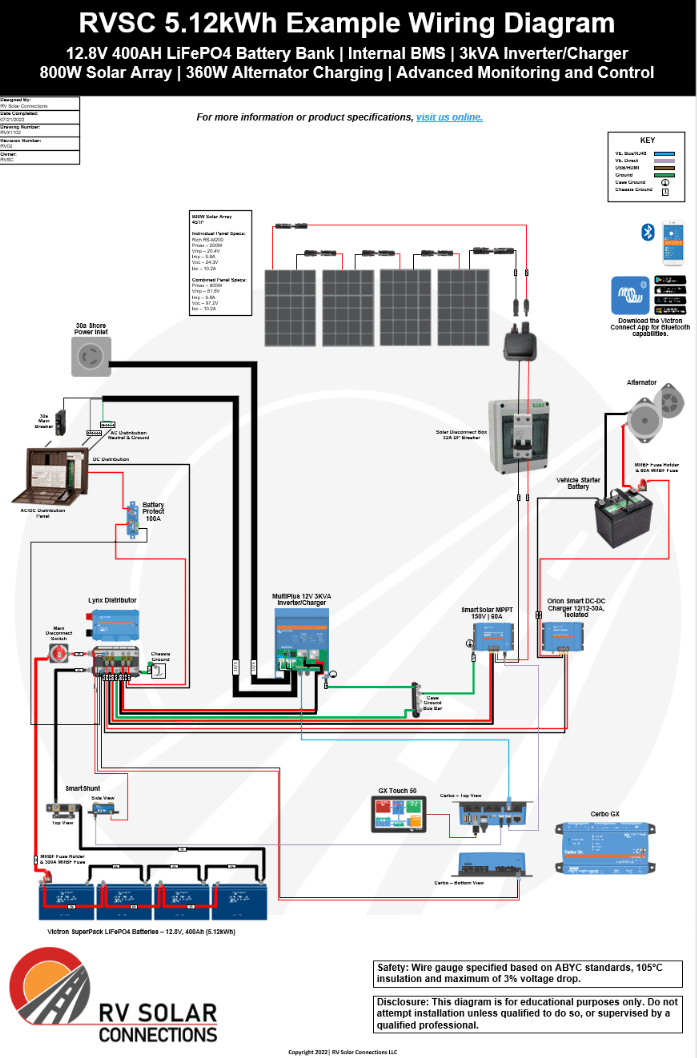
They convert sunlight into electrical energy, which is then stored in your batteries.
Wiring Diagram Components
The following components will be included in our wiring diagram:
- Solar Panel Array: This consists of multiple solar panels connected in series and/or parallel to produce the desired voltage and current output.
- Charge Controller: We will use a maximum power point tracking (MPPT) charge controller, which provides the most efficient charging of your batteries.
- Battery Bank: This consists of multiple batteries connected in series and/or parallel to provide the desired voltage and capacity.
- Inverter/Charger: We will use a pure sine wave inverter/charger, which provides clean and efficient power to your RV’s appliances and systems.
- AC Distribution Panel: This panel distributes the AC power from the inverter/charger to your RV’s appliances and systems.
- DC Distribution Panel: This panel distributes the DC power from the battery bank to your RV’s DC appliances and systems.
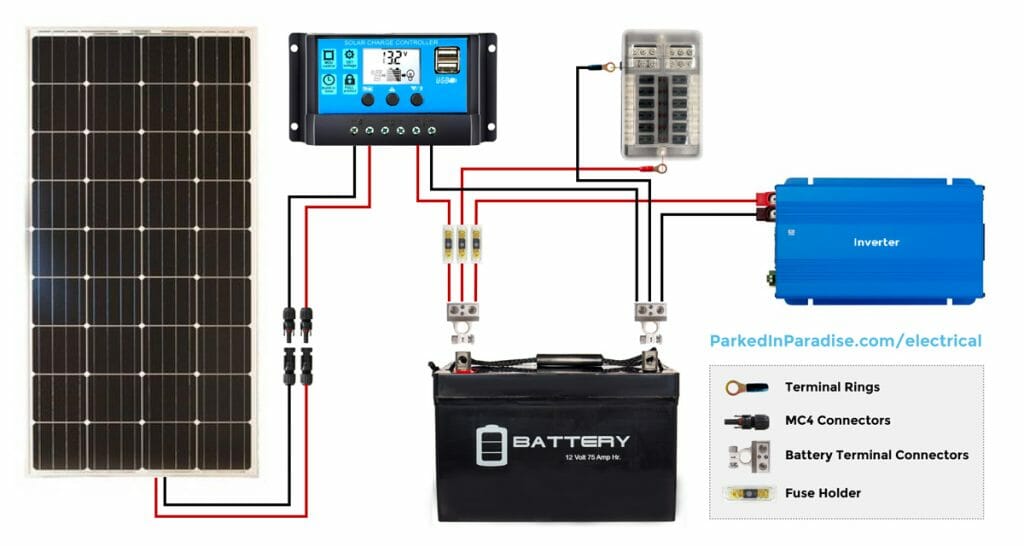
Wiring Diagram
The following wiring diagram illustrates the components and connections described above:
Solar Panel Array
- Solar Panel 1: +ve terminal connected to Charge Controller input +ve
- Solar Panel 2: +ve terminal connected to Charge Controller input +ve
- Solar Panel 3: +ve terminal connected to Charge Controller input +ve
- Solar Panel 1: -ve terminal connected to Charge Controller input -ve
- Solar Panel 2: -ve terminal connected to Charge Controller input -ve
- Solar Panel 3: -ve terminal connected to Charge Controller input -ve
Charge Controller
- Input +ve: connected to Solar Panel Array +ve terminal
- Input -ve: connected to Solar Panel Array -ve terminal
- Output +ve: connected to Battery Bank +ve terminal
- Output -ve: connected to Battery Bank -ve terminal
Battery Bank
- Battery 1: +ve terminal connected to Charge Controller output +ve
- Battery 2: +ve terminal connected to Charge Controller output +ve
- Battery 3: +ve terminal connected to Charge Controller output +ve
- Battery 1: -ve terminal connected to Charge Controller output -ve
- Battery 2: -ve terminal connected to Charge Controller output -ve
- Battery 3: -ve terminal connected to Charge Controller output -ve
Inverter/Charger
- Input +ve: connected to Battery Bank +ve terminal
- Input -ve: connected to Battery Bank -ve terminal
- Output +ve: connected to AC Distribution Panel input +ve
- Output -ve: connected to AC Distribution Panel input -ve
AC Distribution Panel
- Input +ve: connected to Inverter/Charger output +ve
- Input -ve: connected to Inverter/Charger output -ve
- Output 1: connected to RV Appliance 1
- Output 2: connected to RV Appliance 2
- Output 3: connected to RV Appliance 3
DC Distribution Panel
- Input +ve: connected to Battery Bank +ve terminal
- Input -ve: connected to Battery Bank -ve terminal
- Output 1: connected to RV DC Appliance 1
- Output 2: connected to RV DC Appliance 2
- Output 3: connected to RV DC Appliance 3
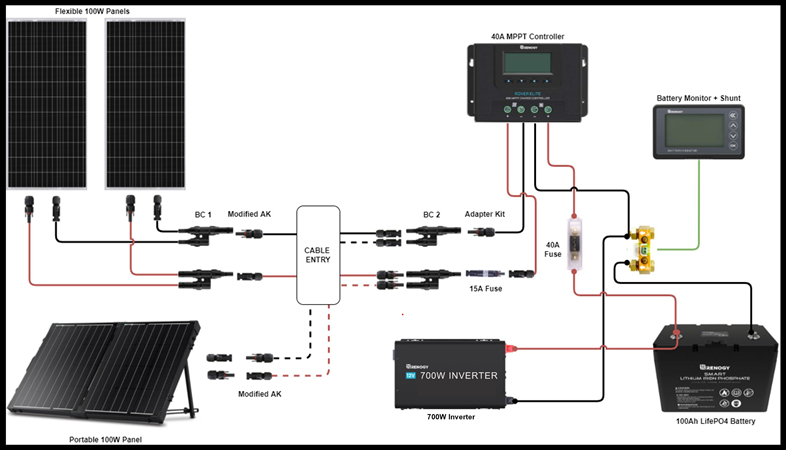
System Configuration
The system configuration will depend on your specific RV and energy requirements. The following are some general guidelines:
- Solar Panel Array: A minimum of 200W of solar panels is recommended for a small RV, with larger RVs requiring up to 1000W or more.
- Charge Controller: A 40A MPPT charge controller is recommended for a small RV, with larger RVs requiring up to 80A or more.
- Battery Bank: A minimum of 200Ah of battery capacity is recommended for a small RV, with larger RVs requiring up to 400Ah or more.
- Inverter/Charger: A 2000W pure sine wave inverter/charger is recommended for a small RV, with larger RVs requiring up to 4000W or more.
Safety Considerations
When designing and installing your RV solar wiring diagram, it is essential to follow safe practices to avoid injury or damage to your system. The following are some general safety considerations:
- Use proper wiring and connections: Ensure that all wiring and connections are secure and meet the specifications of your components.
- Use fuses and circuit breakers: Install fuses and circuit breakers to protect your system from overloads and short circuits.
- Keep the system well-ventilated: Ensure that your system is well-ventilated to prevent overheating and damage to your components.
- Monitor your system: Regularly monitor your system to ensure that it is functioning correctly and efficiently.
Conclusion
A well-designed RV solar wiring diagram with inverter and battery is essential for any RV owner who wants to harness the power of the sun to charge their batteries and power their appliances. By following the guidelines and safety considerations outlined in this article, you can create a safe and efficient solar wiring diagram that meets your specific energy requirements. Remember to consult with a professional if you are unsure about any aspect of the design or installation process.
Additional Tips and Recommendations
- Use a solar panel mounting system: A solar panel mounting system can help to ensure that your solar panels are secure and angled correctly for maximum energy production.
- Use a battery monitoring system: A battery monitoring system can help to ensure that your batteries are charged and maintained correctly, prolonging their lifespan.
- Use a generator or shore power: Consider installing a generator or shore power connection to provide an alternative source of energy when the sun is not shining.
- Regularly maintain your system: Regularly inspect and maintain your system to ensure that it is functioning correctly and efficiently.
By following these tips and recommendations, you can create a reliable and efficient RV solar wiring diagram with inverter and battery that meets your specific energy requirements and provides you with years of trouble-free service.


