“Wiring diagram for RV solar setup with battery bank”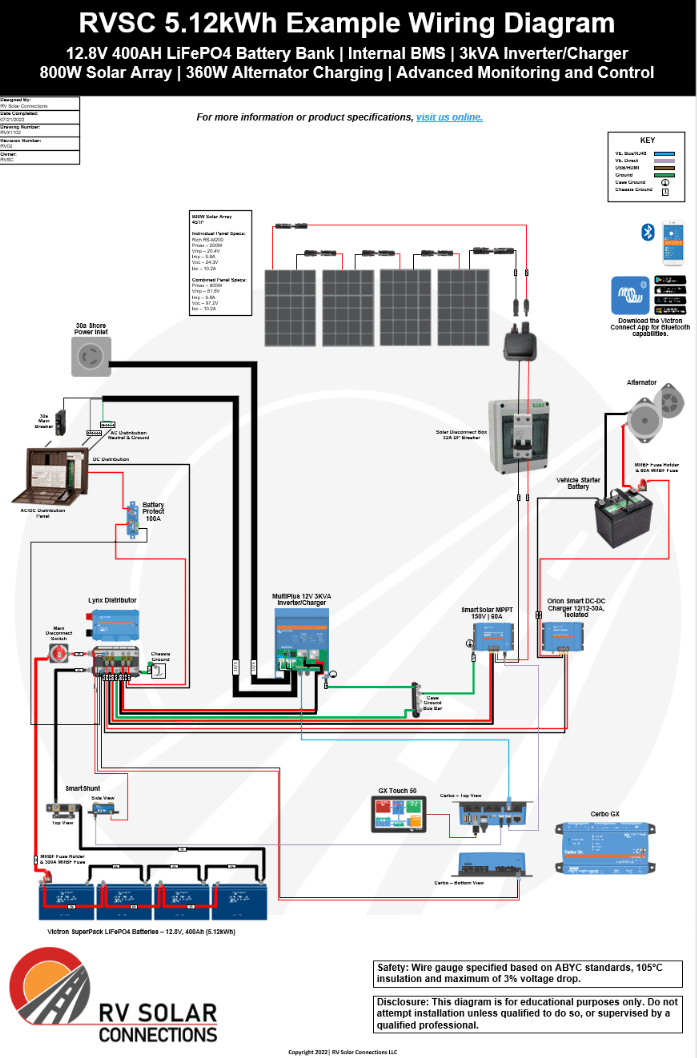
A well-designed RV solar setup with a battery bank can provide a reliable and sustainable source of power for your home on wheels. In this article, we will provide a detailed wiring diagram for an RV solar setup with a battery bank, helping you to understand the components and connections involved.
Introduction to RV Solar Setup
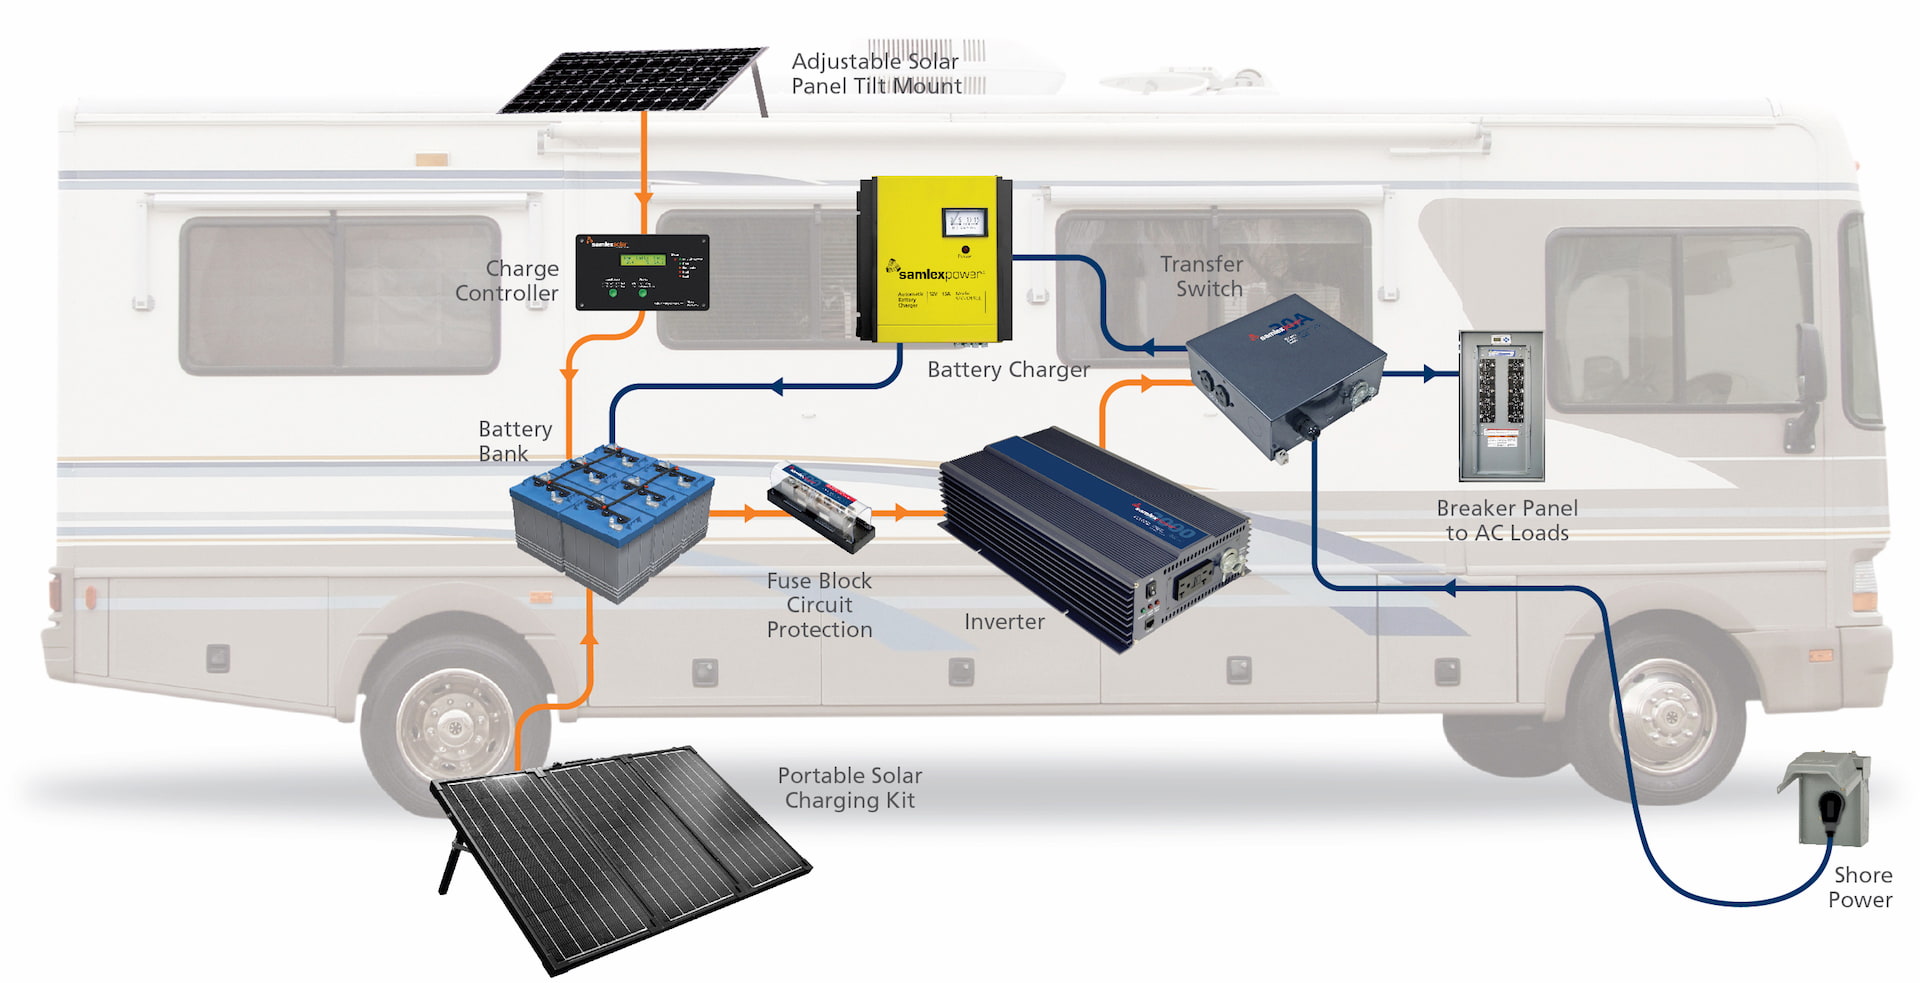
An RV solar setup typically consists of solar panels, a charge controller, a battery bank, and an inverter/charger. The solar panels generate electricity from sunlight, which is then stored in the battery bank through the charge controller. The inverter/charger converts the DC power from the battery bank to AC power, which can be used to power your RV’s appliances.
Components of RV Solar Setup
Before we dive into the wiring diagram, let’s take a closer look at the components involved:
- Solar Panels: These are the backbone of your RV solar setup, responsible for generating electricity from sunlight. The number and size of solar panels will depend on your energy requirements and the space available on your RV’s roof.
- Charge Controller: This device regulates the flow of energy from the solar panels to the battery bank, preventing overcharging and ensuring the batteries are charged efficiently.
- Battery Bank: This is the heart of your RV solar setup, providing a storage system for the energy generated by the solar panels. The battery bank can be made up of multiple batteries connected in series and parallel to provide the required voltage and capacity.
- Inverter/Charger: This device converts the DC power from the battery bank to AC power, which can be used to power your RV’s appliances. It also charges the battery bank from an external power source, such as a generator or shore power.
Wiring Diagram for RV Solar Setup
Now that we have covered the components involved, let’s take a look at the wiring diagram for an RV solar setup with a battery bank:
Solar Panel Wiring
- Connect the positive terminal of each solar panel to the positive terminal of the next panel, creating a series connection.
- Connect the negative terminal of each solar panel to the negative terminal of the next panel, creating a series connection.
- Connect the final positive terminal of the solar panel array to the positive input of the charge controller.
- Connect the final negative terminal of the solar panel array to the negative input of the charge controller.

Charge Controller Wiring

- Connect the positive output of the charge controller to the positive terminal of the battery bank.
- Connect the negative output of the charge controller to the negative terminal of the battery bank.
- Connect the remote temperature sensor (if equipped) to the charge controller, following the manufacturer’s instructions.
Battery Bank Wiring
- Connect the positive terminal of each battery to the positive terminal of the next battery, creating a series connection.
- Connect the negative terminal of each battery to the negative terminal of the next battery, creating a series connection.
- Connect the final positive terminal of the battery bank to the positive input of the inverter/charger.
- Connect the final negative terminal of the battery bank to the negative input of the inverter/charger.
Inverter/Charger Wiring
- Connect the positive output of the inverter/charger to the positive terminal of the AC distribution panel.
- Connect the negative output of the inverter/charger to the negative terminal of the AC distribution panel.
- Connect the remote control panel (if equipped) to the inverter/charger, following the manufacturer’s instructions.
Grounding and Bonding
- Connect the negative terminal of the battery bank to the RV’s chassis, creating a grounding point.
- Connect the grounding point to the AC distribution panel, ensuring a safe and reliable connection.
- Bond all metal components, such as the solar panel frames and the RV’s chassis, to the grounding point.
Safety Considerations
When designing and installing an RV solar setup, safety should be your top priority. Ensure that:
- All electrical connections are secure and meet the manufacturer’s specifications.
- The solar panel array is installed in a well-ventilated area, away from any combustible materials.
- The battery bank is installed in a well-ventilated area, away from any heat sources.
- The inverter/charger is installed in a dry and cool area, away from any direct sunlight.
Conclusion
In conclusion, a well-designed RV solar setup with a battery bank can provide a reliable and sustainable source of power for your home on wheels. By following the wiring diagram outlined in this article, you can ensure a safe and efficient connection between the various components. Remember to always follow the manufacturer’s instructions and take necessary safety precautions when designing and installing your RV solar setup.
Additional Tips and Recommendations
- Always use high-quality components and follow the manufacturer’s instructions for installation and maintenance.
- Monitor your RV solar setup regularly to ensure it is operating efficiently and safely.
- Consider installing a remote monitoring system to track your solar setup’s performance and receive alerts in case of any issues.
- Keep your RV solar setup well-maintained by cleaning the solar panels and battery terminals regularly.
Frequently Asked Questions
Q: What is the minimum number of solar panels required for an RV solar setup?
A: The minimum number of solar panels required will depend on your energy requirements and the space available on your RV’s roof. A typical RV solar setup requires at least 200-400 watts of solar panels.
Q: Can I use a single battery for my RV solar setup?
A: While it is possible to use a single battery, it is recommended to use a battery bank with multiple batteries connected in series and parallel to provide the required voltage and capacity.
Q: What is the difference between a charge controller and an inverter/charger?
A: A charge controller regulates the flow of energy from the solar panels to the battery bank, while an inverter/charger converts the DC power from the battery bank to AC power and charges the battery bank from an external power source.
By following the guidelines outlined in this article, you can create a safe and efficient RV solar setup with a battery bank, providing you with a reliable source of power for your home on wheels. Happy camping!