“How to connect solar panels to a camper battery bank?”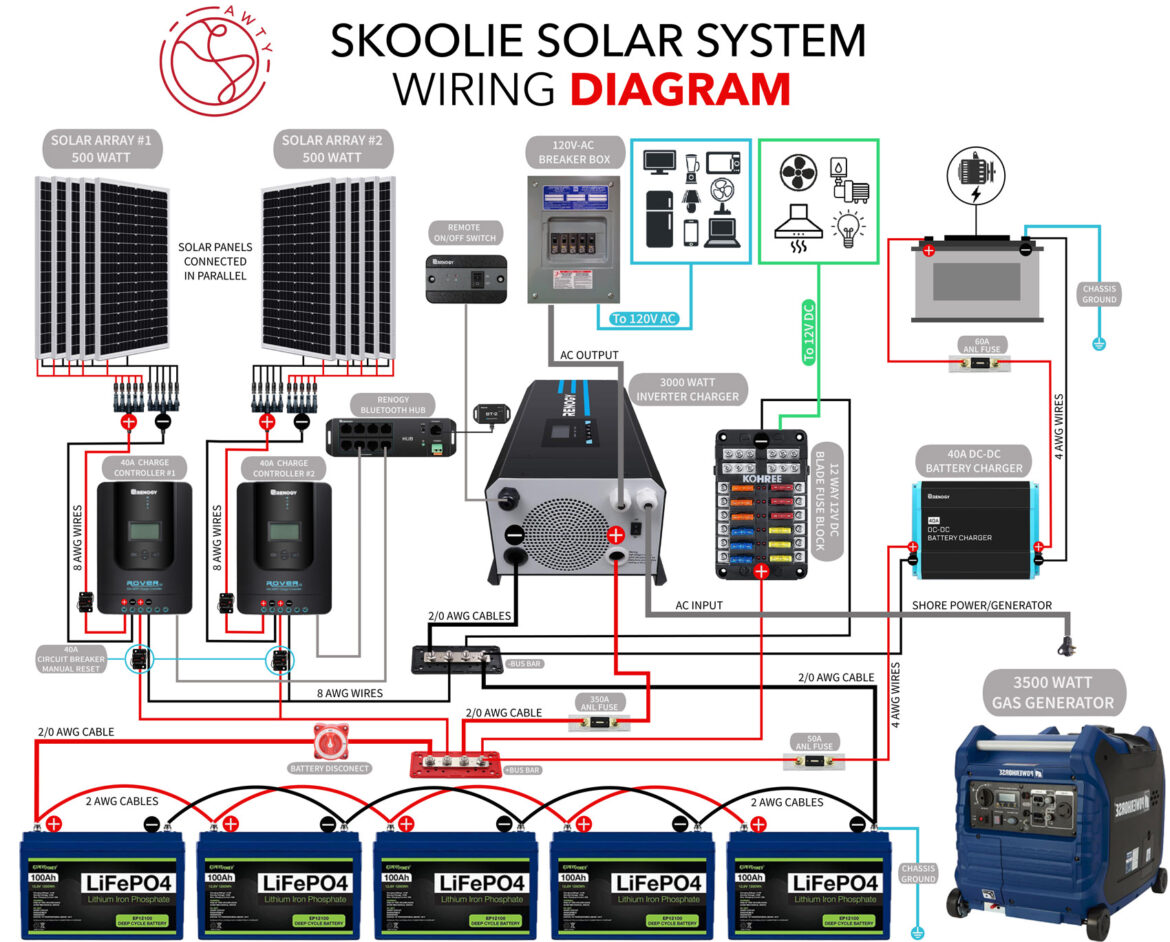
Connecting solar panels to a camper battery bank is a great way to harness the sun’s energy and keep your batteries charged while on the go. In this article, we’ll walk you through the process of connecting solar panels to a camper battery bank, covering the necessary components, safety precautions, and step-by-step instructions.
Introduction to Solar Power and Camper Battery Banks
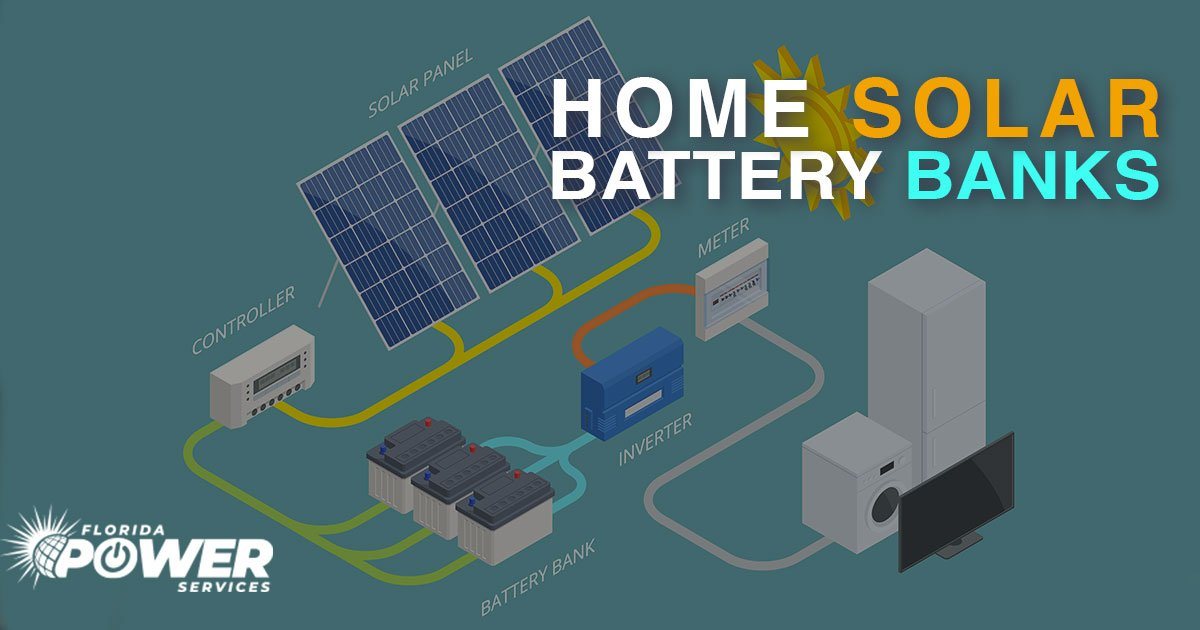
Before we dive into the connection process, it’s essential to understand the basics of solar power and camper battery banks. Solar panels convert sunlight into electrical energy, which is then stored in a battery bank. The battery bank provides power to your camper’s electrical systems, such as lights, appliances, and devices. A typical camper battery bank consists of deep cycle batteries, designed to handle repeated discharge and recharge cycles.
Components Needed
To connect solar panels to a camper battery bank, you’ll need the following components:
- Solar Panels: Choose the right solar panels for your camper, considering factors like wattage, voltage, and size. Ensure they are compatible with your battery bank’s voltage and capacity.
- Charge Controller: A charge controller regulates the flow of energy from the solar panels to the battery bank, preventing overcharging and damage.
- Battery Bank: A deep cycle battery bank is essential for storing energy generated by the solar panels.
- Wiring and Connectors: Use high-quality, UV-resistant wiring and connectors to connect the solar panels, charge controller, and battery bank.
- Mounting Hardware: Secure the solar panels to your camper’s roof or a suitable location using mounting hardware.
- Monitoring System: Consider installing a monitoring system to track your solar panel’s performance, battery bank state of charge, and energy usage.
Safety Precautions
When working with electrical systems, it’s crucial to follow safety guidelines to avoid injury or damage:
- Disconnect the Battery Bank: Before starting the installation, disconnect the battery bank to prevent any accidental short circuits or electrical shocks.
- Use Personal Protective Equipment: Wear protective gear, such as gloves, safety glasses, and a hat, when working with electrical systems.
- Follow Proper Wiring Techniques: Ensure all wiring is properly sized, insulated, and secured to prevent electrical shock or fire hazards.
- Grounding: Properly ground the solar panel system to prevent electrical shock and ensure safe operation.


Step-by-Step Instructions
Now that we’ve covered the essential components and safety precautions, let’s move on to the step-by-step instructions for connecting solar panels to a camper battery bank:
Step 1: Prepare the Solar Panel Mounting Location
- Choose a Location: Select a suitable location for the solar panels, considering factors like sunlight exposure, wind direction, and roof obstructions.
- Clean the Surface: Clean the surface where the solar panels will be mounted to ensure a secure and watertight seal.
- Apply Mounting Hardware: Use mounting hardware to secure the solar panels to the roof or chosen location.
Step 2: Connect the Solar Panels to the Charge Controller
- Connect the Solar Panel Wiring: Connect the solar panel wiring to the charge controller, following the manufacturer’s instructions.
- Set the Charge Controller Parameters: Configure the charge controller parameters, such as voltage, current, and charging mode, according to the manufacturer’s guidelines.
- Connect the Charge Controller to the Battery Bank: Connect the charge controller to the battery bank, ensuring the correct polarity and wiring configuration.
Step 3: Connect the Battery Bank to the Camper’s Electrical System
- Connect the Battery Bank to the Camper’s Electrical Panel: Connect the battery bank to the camper’s electrical panel, following the manufacturer’s instructions.
- Configure the Electrical Panel: Configure the electrical panel to recognize the solar panel system and battery bank, allowing for efficient energy management.
Step 4: Install a Monitoring System (Optional)
- Choose a Monitoring System: Select a suitable monitoring system to track your solar panel’s performance, battery bank state of charge, and energy usage.
- Install the Monitoring System: Install the monitoring system according to the manufacturer’s instructions, ensuring correct wiring and configuration.
Step 5: Test the System
- Test the Solar Panel System: Test the solar panel system to ensure it’s generating energy and charging the battery bank.
- Monitor the System Performance: Monitor the system’s performance, adjusting parameters as needed to optimize energy production and battery bank efficiency.
Tips and Considerations
To ensure a successful and efficient solar panel installation, keep the following tips and considerations in mind:
- Battery Bank Sizing: Ensure the battery bank is sized correctly to handle the energy generated by the solar panels.
- Charge Controller Selection: Choose a charge controller that matches the solar panel’s voltage and current output.
- Wiring and Connector Quality: Use high-quality wiring and connectors to prevent electrical shock, fire hazards, and energy losses.
- Maintenance and Inspection: Regularly inspect and maintain the solar panel system to ensure optimal performance and extend its lifespan.
Conclusion
Connecting solar panels to a camper battery bank is a straightforward process that requires careful planning, attention to safety, and proper installation. By following the steps outlined in this article, you’ll be able to harness the sun’s energy and enjoy the benefits of a reliable, renewable power source while on the go. Remember to consider factors like battery bank sizing, charge controller selection, and wiring quality to ensure an efficient and safe solar panel system. With the right knowledge and equipment, you’ll be well on your way to enjoying the freedom and convenience of solar-powered camping.