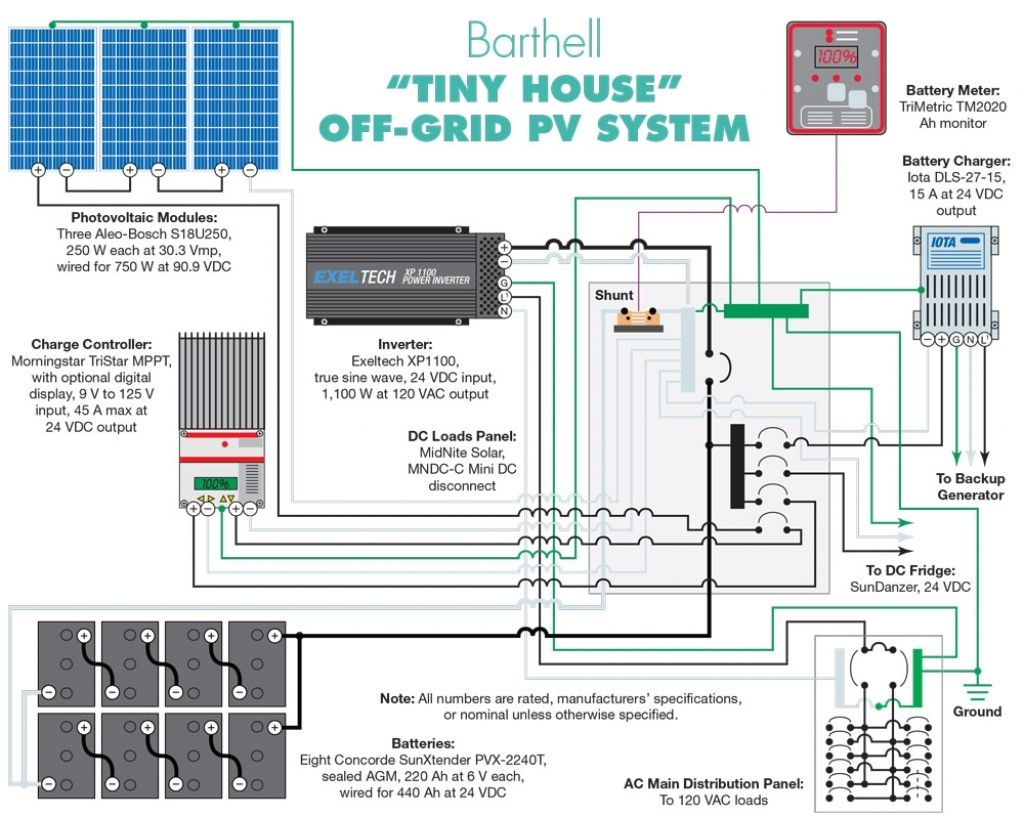
“Complete solar panel wiring with backup generator and battery”
With the cost of solar panels decreasing and their efficiency increasing, it’s no wonder that many are turning to the sun for their energy needs. However, solar panels can be intermittent, and inclement weather can affect their output. That’s why a complete solar panel wiring system with a backup generator and battery is essential to ensure a stable and reliable energy supply.
In this article, we’ll provide a comprehensive guide on complete solar panel wiring with a backup generator and battery. We’ll cover the basics of solar panel wiring, the benefits of a backup generator and battery, and provide a step-by-step guide on how to install a complete solar panel wiring system.
Understanding Solar Panel Wiring
Before we dive into the details of a complete solar panel wiring system, it’s essential to understand the basics of solar panel wiring. A solar panel system consists of several components, including:
- Solar Panels: These are the photovoltaic (PV) panels that convert sunlight into electrical energy.
- Inverter: This component converts the DC power generated by the solar panels into AC power, which is usable in homes and businesses.
- Charge Controller: This device regulates the flow of energy from the solar panels to the battery bank.
- Battery Bank: This is a group of deep cycle batteries that store excess energy generated by the solar panels for later use.
- Mounting System: This is the hardware used to secure the solar panels to the roof or ground.
Benefits of a Backup Generator and Battery
A backup generator and battery are essential components of a complete solar panel wiring system. Here are some benefits of including these components:
- Reliable Energy Supply: A backup generator ensures that you have a reliable energy supply, even during periods of inclement weather or when the solar panels are not generating enough energy.
- Uninterruptible Power: A battery bank provides uninterruptible power, ensuring that your appliances and devices remain operational, even during power outages.
- Energy Storage: A battery bank allows you to store excess energy generated by the solar panels during the day for use at night or during periods of low energy generation.
- Reduced Energy Costs: A backup generator and battery can help reduce your energy costs by providing a reliable and efficient energy supply.
Components of a Complete Solar Panel Wiring System
A complete solar panel wiring system with a backup generator and battery consists of the following components:
- Solar Panel Array: This is the group of solar panels that generate electrical energy.
- Inverter/Charger: This component converts the DC power generated by the solar panels into AC power and also charges the battery bank.
- Charge Controller: This device regulates the flow of energy from the solar panels to the battery bank.
- Battery Bank: This is a group of deep cycle batteries that store excess energy generated by the solar panels for later use.
- Backup Generator: This is a fossil fuel-powered generator that provides a reliable energy supply during periods of low energy generation.
- Transfer Switch: This component automatically transfers the energy supply from the solar panels to the backup generator during periods of low energy generation.
- Wiring and Connectors: These are the components that connect the various parts of the system together.
Step-by-Step Guide to Installing a Complete Solar Panel Wiring System
Installing a complete solar panel wiring system with a backup generator and battery requires careful planning and execution. Here’s a step-by-step guide to help you get started:
Step 1: Plan Your System
- Determine your energy needs and the size of the solar panel array required to meet those needs.
- Choose a suitable location for the solar panel array, taking into account factors such as sunlight, wind, and accessibility.
- Select a suitable backup generator and battery bank to meet your energy needs.
Step 2: Install the Solar Panel Array
- Install the solar panel array, ensuring that it is securely mounted and oriented to maximize energy generation.
- Connect the solar panels to the inverter/charger, following the manufacturer’s instructions.
Step 3: Install the Inverter/Charger and Charge Controller
- Install the inverter/charger, following the manufacturer’s instructions.
- Connect the charge controller to the solar panels and the battery bank.
Step 4: Install the Battery Bank
- Install the battery bank, ensuring that it is securely mounted and protected from the elements.
- Connect the battery bank to the inverter/charger and charge controller.
Step 5: Install the Backup Generator
- Install the backup generator, following the manufacturer’s instructions.
- Connect the backup generator to the transfer switch.
Step 6: Install the Transfer Switch
- Install the transfer switch, following the manufacturer’s instructions.
- Connect the transfer switch to the solar panel array and the backup generator.
Step 7: Connect the Wiring and Connectors
- Connect the wiring and connectors, following the manufacturer’s instructions.
- Ensure that all connections are secure and meet local electrical codes.
Step 8: Test the System
- Test the system, ensuring that it is operating correctly and efficiently.
- Monitor the system’s performance, making adjustments as needed.
Conclusion
A complete solar panel wiring system with a backup generator and battery is a reliable and efficient way to meet your energy needs. By following the steps outlined in this guide, you can install a system that provides a stable and reliable energy supply, even during periods of inclement weather or low energy generation. Remember to always follow local electrical codes and safety guidelines when installing a solar panel wiring system. With the right system in place, you can enjoy the benefits of solar power while minimizing your reliance on the grid.


