“Wiring diagram and guide for home solar system”
They are typically made of silicon and are arranged in a grid-like pattern to maximize energy production.
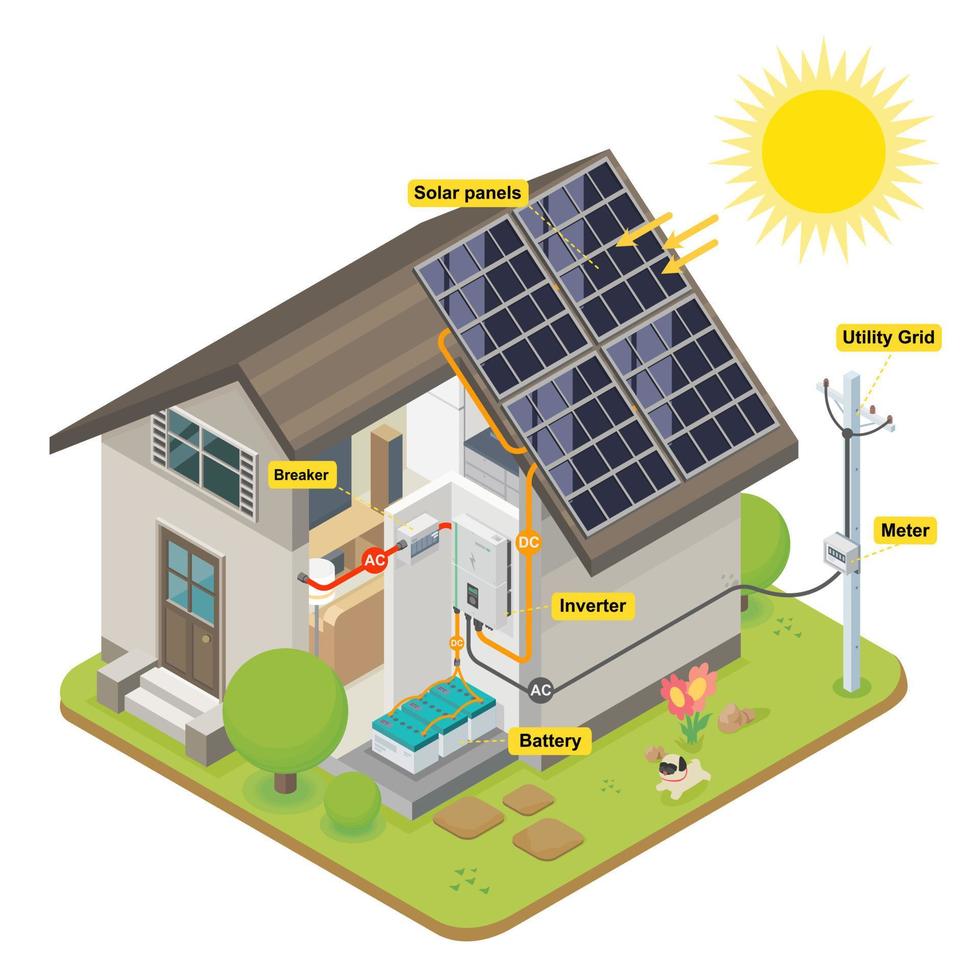
Wiring Diagram Components
A wiring diagram for a home solar system includes the following components:
- Solar Panel Connectors: These are the connectors that link the solar panels to the rest of the system.
- Inverter Connectors: These connect the inverter to the solar panels and the AC panel.
- Grounding System: This includes the grounding rods and wires that protect the system from electrical shock and ensure safe operation.
- Fuses and Circuit Breakers: These devices protect the system from electrical overloads and surges.
- Wire and Cables: These are the conductors that carry electrical energy between the various components.
Safety Considerations
When installing a home solar system, safety is the top priority. The following safety considerations must be taken into account:
- Electrical Shock: The system must be designed to prevent electrical shock, which can occur when a person comes into contact with a live electrical conductor.
- Fire Hazard: The system must be designed to prevent fires, which can occur when electrical energy is not properly managed.
- Grounding: The system must be properly grounded to prevent electrical shock and ensure safe operation.
- Overcurrent Protection: The system must be designed to protect against overcurrent conditions, which can occur when the system is subjected to excessive electrical energy.

Step-by-Step Installation Instructions
Installing a home solar system requires careful planning and attention to detail. The following steps provide a general guide for installing a home solar system:
Step 1: Plan the System
- Determine the size of the system based on the home’s energy needs and the available space for the solar panels.
- Choose the components, including the solar panels, inverter, mounting system, charge controller, battery bank, and AC panel.
- Create a wiring diagram that includes all the necessary components and connections.
Step 2: Install the Solar Panels
- Mount the solar panels to the roof or ground using the mounting system.
- Connect the solar panels to the inverter using the solar panel connectors.
- Ensure that the solar panels are properly secured and aligned to maximize energy production.
Step 3: Install the Inverter
- Mount the inverter to a wall or floor, depending on the manufacturer’s instructions.
- Connect the inverter to the solar panels and the AC panel using the inverter connectors.
- Ensure that the inverter is properly configured and programmed to operate efficiently.
Step 4: Install the Mounting System
- Mount the racks and brackets to the roof or ground using the mounting system.
- Secure the solar panels to the mounting system, ensuring that they are properly aligned and spaced.
- Ensure that the mounting system is sturdy and can support the weight of the solar panels.
Step 5: Install the Charge Controller
- Mount the charge controller to a wall or floor, depending on the manufacturer’s instructions.
- Connect the charge controller to the solar panels and the battery bank using the charge controller connectors.
- Ensure that the charge controller is properly configured and programmed to regulate the flow of energy.
Step 6: Install the Battery Bank
- Mount the battery bank to a wall or floor, depending on the manufacturer’s instructions.
- Connect the battery bank to the charge controller and the inverter using the battery bank connectors.
- Ensure that the battery bank is properly configured and programmed to store excess energy.
Step 7: Install the AC Panel
- Mount the AC panel to a wall or floor, depending on the manufacturer’s instructions.
- Connect the AC panel to the inverter and the home’s electrical system using the AC panel connectors.
- Ensure that the AC panel is properly configured and programmed to distribute AC power to the home.
Conclusion
Installing a home solar system requires careful planning and attention to detail. A wiring diagram is a critical component of the system, ensuring that the system is installed safely and efficiently. By following the steps outlined in this guide, homeowners can ensure that their home solar system is installed correctly and operates efficiently. Remember to always follow safety guidelines and consult with a professional if you are unsure about any aspect of the installation process. With a properly installed home solar system, homeowners can enjoy the benefits of renewable energy and reduce their carbon footprint.
Additional Resources
For more information on home solar systems and wiring diagrams, the following resources are recommended:
- National Electric Code (NEC): This is the standard for electrical safety in the United States, and it provides guidelines for installing electrical systems, including home solar systems.
- International Association of Electrical Inspectors (IAEI): This organization provides training and resources for electrical inspectors and installers, including information on home solar systems and wiring diagrams.
- Solar Energy Industries Association (SEIA): This organization provides information and resources on solar energy, including home solar systems and wiring diagrams.
- Local Electrical Inspectors: These individuals can provide guidance on local electrical codes and regulations, as well as inspect the system to ensure that it is installed correctly and safely.
By following the guidelines outlined in this article and consulting with the resources listed above, homeowners can ensure that their home solar system is installed safely and efficiently, providing them with years of renewable energy and savings on their energy bills.


