“Step-by-step solar power system wiring for home”
However, installing a solar power system can be a complex process, and one of the most critical aspects is the wiring. In this article, we will provide a step-by-step guide on how to wire a solar power system for your home.
Introduction to Solar Power Systems
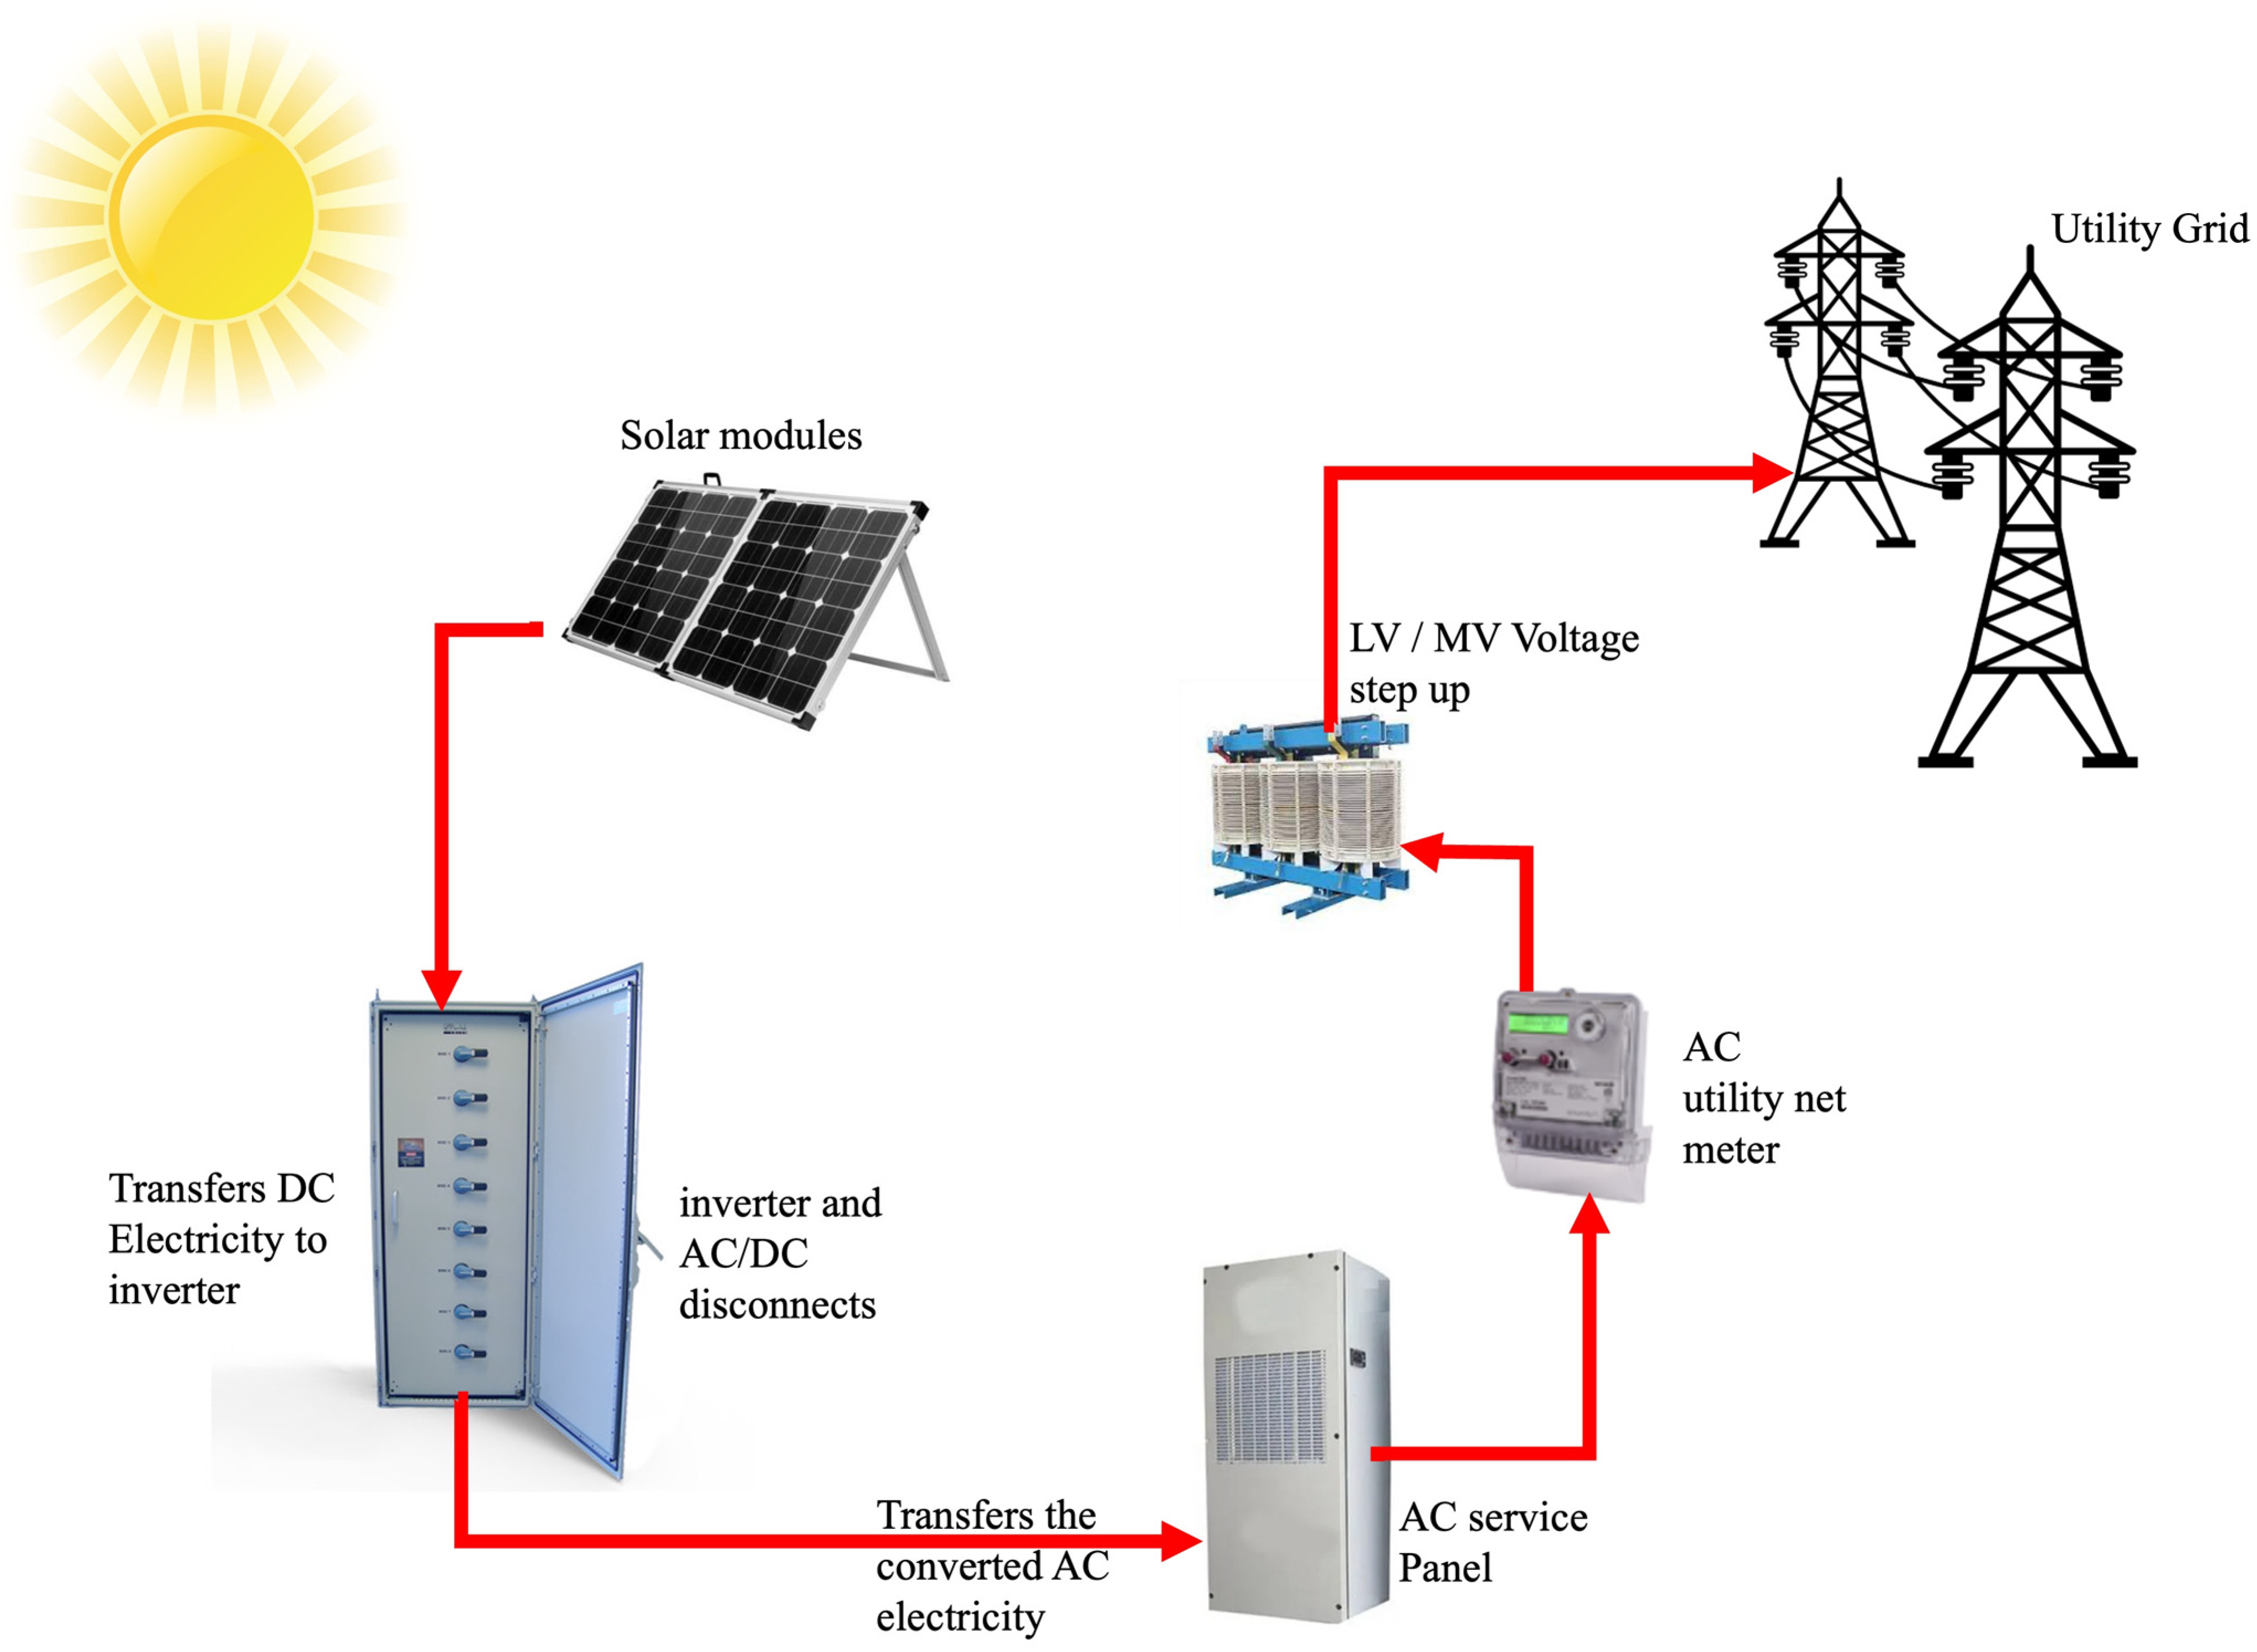
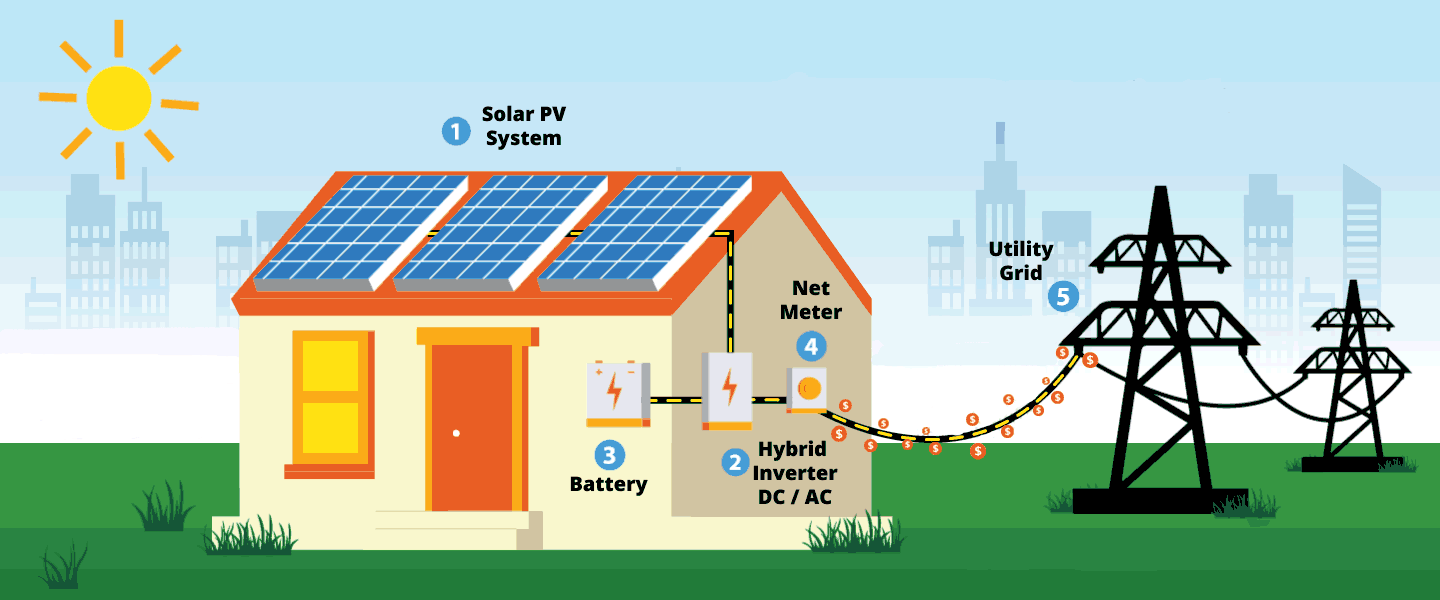
Before we dive into the wiring process, let’s take a brief look at the components of a solar power system. A typical solar power system consists of:
- Solar Panels: These are the photovoltaic (PV) panels that convert sunlight into electrical energy.
- Charge Controller: This device regulates the flow of energy from the solar panels to the battery bank.
- Battery Bank: This is a collection of deep cycle batteries that store excess energy generated by the solar panels for later use.
- Inverter: This device converts the DC power from the battery bank or solar panels into AC power, which is usable in your home.
- Mounting System: This includes the racks and clamps that secure the solar panels to your roof or ground mount.
Wiring Considerations
Before starting the wiring process, it’s essential to consider a few factors to ensure a safe and efficient system:
- System Voltage: Determine the voltage of your system, which is typically 12V, 24V, or 48V.
- System Size: Calculate the total wattage of your system to determine the required wire size and circuit breakers.
- Circuit Protection: Ensure that your system has adequate circuit protection, including fuses and circuit breakers, to prevent damage from overloads or short circuits.
- Grounding: Ensure that your system is properly grounded to prevent electrical shock and equipment damage.
Step-by-Step Wiring Guide
Now that we’ve covered the basics, let’s move on to the step-by-step wiring guide:
Step 1: Connect the Solar Panels
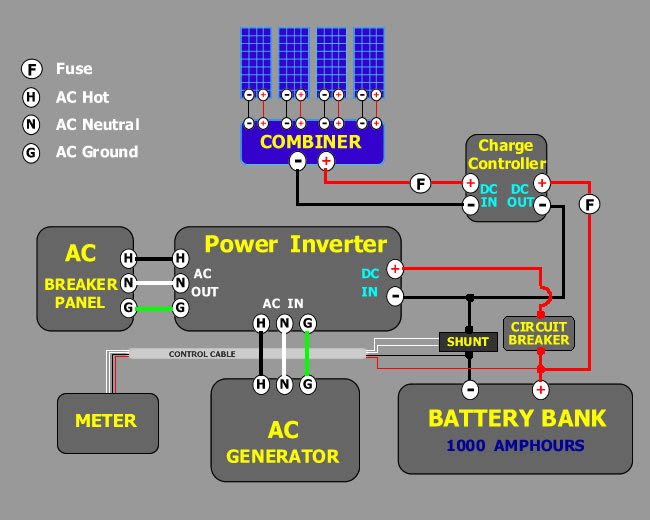
- Begin by connecting the solar panels to the charge controller. Ensure that the panels are securely fastened to the mounting system.
- Use MC4 connectors or equivalent to connect the panels to the charge controller. These connectors are designed for outdoor use and can withstand the elements.
- Connect the positive (red) wire from the solar panel to the positive terminal on the charge controller.
- Connect the negative (black) wire from the solar panel to the negative terminal on the charge controller.
Step 2: Connect the Charge Controller to the Battery Bank
- Connect the output of the charge controller to the battery bank.
- Use a pair of AWG 10 or 12 wires to connect the charge controller to the battery bank. These wires should be long enough to reach from the charge controller to the battery bank.
- Connect the positive (red) wire from the charge controller to the positive terminal on the battery bank.
- Connect the negative (black) wire from the charge controller to the negative terminal on the battery bank.
Step 3: Connect the Battery Bank to the Inverter
- Connect the output of the battery bank to the inverter.
- Use a pair of AWG 10 or 12 wires to connect the battery bank to the inverter. These wires should be long enough to reach from the battery bank to the inverter.
- Connect the positive (red) wire from the battery bank to the positive terminal on the inverter.
- Connect the negative (black) wire from the battery bank to the negative terminal on the inverter.
Step 4: Connect the Inverter to the Load Center
- Connect the output of the inverter to the load center.
- Use a pair of AWG 10 or 12 wires to connect the inverter to the load center. These wires should be long enough to reach from the inverter to the load center.
- Connect the positive (red) wire from the inverter to the positive terminal on the load center.
- Connect the negative (black) wire from the inverter to the negative terminal on the load center.
Step 5: Connect the Grounding System
- Connect the grounding system to the solar panel frames, the mounting system, and the equipment enclosures.
- Use a pair of AWG 10 or 12 wires to connect the grounding system to the solar panel frames and the mounting system.
- Connect the grounding wire to the equipment enclosures, such as the charge controller and inverter.
Step 6: Test the System
- Test the system to ensure that it’s functioning correctly.
- Use a multimeter to measure the voltage and current output of the solar panels, charge controller, and inverter.
- Check the system for any signs of damage or malfunction, such as overheating, burning smells, or unusual noises.
Conclusion
Wiring a solar power system for your home can be a complex process, but with the right guidance, you can ensure a safe and efficient system. By following the steps outlined in this guide, you can connect your solar panels, charge controller, battery bank, inverter, and load center to create a functional solar power system. Remember to always follow safety guidelines and consult local electrical codes and regulations to ensure compliance. With a well-designed and properly installed solar power system, you can enjoy the benefits of renewable energy and reduce your reliance on fossil fuels.
Additional Tips and Recommendations
- Hire a Professional: If you’re not experienced in electrical work, consider hiring a professional to install and wire your solar power system.
- Use High-Quality Components: Use high-quality components, such as solar panels, charge controllers, and inverters, to ensure a reliable and efficient system.
- Monitor Your System: Monitor your system regularly to ensure that it’s functioning correctly and to identify any potential issues.
- Perform Regular Maintenance: Perform regular maintenance, such as cleaning the solar panels and checking the battery bank, to ensure optimal system performance.
By following these tips and recommendations, you can enjoy a safe, efficient, and reliable solar power system that provides you with clean and renewable energy for years to come.