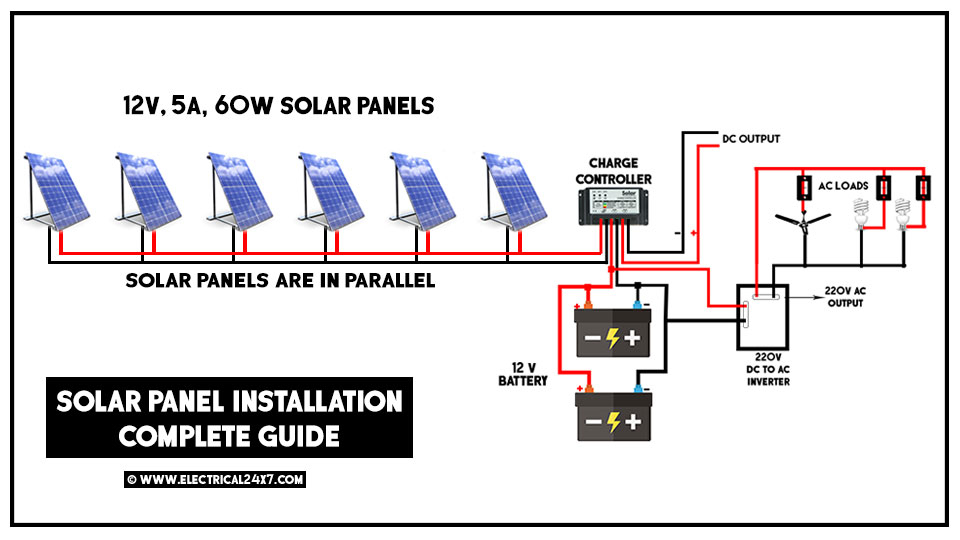
“Step-by-step solar panel wiring for home installation”
While the benefits of solar panel installation are undeniable, the process of wiring the panels can seem daunting, especially for those without prior experience in electrical work. In this article, we will walk you through the step-by-step process of solar panel wiring for home installation, providing you with the knowledge and confidence to tackle this project yourself.
Pre-Installation Checklist
Before we dive into the wiring process, it’s essential to ensure that you have completed the necessary pre-installation steps. These include:
- Assessing your energy needs: Calculate your energy requirements to determine the size of the solar panel system you need.
- Choosing the right equipment: Select high-quality solar panels, an inverter, mounting hardware, and wiring components that meet your energy needs and local regulations.
- Ensuring compliance with local regulations: Familiarize yourself with local building codes, permits, and electrical standards.
- Preparing your roof: Ensure your roof is structurally sound, clean, and free of debris.
Tools and Materials Needed
To complete the wiring process, you will need the following tools and materials:

- Solar panels: The number of panels will depend on your energy needs and the size of your system.
- Inverter: Converts DC power from the solar panels to AC power for your home.
- Mounting hardware: Includes brackets, clamps, and screws to secure the panels to your roof.
- Wiring components: Includes wire, connectors, and junction boxes.
- Electrical test equipment: Includes a multimeter, wire strippers, and pliers.
- Personal protective equipment: Includes safety glasses, gloves, and a ladder.

Step 1: Plan Your Wiring Layout
Before you begin wiring, it’s essential to plan your layout to ensure a safe and efficient installation. Consider the following factors:

- Panel placement: Determine the optimal placement of your solar panels to maximize energy production.
- Inverter location: Choose a location for your inverter that is easily accessible and protected from the elements.
- Wiring routes: Plan the most efficient routes for your wiring to minimize losses and reduce the risk of electrical shock.
- Grounding and bonding: Ensure that your system is properly grounded and bonded to prevent electrical shock and equipment damage.
Step 2: Connect the Solar Panels
To connect the solar panels, follow these steps:
- Identify the positive and negative terminals: Locate the positive and negative terminals on each solar panel.
- Connect the panels in series: Connect the positive terminal of one panel to the negative terminal of the next panel, and so on.
- Use connectors and wire: Use connectors and wire to connect the panels, ensuring a secure and waterproof connection.
- Test the panel connections: Use a multimeter to test the connections and ensure they are secure.
Step 3: Connect the Inverter
To connect the inverter, follow these steps:
- Locate the inverter input terminals: Identify the input terminals on the inverter.
- Connect the solar panel array: Connect the solar panel array to the inverter input terminals.
- Connect the inverter output terminals: Connect the inverter output terminals to your home’s electrical panel.
- Configure the inverter settings: Configure the inverter settings according to the manufacturer’s instructions.
Step 4: Connect the Grounding and Bonding System
To connect the grounding and bonding system, follow these steps:
- Identify the grounding point: Locate the grounding point on your electrical panel.
- Connect the grounding wire: Connect the grounding wire from the solar panel array to the grounding point.
- Bond the equipment: Bond the equipment, including the solar panels, inverter, and mounting hardware, to the grounding system.
- Test the grounding system: Use a multimeter to test the grounding system and ensure it is functioning correctly.
Step 5: Connect the Wiring to the Electrical Panel
To connect the wiring to the electrical panel, follow these steps:
- Locate the electrical panel: Identify the electrical panel in your home.
- Connect the inverter output: Connect the inverter output to the electrical panel.
- Connect the grounding wire: Connect the grounding wire from the solar panel array to the electrical panel.
- Test the connections: Use a multimeter to test the connections and ensure they are secure.
Step 6: Test the System
To test the system, follow these steps:
- Turn on the system: Turn on the solar panel system and inverter.
- Monitor the system performance: Monitor the system performance using the inverter’s display or a monitoring system.
- Check for errors: Check for errors or warnings on the inverter’s display or monitoring system.
- Test the electrical output: Test the electrical output of the system using a multimeter.
Conclusion
Solar panel wiring for home installation can seem like a daunting task, but with the right tools, materials, and knowledge, it can be a rewarding and cost-effective project. By following the step-by-step guide outlined in this article, you can ensure a safe and efficient installation that meets your energy needs and local regulations. Remember to always follow safety guidelines and best practices when working with electrical systems, and consider consulting a professional if you are unsure about any aspect of the installation process.
Additional Tips and Considerations
- Regular maintenance: Regularly inspect and maintain your solar panel system to ensure optimal performance and extend its lifespan.
- Monitoring and troubleshooting: Use a monitoring system to track your system’s performance and troubleshoot any issues that may arise.
- Expansion and upgrades: Consider expanding or upgrading your system in the future to meet changing energy needs or take advantage of new technologies.
- Local incentives and regulations: Familiarize yourself with local incentives and regulations that may affect your solar panel installation.
By following the steps outlined in this article and considering the tips and considerations mentioned above, you can enjoy the benefits of solar panel installation and contribute to a more sustainable future.


