“Solar wiring layout for off-grid camper setup”
With the right solar wiring layout, you can harness the power of the sun to energize your camper and enjoy a sustainable, eco-friendly adventure. In this article, we will delve into the world of solar wiring layouts, exploring the essential components, best practices, and step-by-step guides to help you create a reliable and efficient off-grid camper setup.
Introduction to Solar Power Systems
Before diving into the solar wiring layout, it’s essential to understand the basics of solar power systems. A typical solar power system consists of:
- Solar Panels: Convert sunlight into DC (direct current) electricity.
- Charge Controller: Regulates the flow of energy from the solar panels to the battery bank, preventing overcharging and damage.
- Battery Bank: Stores excess energy generated by the solar panels for later use.
- Inverter/Charger: Converts DC power from the battery bank to AC (alternating current) power for household appliances.
- Loads: The appliances and devices that consume energy, such as lights, refrigerators, and laptops.
Designing a Solar Wiring Layout
A well-designed solar wiring layout is crucial for a safe, efficient, and reliable off-grid camper setup. Here are the key considerations:
- Determine Your Energy Needs: Calculate your daily energy consumption by listing all the appliances and devices you plan to use, along with their power ratings (watts) and usage times (hours). This will help you determine the required solar panel size, battery bank capacity, and inverter/charger rating.
- Choose the Right Solar Panels: Select solar panels that meet your energy needs, considering factors such as efficiency, durability, and cost.
- Select a Suitable Charge Controller: Choose a charge controller that matches your solar panel array’s voltage and current output, as well as your battery bank’s capacity.
- Design Your Battery Bank: Determine the required battery bank capacity based on your energy needs, considering factors such as depth of discharge, cycle life, and charging efficiency.
- Plan Your Inverter/Charger: Select an inverter/charger that matches your battery bank’s voltage and capacity, as well as your load’s power requirements.
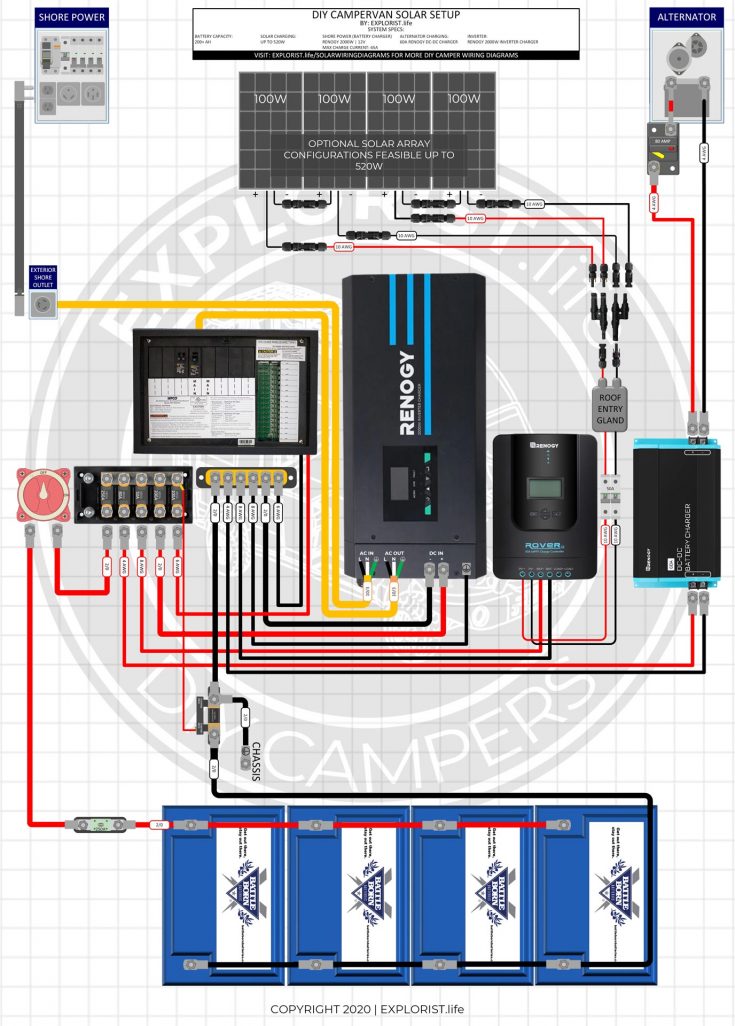
Solar Wiring Layout Components
To create a comprehensive solar wiring layout, you’ll need to consider the following components:
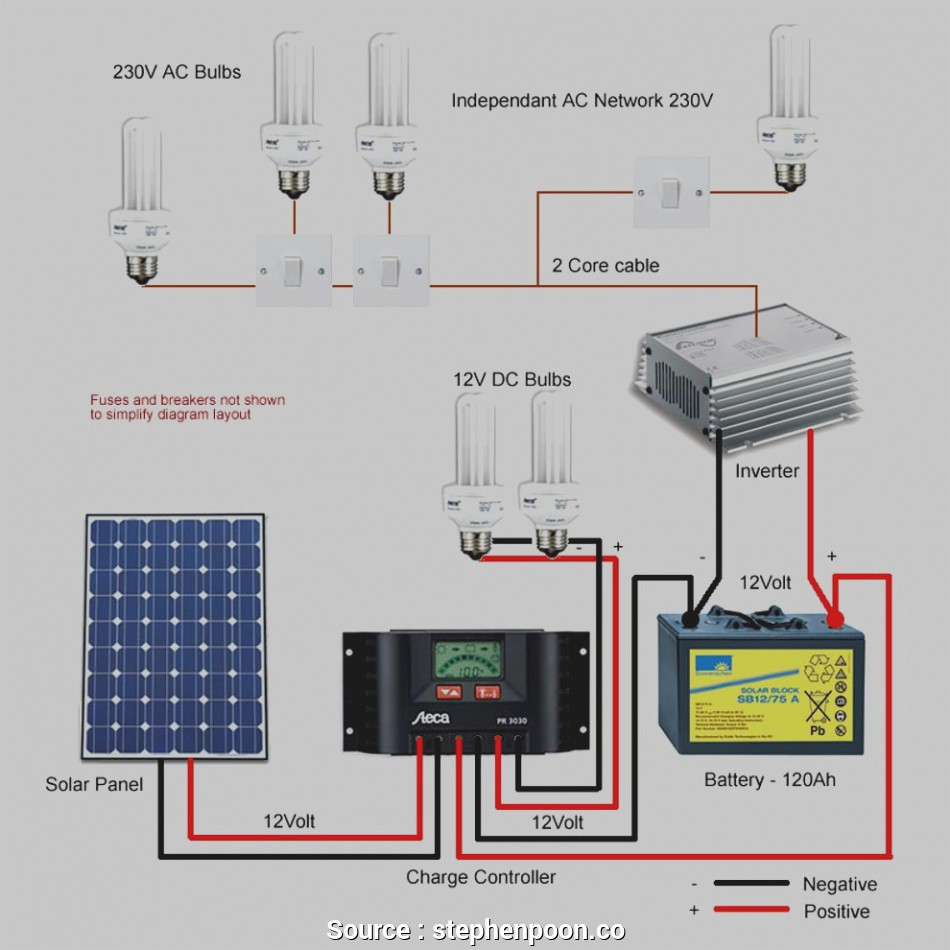
- Solar Panel Connectors: Connect solar panels to the charge controller, typically using MC4 connectors or equivalent.
- Charge Controller Connections: Connect the solar panel array to the charge controller, and the charge controller to the battery bank.
- Battery Bank Connections: Connect batteries in series and/or parallel to achieve the required voltage and capacity.
- Inverter/Charger Connections: Connect the battery bank to the inverter/charger, and the inverter/charger to the loads.
- Fuses and Circuit Breakers: Protect your system from overcurrent and short-circuit conditions.
- Wiring and Cables: Use suitable wiring and cables for connections, considering factors such as gauge, insulation, and protection.
Step-by-Step Solar Wiring Layout Guide
Here’s a step-by-step guide to creating a solar wiring layout for your off-grid camper setup:
Step 1: Connect Solar Panels
- Connect solar panels in series to achieve the required voltage (typically 12V, 24V, or 48V).
- Connect solar panels in parallel to increase the current output.
- Use solar panel connectors (MC4 or equivalent) for connections.
Step 2: Connect Charge Controller
- Connect the solar panel array to the charge controller, using the recommended connectors.
- Connect the charge controller to the battery bank, using the recommended connectors.
Step 3: Configure Battery Bank
- Connect batteries in series to achieve the required voltage (typically 12V, 24V, or 48V).
- Connect batteries in parallel to increase the capacity (Ah).
- Use battery interconnects and busbars to connect batteries.
Step 4: Connect Inverter/Charger
- Connect the battery bank to the inverter/charger, using the recommended connectors.
- Connect the inverter/charger to the loads, using the recommended connectors.
Step 5: Add Fuses and Circuit Breakers
- Install fuses or circuit breakers to protect the system from overcurrent and short-circuit conditions.
- Use suitable fuse ratings and circuit breaker settings for each component.
Step 6: Finalize Wiring and Connections
- Use suitable wiring and cables for connections, considering factors such as gauge, insulation, and protection.
- Ensure all connections are secure, clean, and protected from the elements.
Best Practices and Safety Considerations
To ensure a safe and reliable solar wiring layout, follow these best practices and safety considerations:
- Use proper wiring and connections: Avoid loose or damaged connections, and use suitable wiring and cables for each component.
- Follow manufacturer instructions: Adhere to manufacturer recommendations for each component, including charge controllers, inverters, and batteries.
- Protect against overcurrent and short-circuit conditions: Install fuses or circuit breakers to safeguard your system.
- Ensure proper grounding and bonding: Connect all components to a common grounding point, and bond metal parts to prevent electrical shock.
- Regularly inspect and maintain your system: Check for signs of wear, damage, or corrosion, and perform routine maintenance tasks to ensure optimal performance.
Conclusion
Creating a solar wiring layout for your off-grid camper setup requires careful planning, attention to detail, and adherence to best practices and safety considerations. By following this comprehensive guide, you’ll be well on your way to designing a reliable, efficient, and sustainable solar power system that meets your energy needs and enhances your off-grid adventure. Remember to always consult manufacturer instructions, follow local regulations, and seek professional help if you’re unsure about any aspect of your solar wiring layout. Happy camping!


