“Solar panel to battery bank wiring diagram for RV”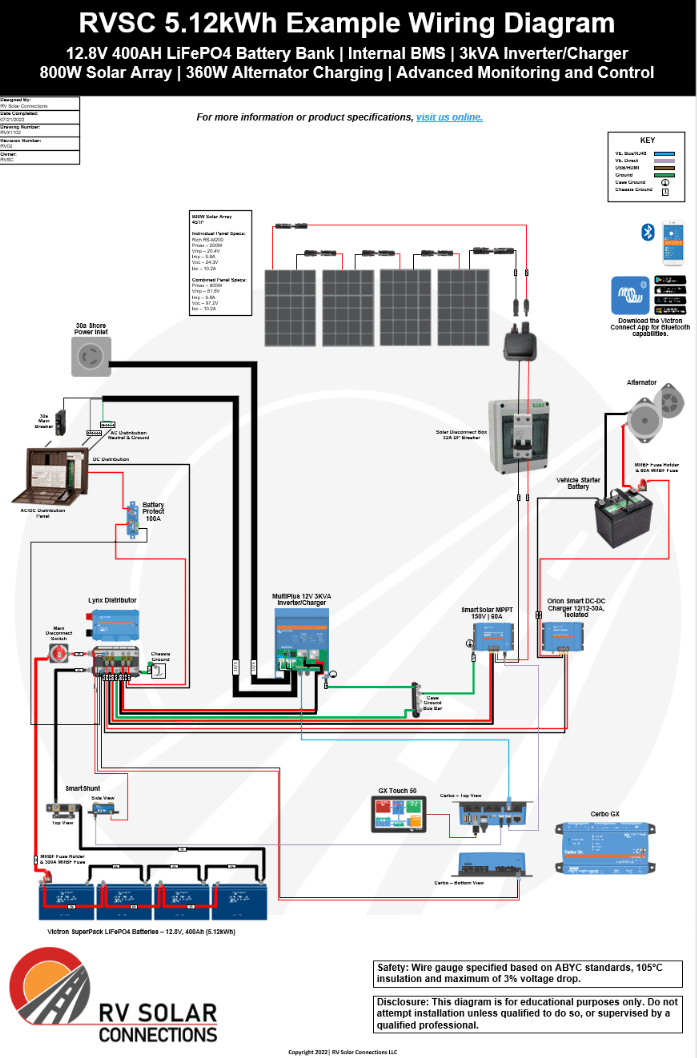
However, proper wiring is crucial to ensure safe and efficient transfer of energy from the solar panels to the battery bank. In this article, we will provide a detailed guide on creating a solar panel to battery bank wiring diagram for your RV, covering the necessary components, wiring instructions, and safety considerations.
Introduction to Solar Panel Systems for RVs
Before diving into the wiring diagram, it’s essential to understand the basic components of a solar panel system for RVs. A typical system consists of:
- Solar Panels: These are the photovoltaic (PV) panels that convert sunlight into electrical energy.
- Charge Controller: This device regulates the flow of energy from the solar panels to the battery bank, preventing overcharging and ensuring optimal charging.
- Battery Bank: This is the collection of deep cycle batteries that store excess energy generated by the solar panels for later use.
- Inverter/Charger: This component converts DC power from the battery bank to AC power for use in the RV, and also charges the battery bank from an external AC power source, such as a generator or shore power.
Components Required for the Wiring Diagram
To create a comprehensive wiring diagram, you’ll need the following components:
- Solar Panels: Choose the suitable solar panels for your RV, considering factors such as power output, size, and efficiency.
- Charge Controller: Select a charge controller that matches your solar panel array’s voltage and current output.
- Battery Bank: Determine the size and type of battery bank you need, based on your energy requirements and budget.
- Inverter/Charger: Choose an inverter/charger that matches your battery bank’s voltage and capacity.
- Wiring and Connectors: Use high-quality, UV-resistant wiring and connectors to ensure safe and reliable connections.
- Fuses and Circuit Breakers: Install fuses and circuit breakers to protect your system from overcurrent and short circuits.

Solar Panel to Battery Bank Wiring Diagram
The following is a basic wiring diagram for a solar panel to battery bank system:

- Solar Panel Array: Connect the solar panels in series and/or parallel to achieve the desired voltage and current output.
- Charge Controller: Connect the solar panel array to the charge controller, following the manufacturer’s instructions.
- Battery Bank: Connect the charge controller to the battery bank, ensuring the correct polarity (positive to positive, negative to negative).
- Inverter/Charger: Connect the battery bank to the inverter/charger, following the manufacturer’s instructions.
- Grounding: Connect the system to a suitable grounding point, such as a metal chassis or a grounding rod.
Wiring Instructions
To create a safe and efficient wiring diagram, follow these instructions:
- Use Proper Wire Sizing: Use wire gauges that match the current output of your solar panel array and charge controller.
- Keep Wiring Organized: Use cable ties, wire looms, or conduit to keep wiring organized and protected from damage.
- Avoid Overheating: Keep wiring away from heat sources, such as engines, generators, or cooktops.
- Use Waterproof Connectors: Use waterproof connectors to protect your system from moisture and corrosion.
- Label Wiring: Label your wiring to ensure easy identification and troubleshooting.
Safety Considerations
When working with electrical systems, safety is paramount. Consider the following:
- Disconnect Power: Always disconnect power to the system before performing any maintenance or repairs.
- Use Personal Protective Equipment: Wear protective gear, such as gloves and safety glasses, when working with electrical systems.
- Follow Manufacturer Instructions: Follow the manufacturer’s instructions for each component, including wiring and installation guidelines.
- Regular Maintenance: Regularly inspect and maintain your system to ensure optimal performance and prevent damage.
Troubleshooting Common Issues
Common issues with solar panel to battery bank wiring diagrams include:
- Low Voltage: Check for loose connections, incorrect wire sizing, or faulty components.
- Overcharging: Check the charge controller settings and adjust as needed.
- Undercharging: Check the solar panel array output and adjust the charge controller settings as needed.
- Short Circuits: Check for damaged wiring or faulty components.
Conclusion
Creating a solar panel to battery bank wiring diagram for your RV requires careful planning, attention to detail, and a focus on safety. By following the guidelines outlined in this article, you can ensure a reliable and efficient system that harnesses the power of the sun to keep your RV running smoothly. Remember to regularly inspect and maintain your system to prevent damage and ensure optimal performance.
Additional Tips and Recommendations
- Monitor Your System: Use a monitoring system to track your energy production, consumption, and battery state of charge.
- Upgrade Your System: Consider upgrading your system as technology improves or your energy needs change.
- Consult a Professional: If you’re unsure about any aspect of your wiring diagram, consult a professional solar installer or electrician.
- Follow Local Regulations: Ensure your system complies with local regulations and building codes.
By following these guidelines and recommendations, you can create a safe and efficient solar panel to battery bank wiring diagram for your RV, enjoying the benefits of renewable energy on the go.


