“Solar panel installation and wiring step-by-step”
Not only does it provide a clean and sustainable source of energy, but it also offers a significant reduction in energy costs and a potential increase in property value. However, the process of installing solar panels can seem daunting, especially for those without prior experience in electrical work. In this article, we will provide a comprehensive, step-by-step guide on solar panel installation and wiring, helping you to navigate the process with confidence.
Pre-Installation Checklist
Before beginning the installation process, it is essential to ensure that you have met the necessary requirements and have all the necessary materials. Here is a checklist to get you started:
- Assess your energy needs: Determine your energy requirements by reviewing your past energy bills and calculating your average energy consumption.
- Choose the right solar panel system: Select a solar panel system that meets your energy needs and is compatible with your roof type and size.
- Check local building codes and regulations: Familiarize yourself with local building codes and regulations regarding solar panel installation.
- Ensure a sunny location: Ensure that your roof receives sufficient sunlight throughout the day, ideally with minimal shading.
- Hire a professional or obtain necessary permits: If you are not experienced in electrical work, consider hiring a professional solar panel installer. Otherwise, obtain the necessary permits and follow local regulations.
- Gather necessary materials: Make sure you have all the necessary materials, including solar panels, mounting hardware, wiring, and electrical connectors.
Step 1: Prepare the Roof (Time: 2-3 hours)
The first step in solar panel installation is to prepare the roof. This involves:
- Cleaning the roof: Clear the roof of any debris, dirt, or obstacles that may interfere with the installation process.
- Inspecting the roof: Inspect the roof for any damage, wear, or tear. Make any necessary repairs before proceeding.
- Marking the roof: Mark the location where the solar panels will be installed, taking into account the size and layout of the panels.
- Installing roof mounts: Install roof mounts or brackets that will hold the solar panels in place. These mounts should be sturdy and securely attached to the roof.
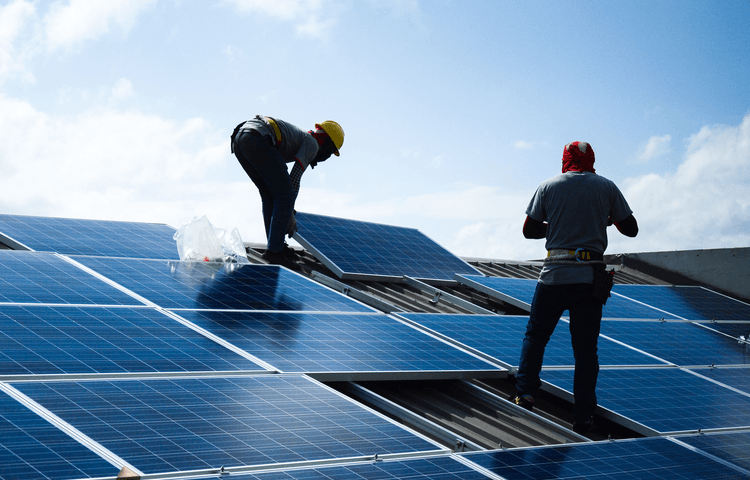
Step 2: Assemble the Solar Panel Array (Time: 2-3 hours)
Once the roof is prepared, it’s time to assemble the solar panel array. This involves:
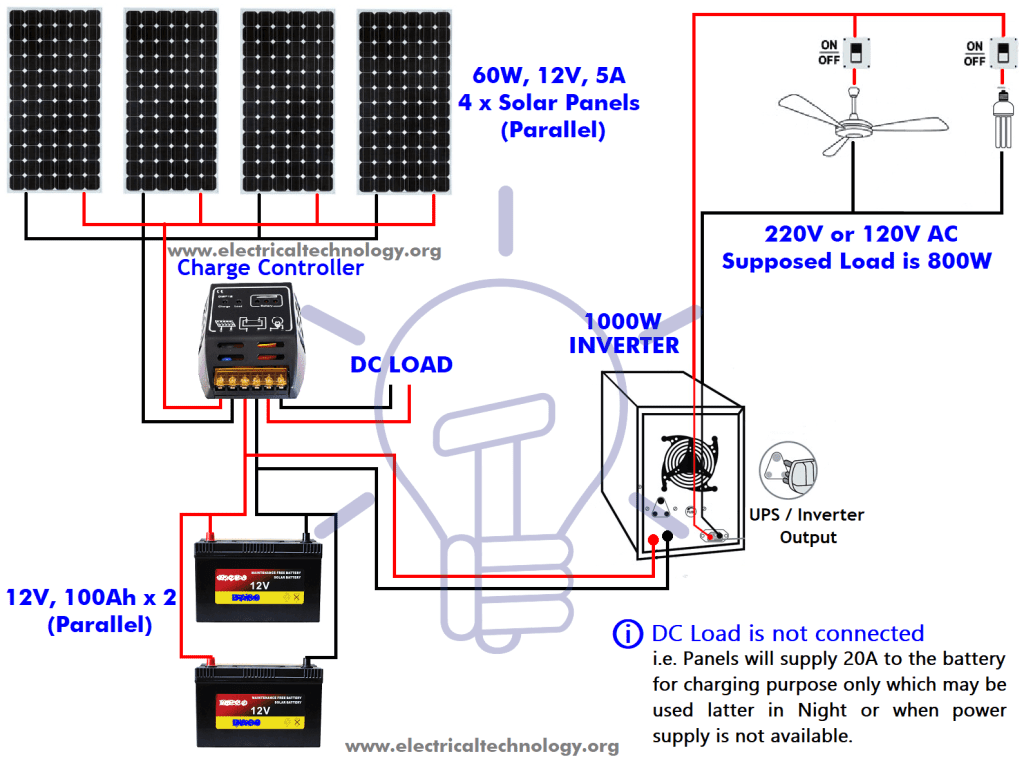
- Connecting the solar panels: Connect the solar panels together using electrical connectors, making sure to match the positive and negative terminals.
- Configuring the array: Configure the solar panel array to meet your energy needs, taking into account the size and layout of the panels.
- Securing the panels: Secure the solar panels to the roof mounts, ensuring they are level and securely fastened.
Step 3: Install the Inverter (Time: 1-2 hours)
The inverter is a critical component of the solar panel system, responsible for converting DC power from the solar panels to AC power for your home or business. To install the inverter:
- Choose a location: Choose a location for the inverter, ideally in a cool, dry, and well-ventilated area.
- Mount the inverter: Mount the inverter to a wall or floor, ensuring it is securely fastened and level.
- Connect the inverter: Connect the inverter to the solar panel array, making sure to match the positive and negative terminals.
Step 4: Install the Mounting Hardware (Time: 1-2 hours)
The mounting hardware includes the racks, clamps, and brackets that hold the solar panels in place. To install the mounting hardware:
- Install the racks: Install the racks or tracks that will hold the solar panels, ensuring they are securely fastened to the roof.
- Install the clamps: Install the clamps or brackets that will hold the solar panels to the racks, ensuring they are securely fastened.
- Tighten the clamps: Tighten the clamps to ensure the solar panels are securely held in place.
Step 5: Connect the Wiring (Time: 2-3 hours)
The wiring is a critical component of the solar panel system, responsible for connecting the solar panels to the inverter and the electrical panel. To connect the wiring:
- Run the wiring: Run the wiring from the solar panels to the inverter, making sure to follow local electrical codes and regulations.
- Connect the wiring: Connect the wiring to the inverter, making sure to match the positive and negative terminals.
- Connect to the electrical panel: Connect the wiring to the electrical panel, making sure to follow local electrical codes and regulations.
Step 6: Test the System (Time: 1-2 hours)
Once the installation is complete, it’s time to test the system. This involves:
- Turn on the system: Turn on the solar panel system, making sure the inverter is functioning properly.
- Check the voltage: Check the voltage output of the solar panels, ensuring it is within the specified range.
- Check the current: Check the current output of the solar panels, ensuring it is within the specified range.
- Monitor the system: Monitor the system for any errors or issues, making sure it is functioning properly.
Step 7: Inspect and Maintain the System (Time: Ongoing)
Once the system is installed and tested, it’s essential to inspect and maintain it regularly. This involves:
- Regular inspections: Regularly inspect the system for any damage, wear, or tear.
- Cleaning the panels: Clean the solar panels regularly to ensure maximum energy output.
- Checking the wiring: Check the wiring regularly for any damage or wear.
- Updating the system: Update the system as needed, ensuring it remains compatible with local building codes and regulations.
Conclusion
Solar panel installation and wiring can seem like a daunting task, but with the right guidance, it can be a straightforward and rewarding process. By following the steps outlined in this article, you can ensure a safe and efficient installation that meets your energy needs. Remember to always follow local building codes and regulations, and consider hiring a professional solar panel installer if you are not experienced in electrical work. With the right installation and maintenance, your solar panel system can provide you with clean, sustainable energy for years to come.
Additional Tips and Considerations
- Always follow local building codes and regulations: Ensure that your solar panel installation meets local building codes and regulations, including electrical and fire safety standards.
- Use high-quality materials: Use high-quality materials, including solar panels, mounting hardware, and wiring, to ensure a safe and efficient installation.
- Consider energy storage: Consider energy storage options, such as batteries, to store excess energy generated by your solar panel system.
- Monitor your energy usage: Monitor your energy usage regularly to ensure your solar panel system is meeting your energy needs.
- Maintain your system: Regularly inspect and maintain your solar panel system to ensure it remains safe and efficient.
By following the steps outlined in this article and considering the additional tips and considerations, you can ensure a successful solar panel installation that provides you with clean, sustainable energy for years to come.