“Solar panel connection layout for camper”
Not only do they provide a clean and sustainable source of energy, but they also offer a reliable and efficient way to power your campsite. However, installing a solar panel system on your camper can be a daunting task, especially when it comes to designing the connection layout. In this article, we will provide a comprehensive guide to help you create a safe and efficient solar panel connection layout for your camper.
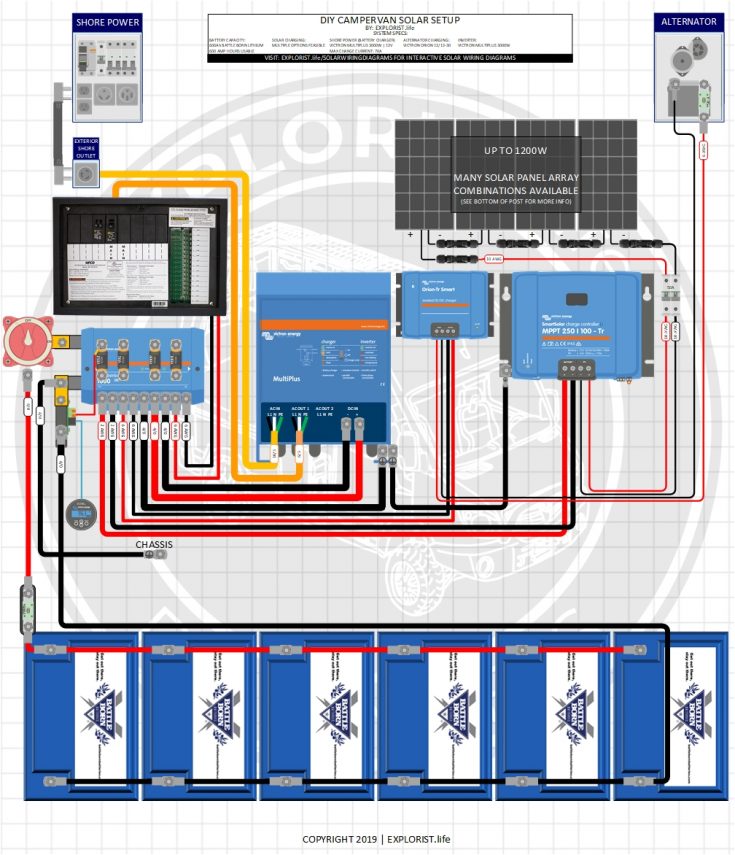
Understanding the Basics of Solar Panels
Before we dive into the connection layout, it’s essential to understand the basics of solar panels. Solar panels convert sunlight into electrical energy through photovoltaic (PV) cells. The energy generated by the solar panels is direct current (DC) and needs to be converted to alternating current (AC) to power your appliances. The solar panel system consists of several components, including:
- Solar Panels: These are the photovoltaic cells that convert sunlight into electrical energy.
- Charge Controller: This device regulates the flow of energy from the solar panels to the battery and prevents overcharging.
- Battery: This is the storage unit that holds the excess energy generated by the solar panels for later use.
- Inverter: This device converts the DC energy from the battery to AC energy for powering your appliances.
- Mounting System: This includes the frames, brackets, and other hardware used to secure the solar panels to the camper’s roof or surface.
Determining the Required Solar Panel Capacity
To design an efficient connection layout, you need to determine the required solar panel capacity for your camper. This depends on several factors, including:
- Energy Requirements: Calculate the total energy required to power your appliances, including lights, refrigerator, water pump, and other gadgets.
- Climate and Location: The amount of sunlight your camper receives depends on the climate and location. Areas with more sunlight require fewer solar panels.
- Panel Efficiency: The efficiency of the solar panels also affects the required capacity. Higher efficiency panels require fewer panels to generate the same amount of energy.
A general rule of thumb is to calculate the energy requirements based on the appliances you plan to use and the number of hours you plan to use them. For example, if you plan to use a 100W light for 4 hours a day, you’ll need a solar panel system that can generate at least 400Wh of energy per day.
Designing the Connection Layout
Once you have determined the required solar panel capacity, you can design the connection layout. Here are some general guidelines to follow:
- Series and Parallel Connections: Solar panels can be connected in series or parallel to increase the voltage and current output. Series connections increase the voltage, while parallel connections increase the current.
- Panel Configuration: The panel configuration depends on the type of panels you use. Most solar panels are designed to be connected in a series-parallel configuration, with multiple panels connected in series to form a string, and multiple strings connected in parallel.
- Charge Controller: The charge controller should be connected between the solar panels and the battery to regulate the flow of energy.
- Battery Connection: The battery should be connected to the charge controller and the inverter.
- Inverter Connection: The inverter should be connected to the battery and the AC appliances.

Safety Considerations
When designing the connection layout, safety should be your top priority. Here are some safety considerations to keep in mind:
- Overcurrent Protection: Install overcurrent protection devices, such as fuses or circuit breakers, to prevent damage to the solar panels and other components.
- Grounding: Ensure that the solar panels and other components are properly grounded to prevent electrical shock.
- Insulation: Use proper insulation to prevent electrical shorts and damage to the components.
- Labeling: Label the connections and components clearly to prevent confusion and ensure easy maintenance.
Best Practices for Camper Solar Panel Installation
Here are some best practices to follow when installing a solar panel system on your camper:
- Assess the Roof: Assess the camper’s roof to determine the best location for the solar panels. Ensure that the roof is strong enough to support the weight of the panels and that there are no obstructions.
- Use a Mounting System: Use a mounting system specifically designed for campers to secure the solar panels to the roof.
- Install a Charge Controller: Install a charge controller to regulate the flow of energy from the solar panels to the battery.
- Monitor the System: Monitor the solar panel system regularly to ensure that it is functioning correctly and to detect any issues.
Common Mistakes to Avoid
Here are some common mistakes to avoid when designing and installing a solar panel system for your camper:
- Incorrect Panel Configuration: Incorrect panel configuration can lead to reduced energy output and decreased system efficiency.
- Insufficient Overcurrent Protection: Insufficient overcurrent protection can lead to damage to the solar panels and other components.
- Poor Grounding: Poor grounding can lead to electrical shock and damage to the components.
- Inadequate Insulation: Inadequate insulation can lead to electrical shorts and damage to the components.
Conclusion
Designing a solar panel connection layout for your camper requires careful planning and attention to detail. By following the guidelines outlined in this article, you can create a safe and efficient solar panel system that meets your energy needs. Remember to determine the required solar panel capacity, design the connection layout, and follow safety considerations to ensure a safe and reliable system. With the right solar panel system, you can enjoy the freedom and flexibility of camping with a reliable source of renewable energy.
Recommendations
Based on the guidelines outlined in this article, we recommend the following:
- Consult a Professional: Consult a professional solar panel installer if you are unsure about designing and installing a solar panel system for your camper.
- Use High-Efficiency Panels: Use high-efficiency solar panels to minimize the number of panels required and maximize energy output.
- Install a Monitoring System: Install a monitoring system to track the performance of the solar panel system and detect any issues.
- Perform Regular Maintenance: Perform regular maintenance to ensure that the solar panel system is functioning correctly and to extend its lifespan.
By following these recommendations and guidelines, you can create a reliable and efficient solar panel system for your camper and enjoy the benefits of renewable energy on your next camping trip.


