“Residential solar panel wiring tutorial”
Not only do they reduce your carbon footprint, but they also help you save on electricity bills. However, installing a solar panel system can be a daunting task, especially when it comes to wiring. In this article, we will provide a comprehensive guide on residential solar panel wiring, covering the basics, safety precautions, and step-by-step instructions.
Introduction to Solar Panel Wiring
Solar panel wiring involves connecting the solar panels to the electrical grid, allowing you to harness the energy generated by the sun. The wiring system consists of several components, including:
- Solar Panels: These are the photovoltaic (PV) panels that convert sunlight into electrical energy.
- Mounting System: This includes the racking and mounting hardware that secures the solar panels to the roof or ground.
- Inverter: This device converts the DC power generated by the solar panels into AC power, which is usable in your home.
- Charge Controller: This component regulates the flow of energy from the solar panels to the battery bank (if you have one).
- Battery Bank: This is an optional component that stores excess energy generated by the solar panels for later use.
- Electrical Panel: This is the main electrical panel that distributes power to your home.
Safety Precautions
Before starting the wiring process, it’s essential to take necessary safety precautions to avoid injuries and ensure a successful installation. Here are some safety tips to keep in mind:
- Turn off the power: Switch off the main electrical panel and ensure that all wires are de-energized before starting the installation.
- Use personal protective equipment: Wear safety glasses, gloves, and a hard hat to protect yourself from electrical shocks and falls.
- Follow local electrical codes: Familiarize yourself with local electrical codes and regulations to ensure compliance.
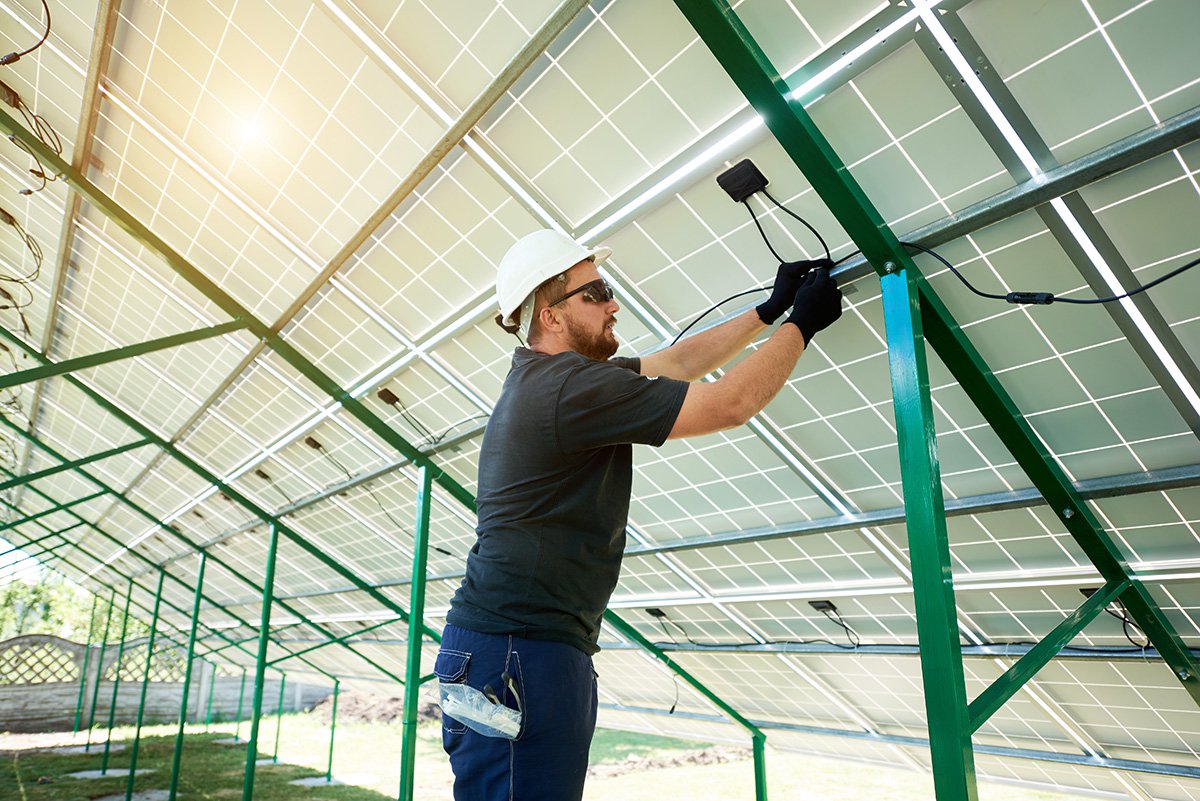
- Hire a professional: If you’re not experienced with electrical work, consider hiring a licensed electrician to perform the installation.
Step-by-Step Wiring Instructions
Now that we’ve covered the basics and safety precautions, let’s move on to the step-by-step wiring instructions:
Step 1: Connect the Solar Panels
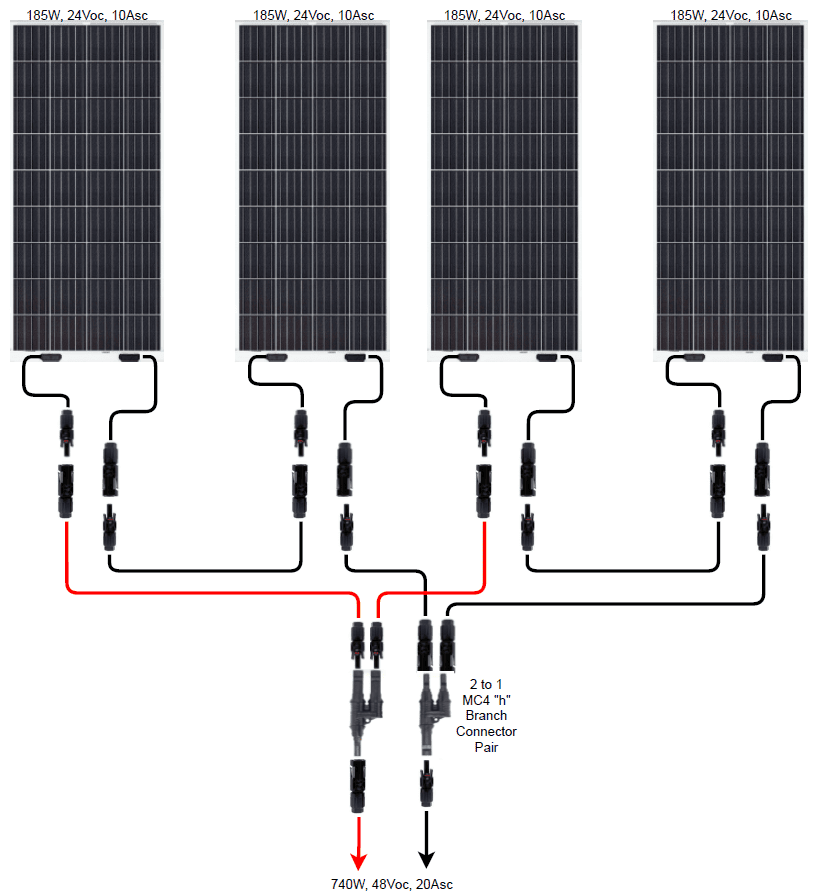
- Series or parallel connection: Decide whether you want to connect your solar panels in series or parallel. Series connection increases the voltage, while parallel connection increases the current.
- Connect the panels: Use MC4 connectors or equivalent to connect the solar panels to each other. Make sure to match the positive and negative terminals.
- Secure the connections: Use cable ties or tape to secure the connections and prevent them from coming loose.
Step 2: Connect the Inverter
- Choose the right inverter: Select an inverter that matches your solar panel system’s voltage and power output.
- Connect the inverter to the solar panels: Use MC4 connectors or equivalent to connect the inverter to the solar panels.
- Connect the inverter to the electrical panel: Use a suitable cable to connect the inverter to the electrical panel. Ensure that the cable is rated for the inverter’s output power.
Step 3: Connect the Charge Controller (if applicable)
- Choose the right charge controller: Select a charge controller that matches your solar panel system’s voltage and power output.
- Connect the charge controller to the solar panels: Use MC4 connectors or equivalent to connect the charge controller to the solar panels.
- Connect the charge controller to the battery bank: Use a suitable cable to connect the charge controller to the battery bank.
Step 4: Connect the Battery Bank (if applicable)
- Choose the right battery bank: Select a battery bank that matches your solar panel system’s voltage and power output.
- Connect the battery bank to the charge controller: Use a suitable cable to connect the battery bank to the charge controller.
- Connect the battery bank to the inverter: Use a suitable cable to connect the battery bank to the inverter.
Step 5: Connect the Electrical Panel
- Connect the inverter to the electrical panel: Use a suitable cable to connect the inverter to the electrical panel.
- Connect the batteries (if applicable) to the electrical panel: Use a suitable cable to connect the battery bank to the electrical panel.
- Verify the connections: Double-check all connections to ensure they are secure and correct.
Testing and Commissioning
Once you’ve completed the wiring process, it’s essential to test and commission the system to ensure it’s working safely and efficiently. Here are some steps to follow:
- Turn on the power: Switch on the main electrical panel and verify that the system is functioning correctly.
- Check the inverter display: Verify that the inverter is displaying the correct voltage, current, and power output.
- Check the battery bank (if applicable): Verify that the battery bank is charging and discharging correctly.
- Perform a safety inspection: Inspect the system for any signs of damage, wear, or overheating.
Conclusion
Residential solar panel wiring requires careful planning, attention to detail, and adherence to safety precautions. By following the steps outlined in this tutorial, you can ensure a safe and successful installation. Remember to always follow local electrical codes and regulations, and consider hiring a licensed electrician if you’re not experienced with electrical work. With the right knowledge and skills, you can harness the power of the sun to reduce your carbon footprint and save on electricity bills.
Additional Tips and Recommendations
- Use high-quality materials: Use high-quality cables, connectors, and other components to ensure a reliable and efficient system.
- Monitor your system: Install a monitoring system to track your energy production, consumption, and savings.
- Perform regular maintenance: Regularly inspect and maintain your system to ensure optimal performance and safety.
- Consider energy storage: Consider installing a battery bank to store excess energy generated by your solar panels for later use.
- Seek professional help: If you’re unsure about any aspect of the installation, don’t hesitate to seek help from a licensed electrician or solar panel professional.
By following these tips and recommendations, you can ensure a successful and efficient residential solar panel installation that will provide you with years of clean, renewable energy.


