“Simple RV solar power wiring guide for beginners”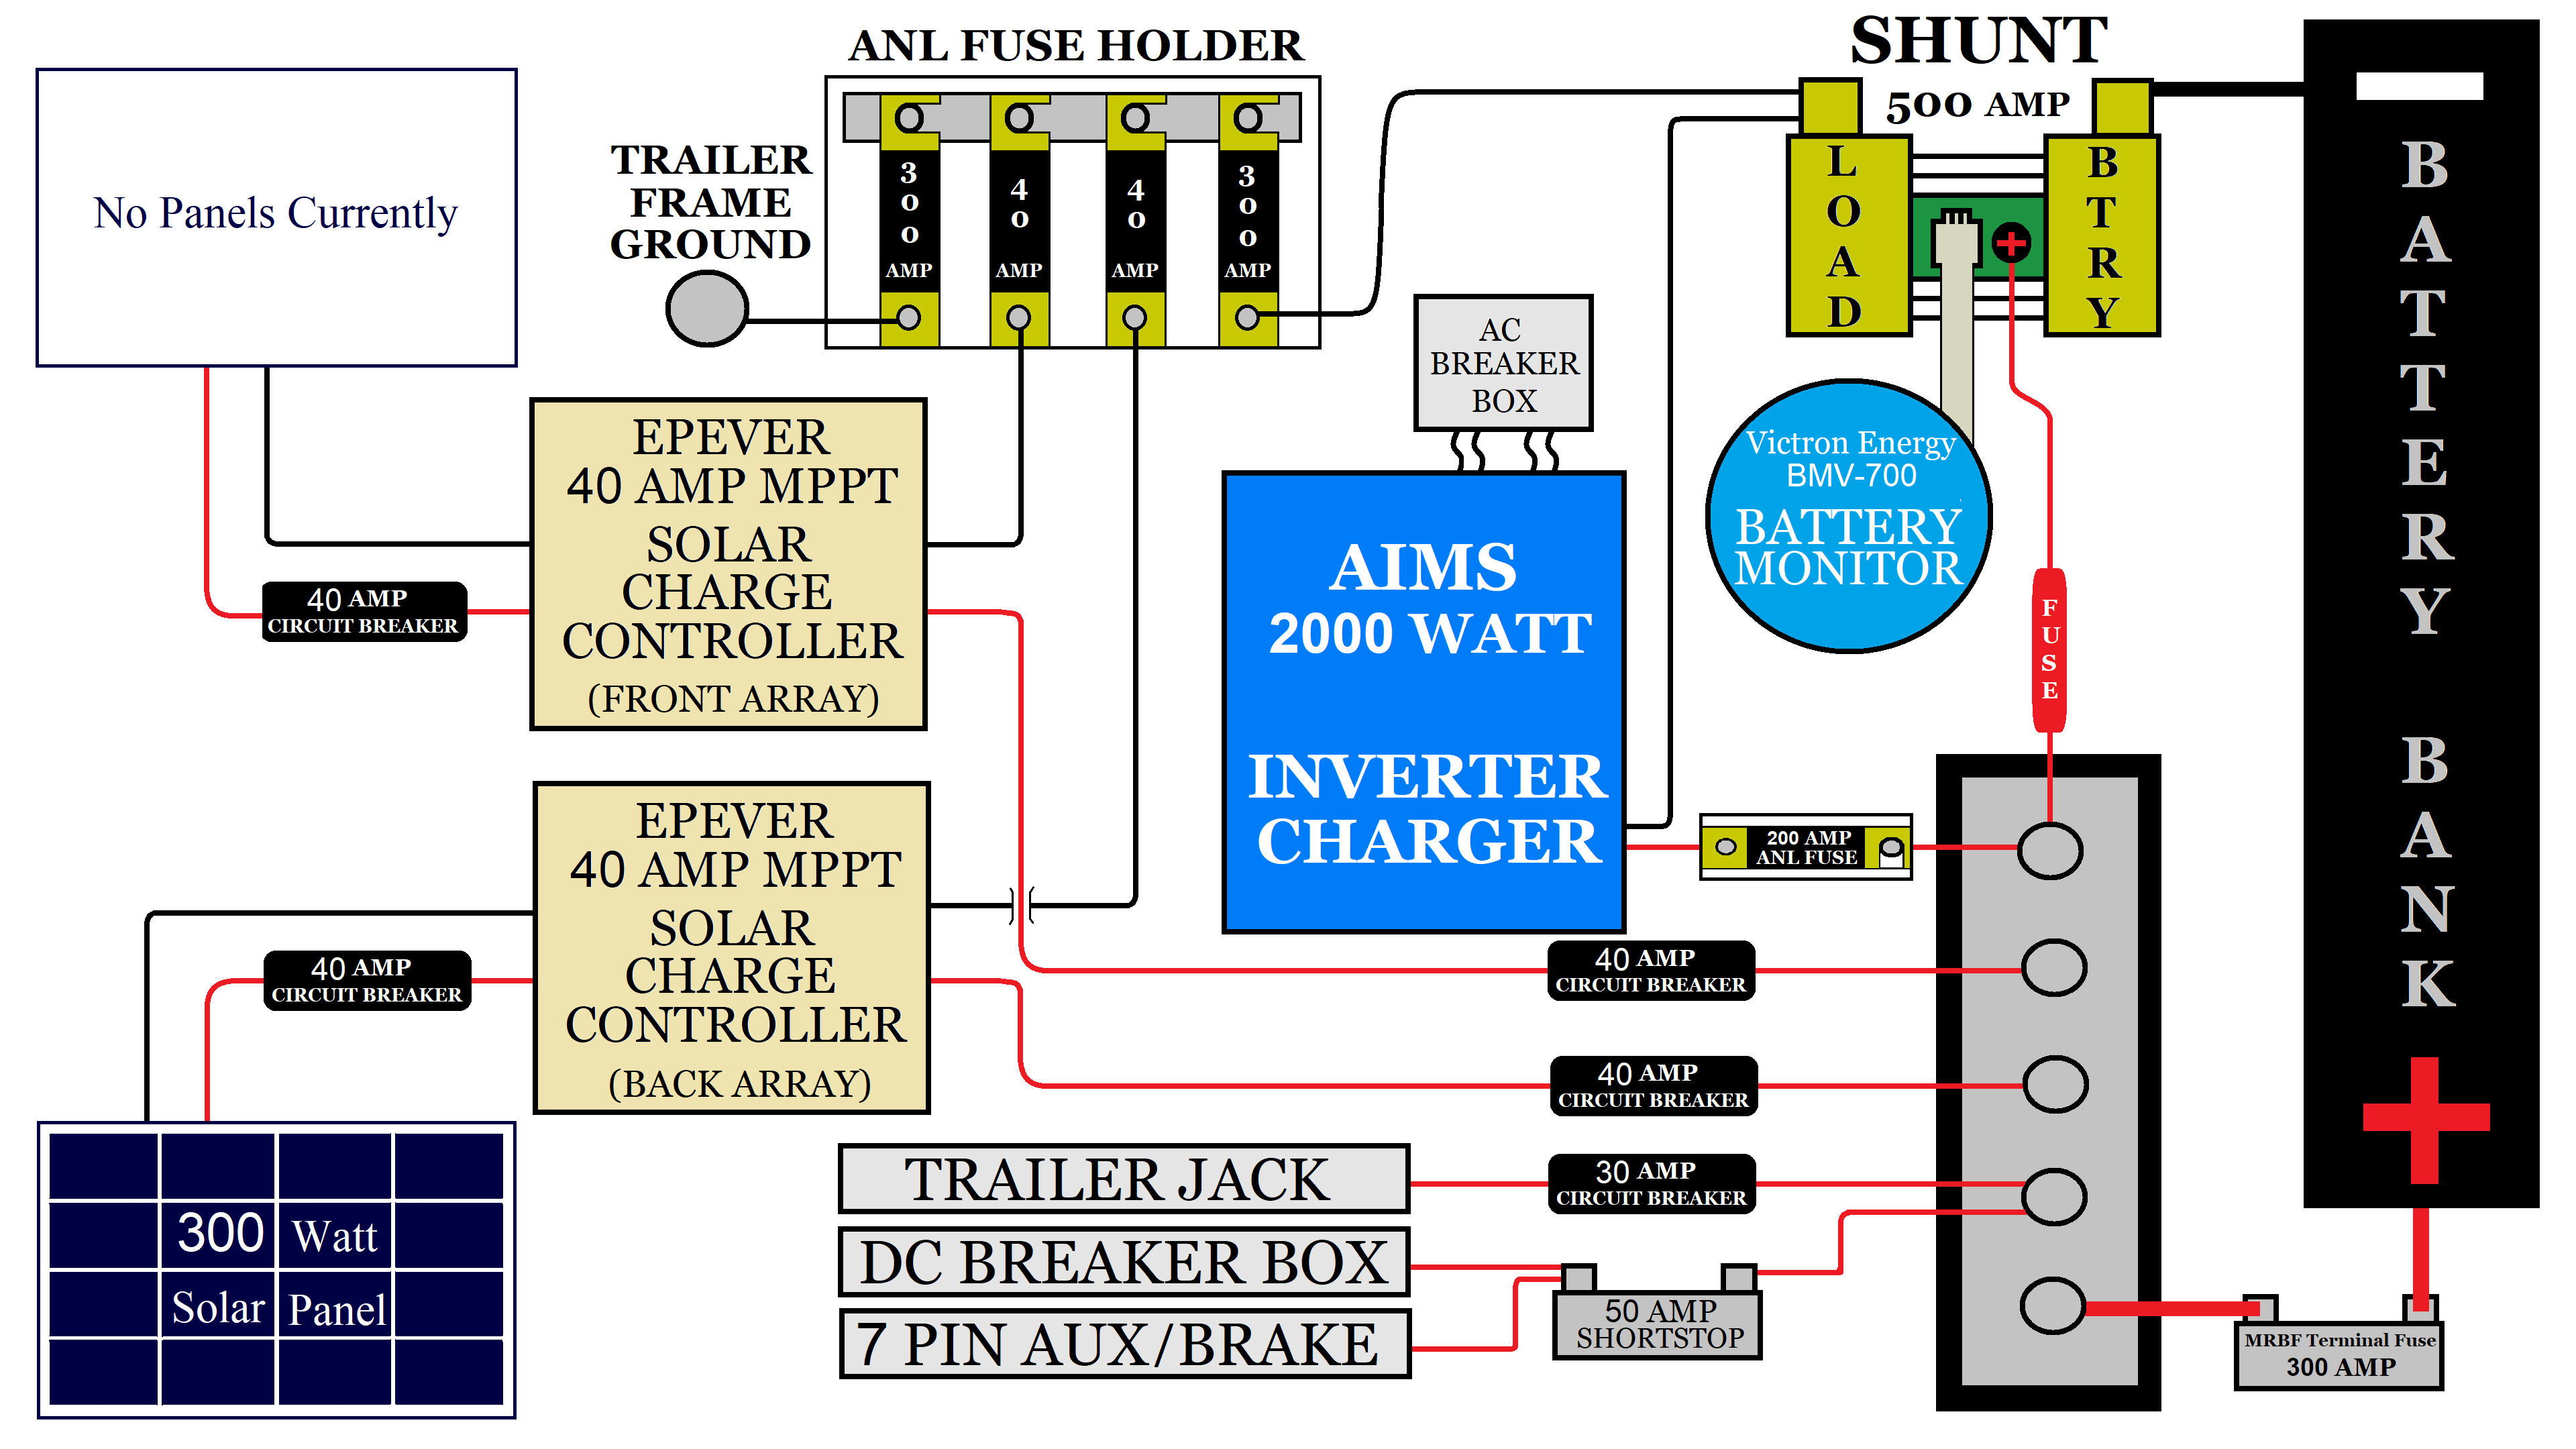
The number and type of solar panels you need depend on your energy requirements and the size of your RV.
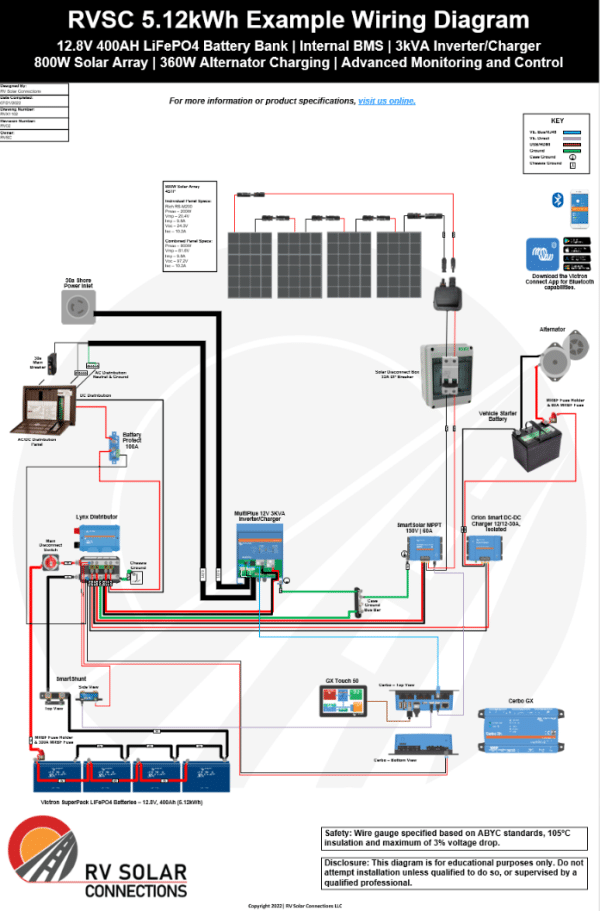
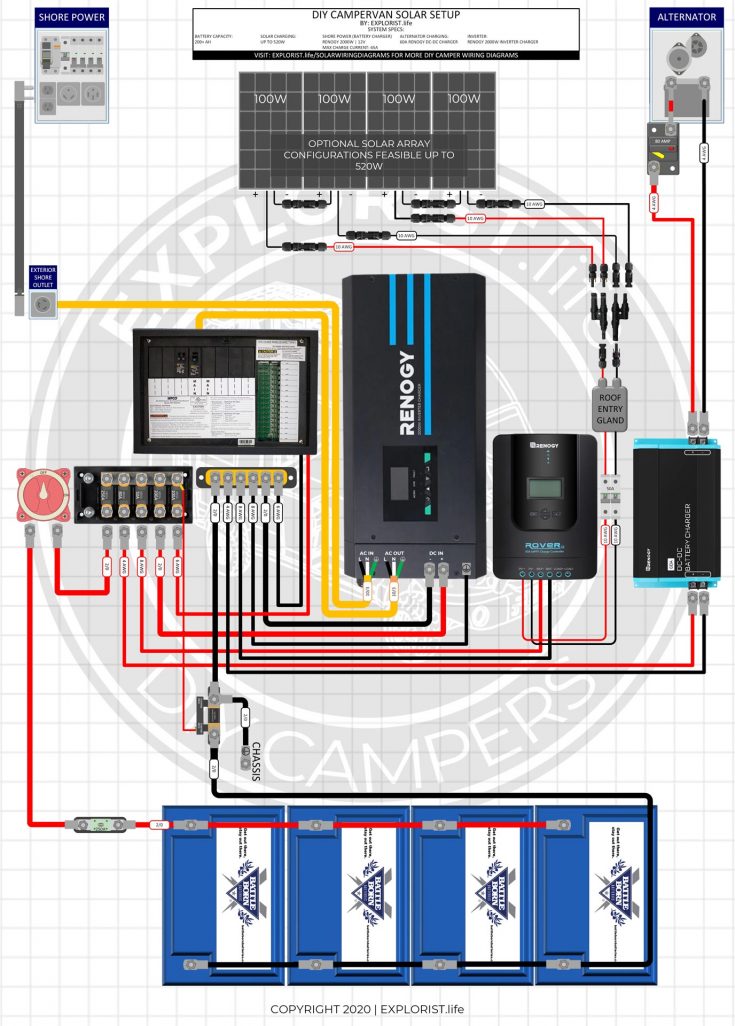
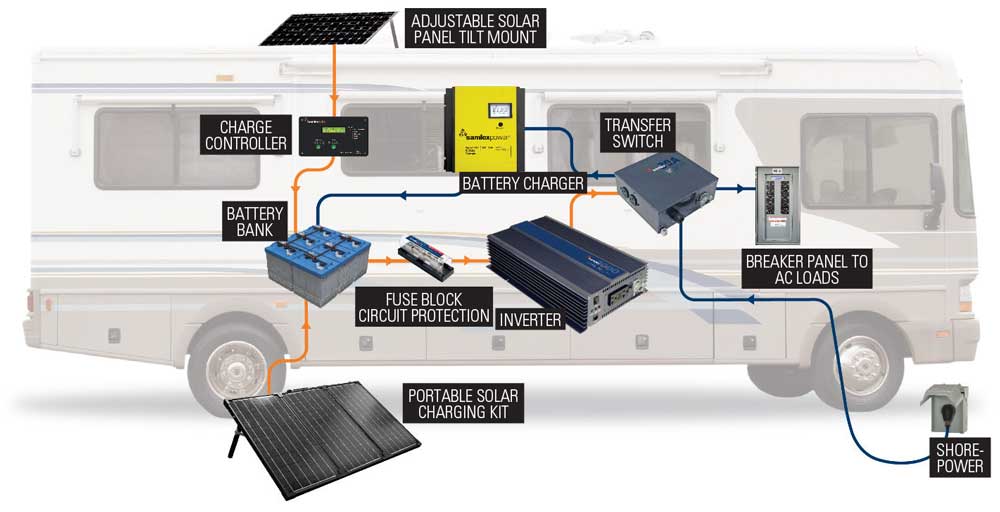
Wiring Your RV Solar Power System
Now that you’re familiar with the components, it’s time to learn about the wiring process. The wiring system is the backbone of your RV solar power system, and it’s essential to get it right to ensure safe and efficient operation. Here are the steps to follow:
- Plan Your System: Before you start wiring, plan your system to determine the best layout for your components. Consider the location of your solar panels, battery bank, charge controller, and inverter/charger.
- Choose the Right Wire: Select wire that is suitable for outdoor use and can withstand the elements. The wire should be sized correctly to handle the amps and volts of your system.
- Connect the Solar Panels: Connect the solar panels to the charge controller, making sure to follow the manufacturer’s instructions. Use a fuse or circuit breaker to protect the system from overcurrent.
- Connect the Charge Controller: Connect the charge controller to the battery bank, ensuring that the polarity is correct. The charge controller should be set to the correct voltage and amps for your system.
- Connect the Battery Bank: Connect the battery bank to the inverter/charger, making sure to follow the manufacturer’s instructions. Use a fuse or circuit breaker to protect the system from overcurrent.
- Connect the Inverter/Charger: Connect the inverter/charger to the AC distribution panel, which powers your RV’s appliances.
- Test the System: Test the system to ensure that it’s working correctly. Use a multimeter to check the voltage and amps of the system.
Safety Considerations
When wiring your RV solar power system, safety should be your top priority. Here are some safety considerations to keep in mind:
- Use Protective Gear: Use protective gear, such as gloves and safety glasses, when working with electrical components.
- Follow Manufacturer’s Instructions: Follow the manufacturer’s instructions for each component, ensuring that you’re using the correct wire size and type.
- Use Fuses and Circuit Breakers: Use fuses and circuit breakers to protect the system from overcurrent and short circuits.
- Keep the System Grounded: Keep the system grounded to prevent electrical shock.
- Monitor the System: Monitor the system regularly to ensure that it’s working correctly and efficiently.
Troubleshooting Common Issues
Even with a well-designed and installed system, issues can still arise. Here are some common issues and their solutions:
- Low Voltage: If the voltage is low, check the solar panels to ensure they’re clean and not shaded. Check the charge controller to ensure it’s set to the correct voltage.
- Overcharging: If the batteries are overcharging, check the charge controller to ensure it’s set to the correct voltage and amps.
- Inverter/Charger Failure: If the inverter/charger fails, check the wiring and connections to ensure they’re secure. Check the manufacturer’s instructions for troubleshooting procedures.
- System Not Charging: If the system is not charging, check the solar panels to ensure they’re generating power. Check the charge controller to ensure it’s set to the correct voltage and amps.
Conclusion
Wiring an RV solar power system can seem daunting, but with a simple and straightforward guide, you can navigate the process with ease. Remember to plan your system carefully, choose the right wire, and follow the manufacturer’s instructions for each component. Always prioritize safety, and monitor your system regularly to ensure it’s working correctly and efficiently. With these tips and guidelines, you’ll be well on your way to enjoying the benefits of RV solar power.
Additional Tips and Resources
- Consult the Manufacturer’s Manual: Consult the manufacturer’s manual for each component to ensure you’re using the correct wire size and type.
- Join Online Communities: Join online communities, such as forums and Facebook groups, to connect with other RV owners and learn from their experiences.
- Hire a Professional: If you’re not comfortable with the wiring process, consider hiring a professional to install and configure your RV solar power system.
- Attend Workshops and Seminars: Attend workshops and seminars to learn more about RV solar power and stay up-to-date with the latest technologies and best practices.
By following these tips and guidelines, you’ll be able to create a safe and efficient RV solar power system that meets your energy needs and enhances your RVing experience. Happy RVing!