“Residential solar power system wiring schematics with inverter and battery”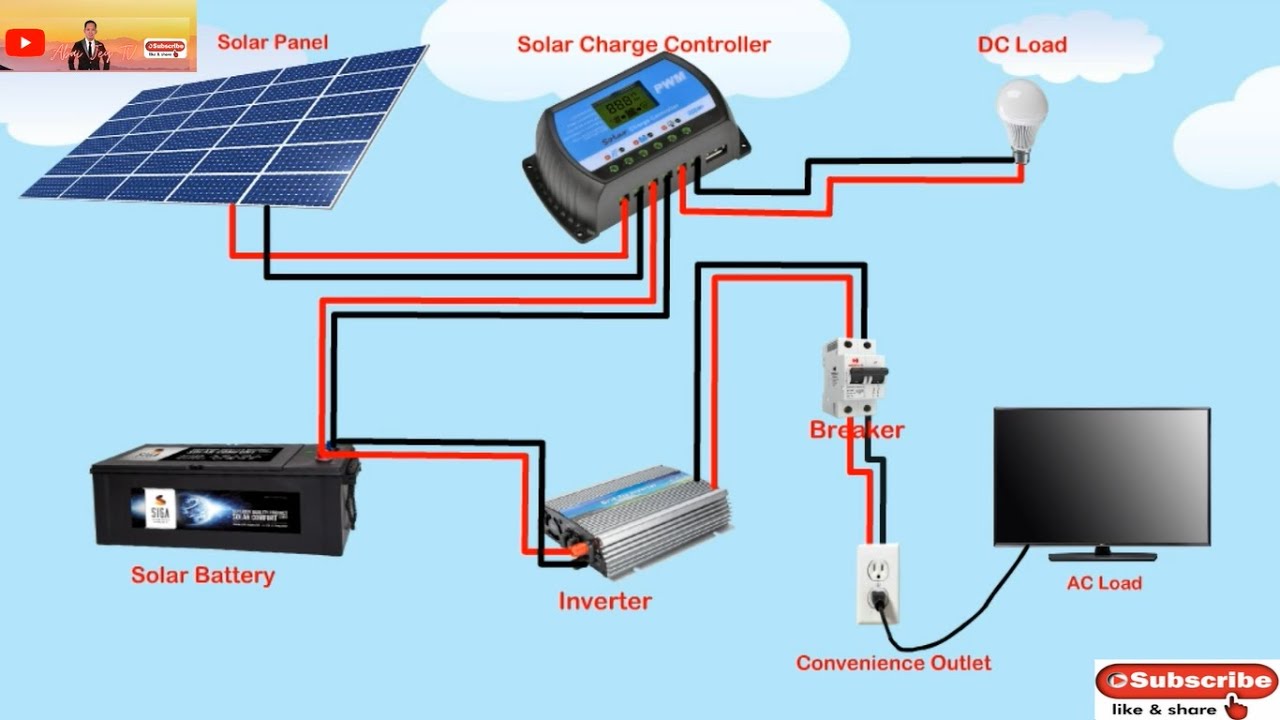
These systems not only reduce energy costs but also contribute to a sustainable future. A crucial aspect of installing a residential solar power system is understanding the wiring schematics, especially when it comes to inverters and batteries. In this article, we will delve into the world of residential solar power system wiring schematics, exploring the key components, system design, and best practices for a safe and efficient installation.
Introduction to Residential Solar Power Systems
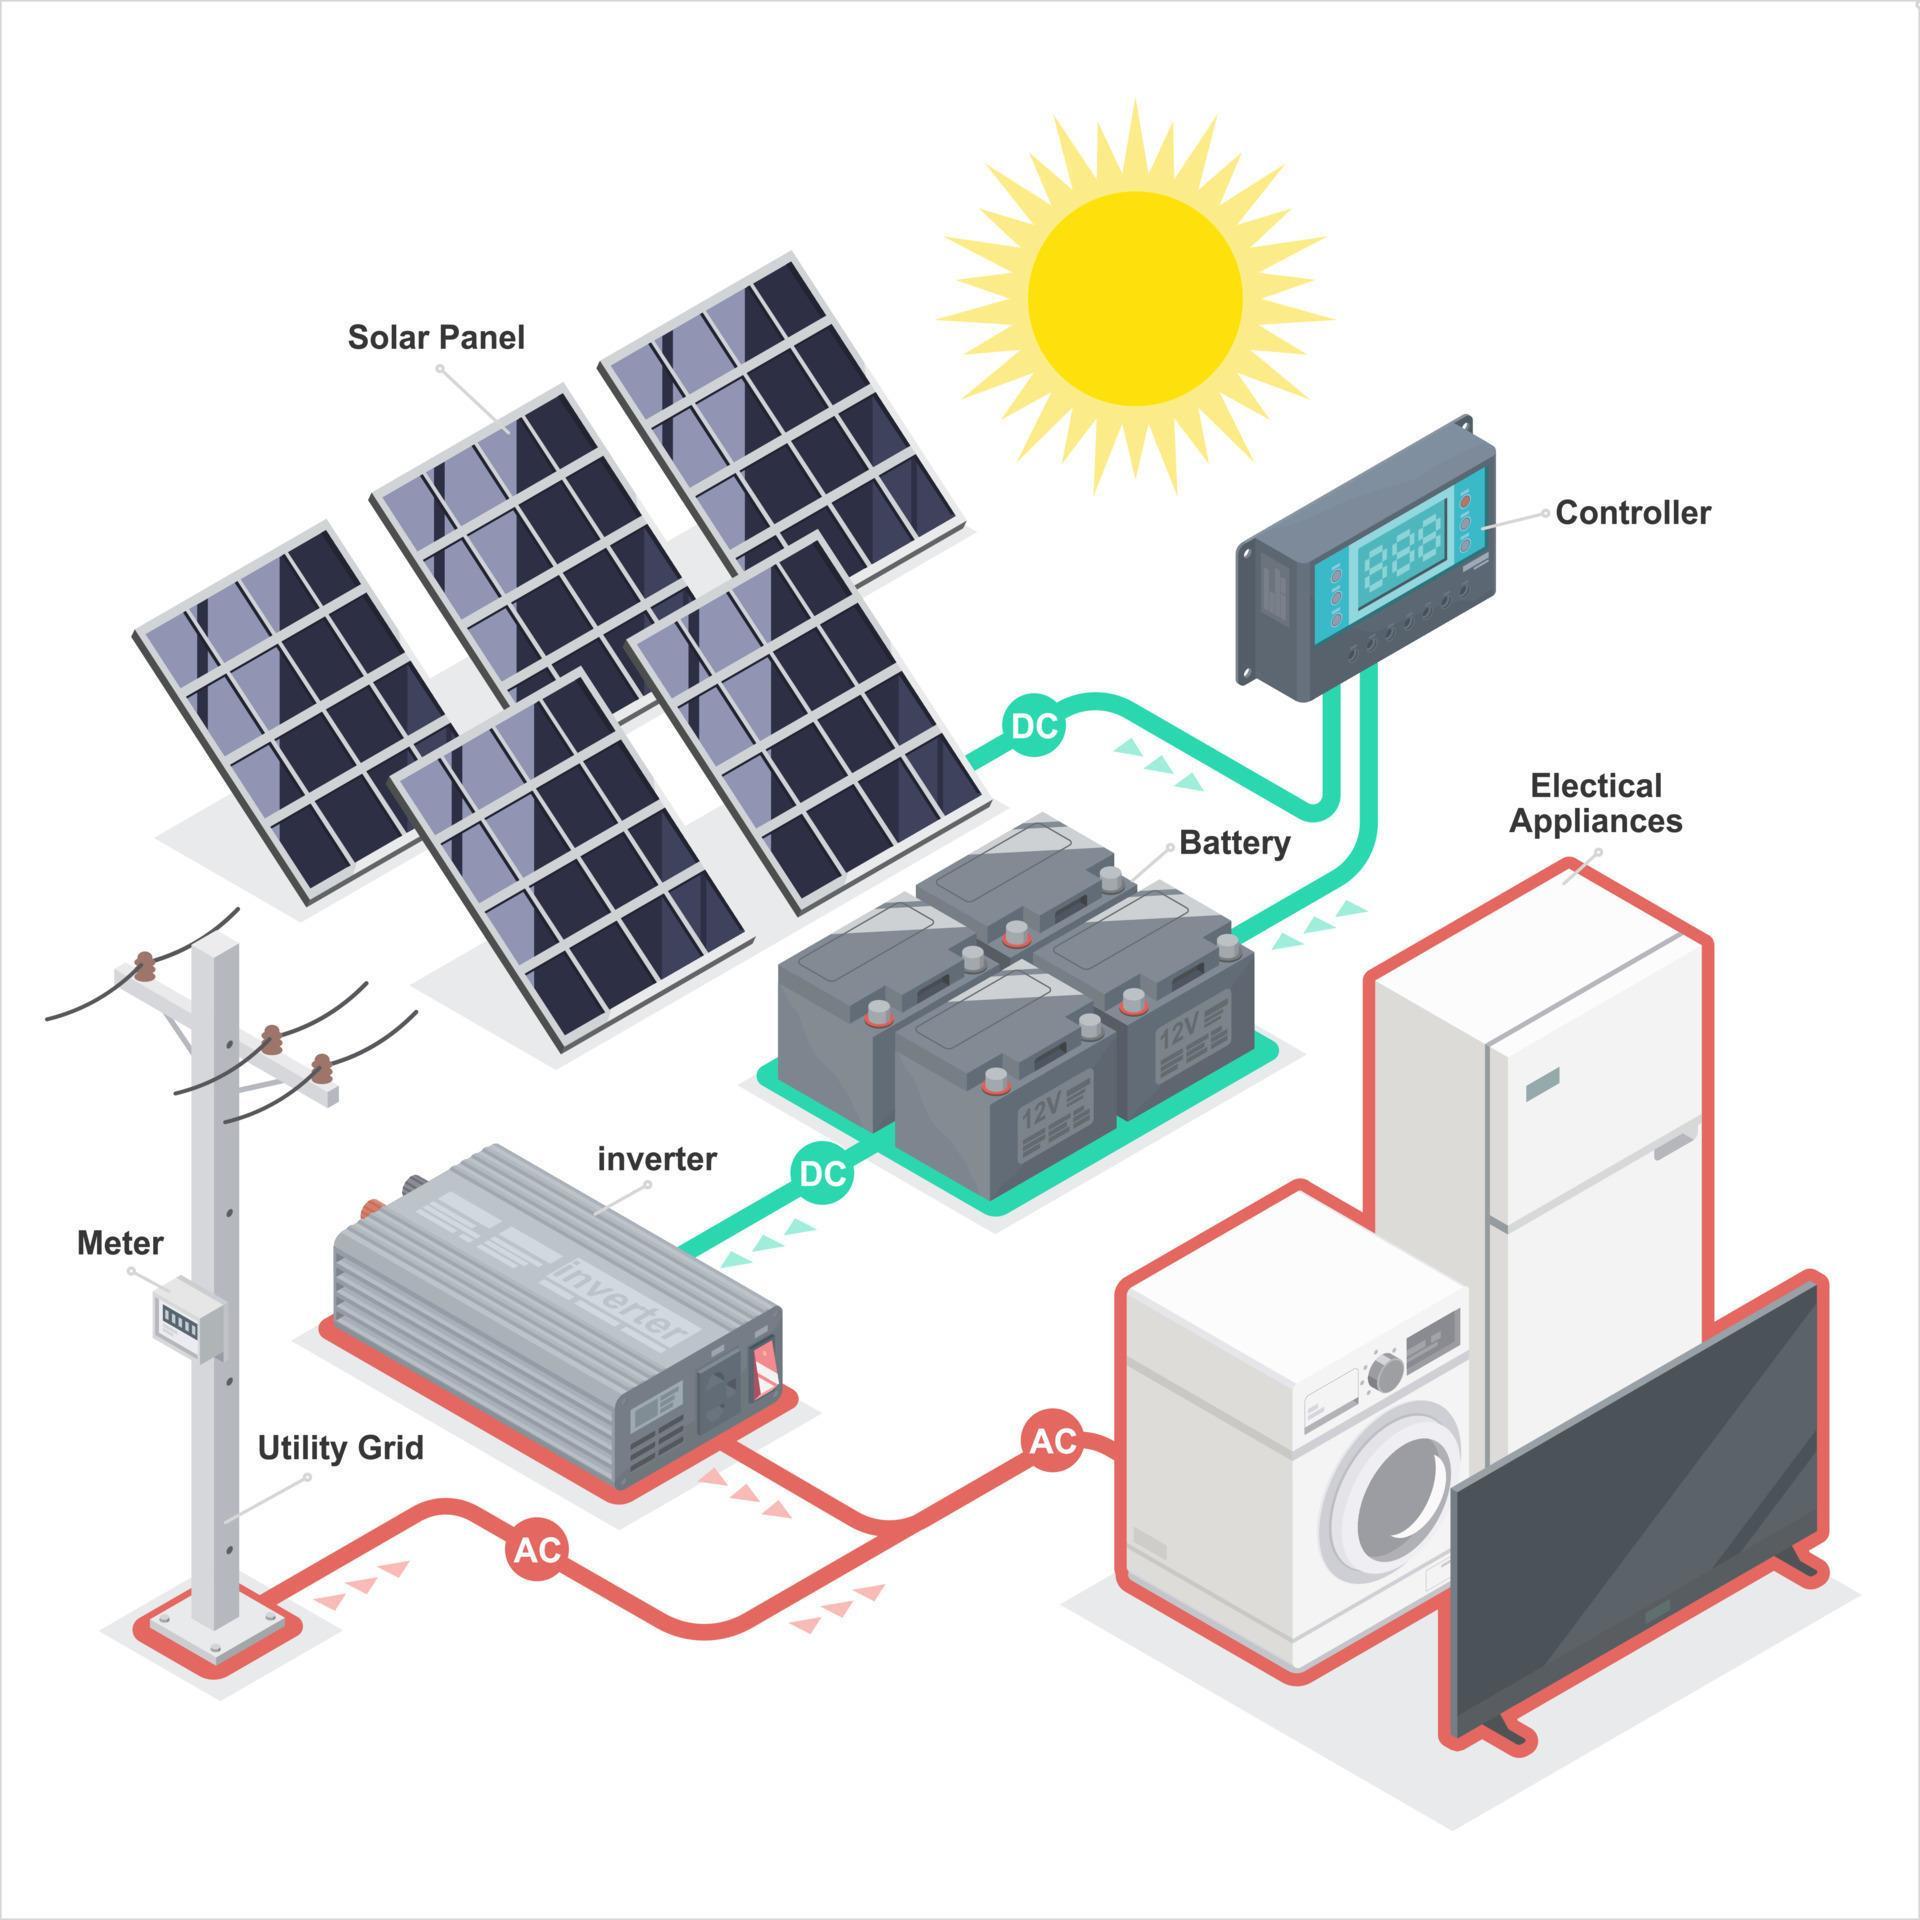
A residential solar power system consists of several key components, including:
- Solar Panels: Convert sunlight into DC (direct current) electricity.
- Inverter: Converts DC electricity from the solar panels into AC (alternating current) electricity, which can be used in the home.
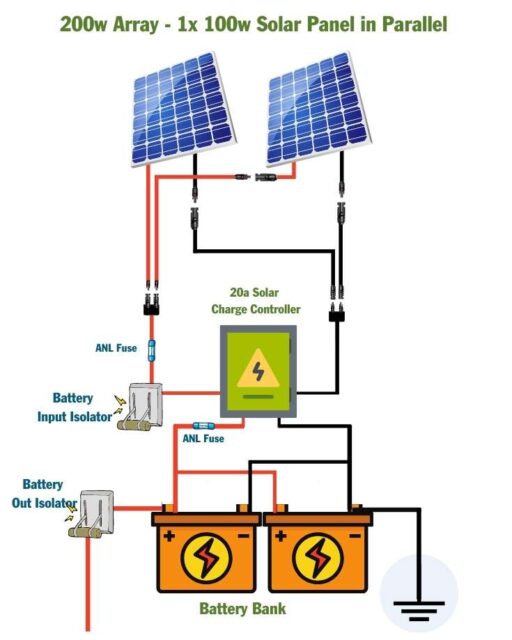
- Battery Bank: Stores excess energy generated by the solar panels for use during periods of low sunlight or at night.
- Charge Controller: Regulates the flow of energy between the solar panels, battery bank, and inverter.
- Mounting System: Secures the solar panels to the roof or ground.
Wiring Schematics: Understanding the Basics
Wiring schematics are essential for a safe and efficient residential solar power system installation. A wiring schematic is a diagram that illustrates the electrical connections between the various components of the system. It is crucial to understand the basics of wiring schematics to ensure that the system is installed correctly and functions as intended.
Here are some key elements to consider when reviewing wiring schematics:
- Component symbols: Familiarize yourself with the symbols used to represent each component, such as solar panels, inverters, batteries, and charge controllers.
- Wiring notation: Understand the notation used to indicate wire sizes, colors, and connections.
- System configuration: Identify the system configuration, including the number of solar panels, inverters, and batteries.
Inverter and Battery Integration
The inverter and battery are critical components of a residential solar power system. The inverter converts DC electricity from the solar panels into AC electricity, while the battery bank stores excess energy for later use. When integrating these components, consider the following:
- Inverter type: Choose an inverter that is compatible with the battery bank and can handle the system’s energy requirements.
- Battery type: Select a battery type that is suitable for the system’s energy storage needs, such as deep cycle batteries or lithium-ion batteries.
- Inverter and battery sizing: Ensure that the inverter and battery bank are sized correctly to meet the system’s energy demands.
System Design Considerations
When designing a residential solar power system, consider the following factors:
- System size: Determine the system size based on the home’s energy requirements and available roof space.
- Panel orientation and tilt: Optimize panel orientation and tilt to maximize energy production.
- Shading analysis: Conduct a shading analysis to identify potential shading issues and ensure optimal energy production.
- Battery bank configuration: Configure the battery bank to meet the system’s energy storage needs.
Wiring Schematics Examples
Here are a few examples of wiring schematics for residential solar power systems with inverters and batteries:
Example 1: Simple Inverter-Based System
- Solar panels (4) connected in series
- Inverter (1) connected to the solar panel array
- AC output from the inverter connected to the home’s electrical panel
Example 2: Battery-Based System with Inverter
- Solar panels (6) connected in series
- Charge controller connected to the solar panel array
- Battery bank (12) connected to the charge controller
- Inverter (1) connected to the battery bank
- AC output from the inverter connected to the home’s electrical panel
Example 3: Hybrid System with Inverter and Battery
- Solar panels (8) connected in series
- Charge controller connected to the solar panel array
- Battery bank (12) connected to the charge controller
- Inverter (1) connected to the battery bank
- Grid tie inverter (1) connected to the inverter and battery bank
- AC output from the grid tie inverter connected to the home’s electrical panel and the grid
Best Practices for Wiring Schematics
When creating or reviewing wiring schematics, keep the following best practices in mind:
- Use standard symbols and notation: Ensure that the wiring schematic uses standard symbols and notation to avoid confusion.
- Clearly label components: Label each component clearly to facilitate identification and troubleshooting.
- Use color-coding: Use color-coding to differentiate between various wires and connections.
- Include system ratings: Include system ratings, such as voltage, current, and power, to ensure that the system is installed correctly.
- Review and verify: Review and verify the wiring schematic with the system installer and other stakeholders to ensure accuracy and completeness.
Conclusion
Residential solar power system wiring schematics with inverters and batteries are critical components of a safe and efficient installation. By understanding the key components, system design, and best practices, homeowners and installers can ensure that the system functions as intended and provides reliable, renewable energy for years to come. Remember to always consult local electrical codes and regulations, and seek professional assistance if you are unsure about any aspect of the installation process.
Additional Resources
For those interested in learning more about residential solar power systems and wiring schematics, the following resources are recommended:
- National Electric Code (NEC)
- International Association of Electrical Inspectors (IAEI)
- Solar Energy Industries Association (SEIA)
- Local electrical codes and regulations
Final Thoughts
Residential solar power systems are a vital step towards a sustainable future. By investing in a well-designed and installed system, homeowners can reduce their energy costs, minimize their carbon footprint, and contribute to a cleaner, healthier environment. Remember to always follow best practices and consult local experts to ensure a safe and efficient installation.


