“Off-grid 12V RV solar wiring diagram”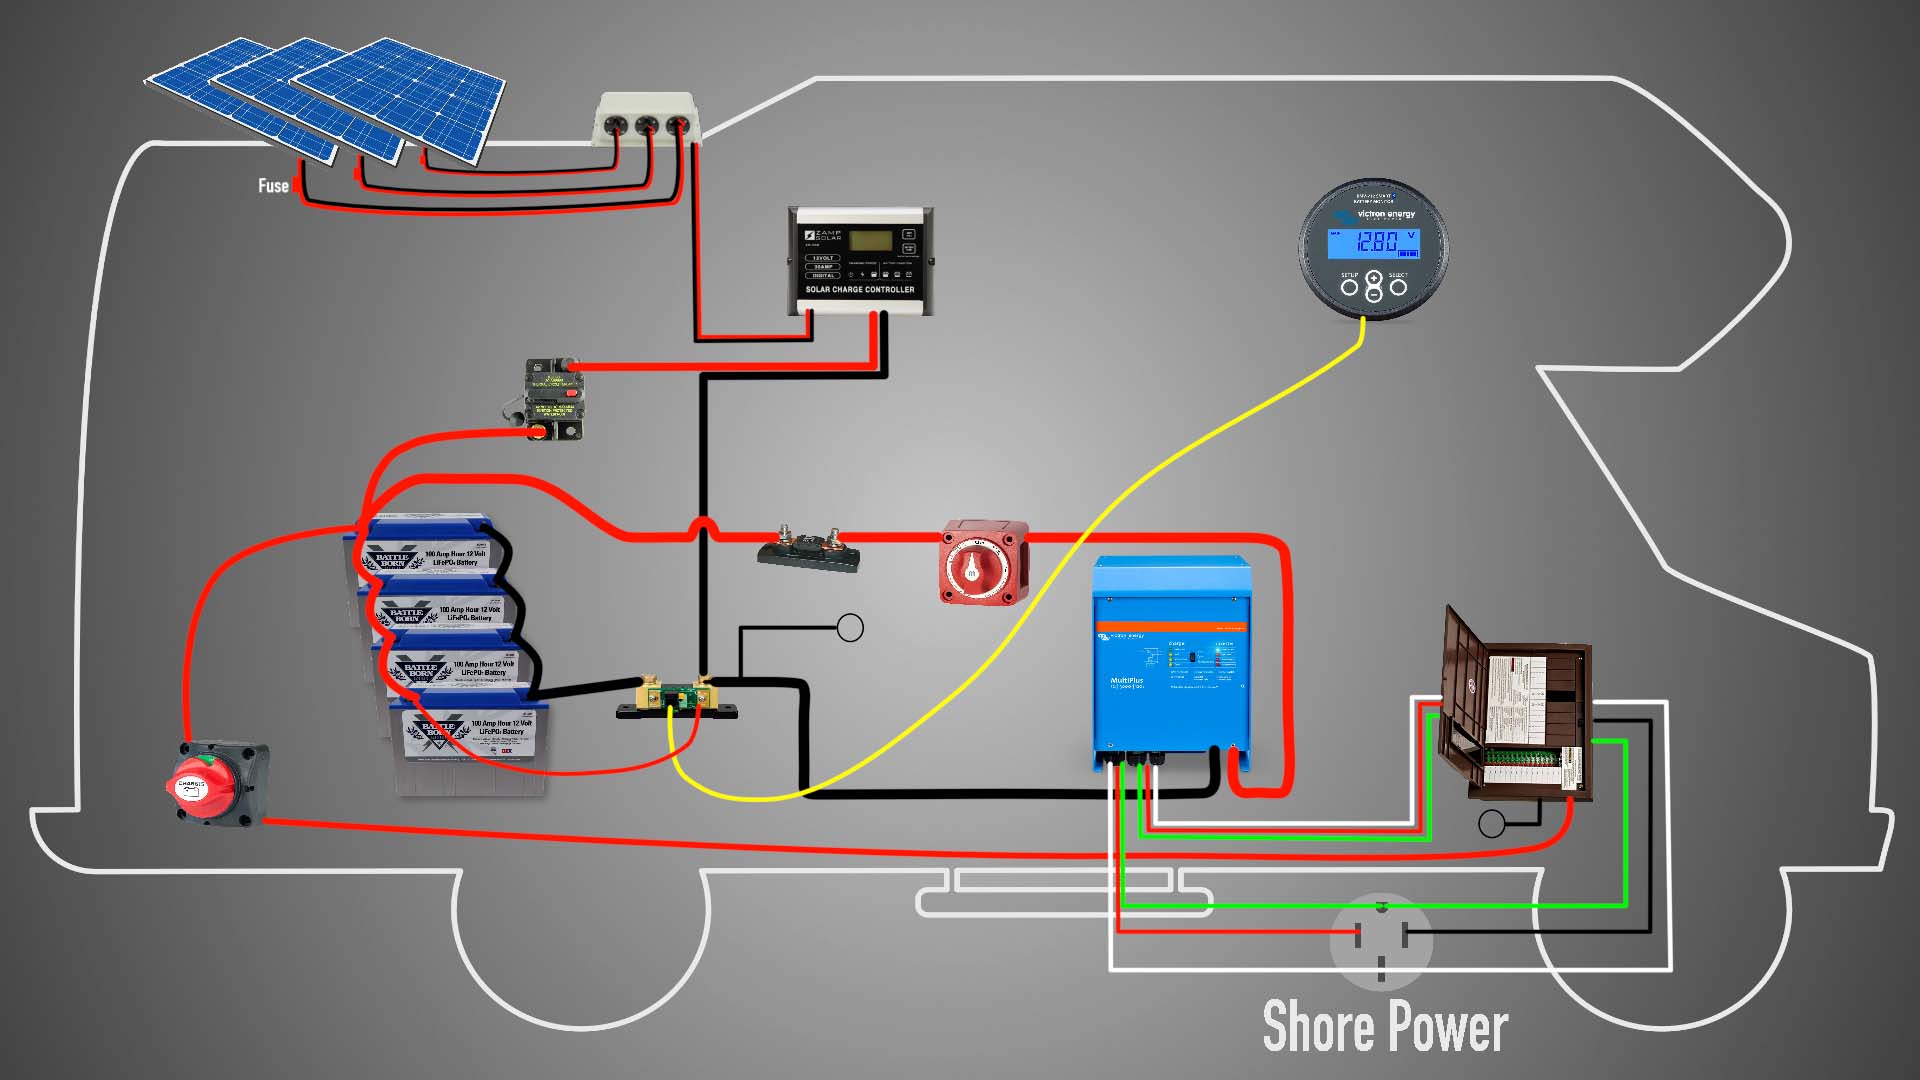
A well-designed 12V RV solar wiring diagram is crucial for a reliable and efficient off-grid solar system. In this article, we will delve into the world of 12V RV solar wiring, exploring the key components, design considerations, and a step-by-step guide to creating a comprehensive wiring diagram.
Introduction to 12V RV Solar Systems
A 12V RV solar system is designed to generate electricity from sunlight, store it in batteries, and power the electrical load of an RV. The system typically consists of solar panels, a charge controller, batteries, an inverter/charger, and various electrical loads such as lights, appliances, and outlets. The 12V system is the most common configuration for RVs, as it is compatible with the existing electrical infrastructure and provides a safe and efficient way to manage power.
Key Components of a 12V RV Solar Wiring Diagram
Before creating a wiring diagram, it’s essential to understand the key components involved:
- Solar Panels: These convert sunlight into electrical energy. The panels are typically connected in series and/or parallel to achieve the desired voltage and current.
- Charge Controller: This device regulates the flow of energy from the solar panels to the batteries, preventing overcharging and ensuring the batteries are charged efficiently.
- Batteries: These store the generated energy for later use. Deep cycle batteries, such as AGM or lithium-ion, are commonly used in RV solar systems.
- Inverter/Charger: This device converts the 12V DC power from the batteries to 120V AC power for appliances and outlets. It also charges the batteries from an external power source, such as a generator or shore power.
- Electrical Loads: These include lights, appliances, outlets, and other devices that consume energy.
Design Considerations for a 12V RV Solar Wiring Diagram
When designing a wiring diagram, consider the following factors:
- System Size: Determine the total wattage required to power the electrical loads. This will help size the solar array, charge controller, and batteries.
- Voltage Drop: Minimize voltage drop by using adequate wire sizing and keeping the wiring runs as short as possible.
- Safety: Ensure the system is designed with safety in mind, including proper grounding, fusing, and overcurrent protection.
- Efficiency: Optimize the system for maximum efficiency by selecting high-efficiency components and minimizing energy losses.
- Scalability: Design the system to be scalable, allowing for easy upgrades or additions in the future.

Step-by-Step Guide to Creating a 12V RV Solar Wiring Diagram
To create a comprehensive wiring diagram, follow these steps:
- Determine the System Size: Calculate the total wattage required to power the electrical loads. This will help size the solar array, charge controller, and batteries.
- Select the Components: Choose the solar panels, charge controller, batteries, inverter/charger, and electrical loads that meet the system size requirements.
- Create a System Layout: Sketch the physical layout of the system, including the location of each component and the wiring runs.
- Determine the Wire Sizing: Calculate the required wire size based on the ampacity and voltage drop.
- Create a Wiring Diagram: Using a wiring diagram software or a graphical representation, create a detailed diagram showing the connections between each component.
- Add Safety Features: Include proper grounding, fusing, and overcurrent protection to ensure a safe and reliable system.
- Review and Refine: Review the wiring diagram for accuracy and completeness, making any necessary adjustments or refinements.
Example 12V RV Solar Wiring Diagram
The following example diagram illustrates a basic 12V RV solar system:
- Solar Panels (4x 100W) connected in series and parallel to provide 400W of power
- Charge Controller (30A) regulating the flow of energy to the batteries
- Batteries (4x 200Ah) storing the generated energy
- Inverter/Charger (2000W) converting the 12V DC power to 120V AC power
- Electrical Loads (lights, appliances, outlets)
The wiring diagram would show the following connections:
- Solar panels connected to the charge controller
- Charge controller connected to the batteries
- Batteries connected to the inverter/charger
- Inverter/charger connected to the electrical loads
- Grounding and fusing for safety
Conclusion
Creating a comprehensive 12V RV solar wiring diagram requires careful consideration of the key components, design factors, and safety features. By following the step-by-step guide outlined in this article, you can design a reliable and efficient off-grid solar system for your RV. Remember to review and refine your wiring diagram to ensure accuracy and completeness. With a well-designed system, you can enjoy the freedom and independence of off-grid solar power on your next RV adventure.
Additional Resources
For further information and resources, consult the following:
- National Electric Code (NEC) guidelines for RV electrical systems
- Manufacturer documentation for solar panels, charge controllers, batteries, and inverters/chargers
- Online forums and communities dedicated to RV solar and off-grid power
- Professional electricians or solar installers for personalized guidance and expertise
By investing time and effort into creating a comprehensive 12V RV solar wiring diagram, you’ll be well on your way to enjoying the benefits of off-grid solar power and the freedom to explore the great outdoors.


