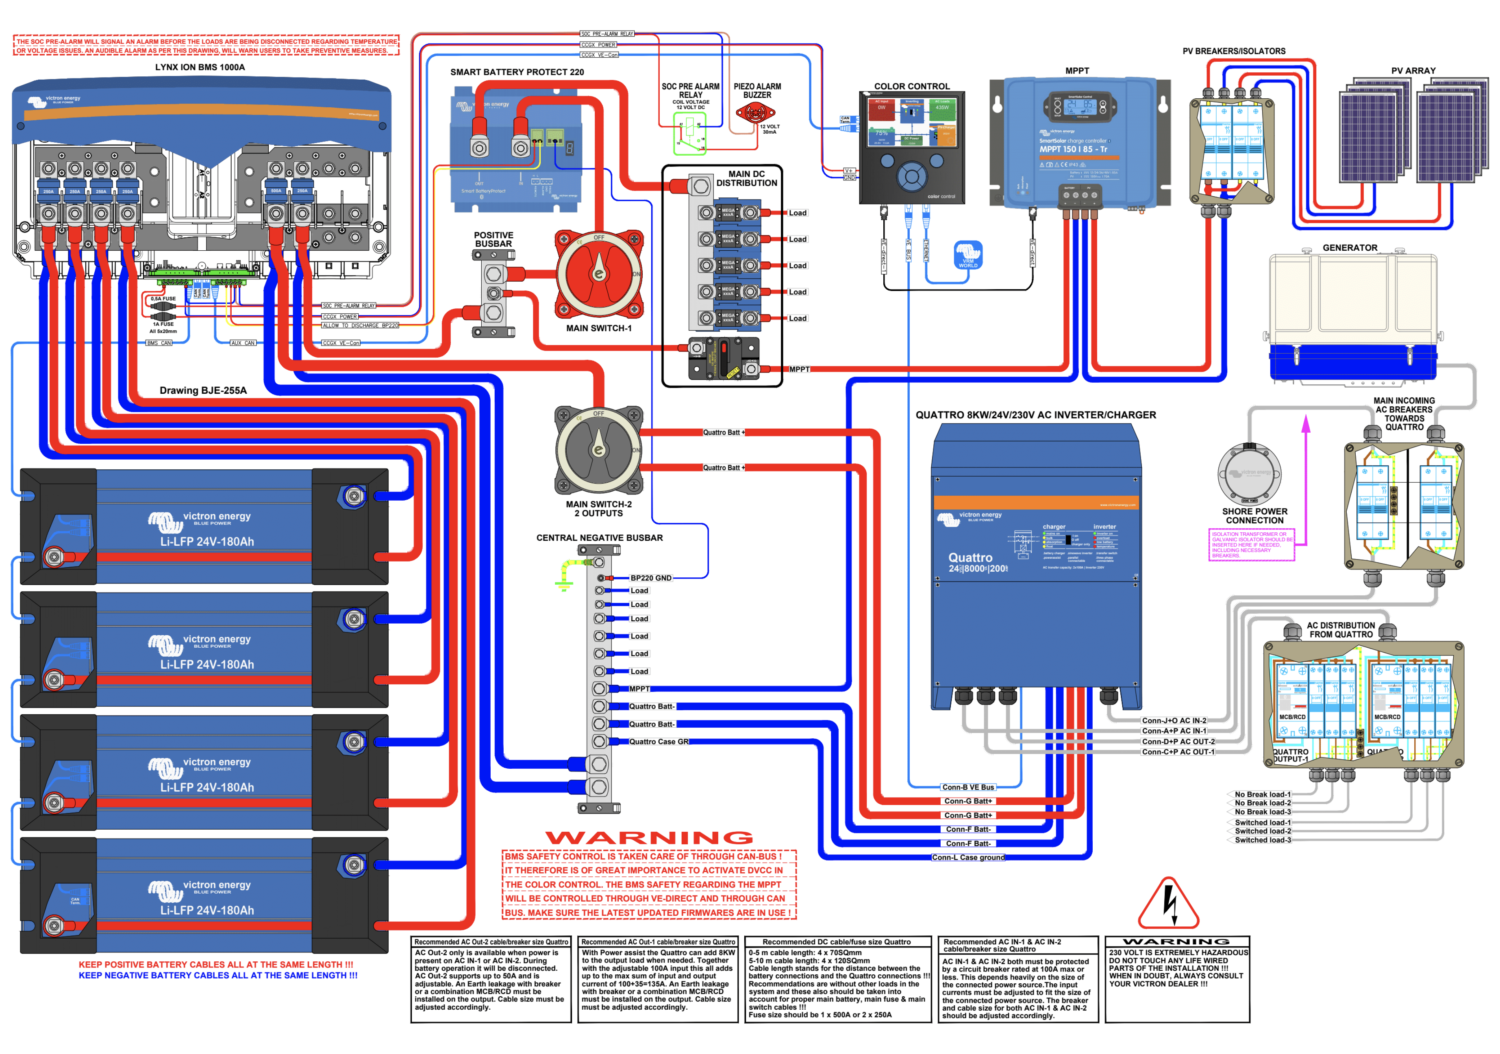
“Motorhome solar power wiring schematic”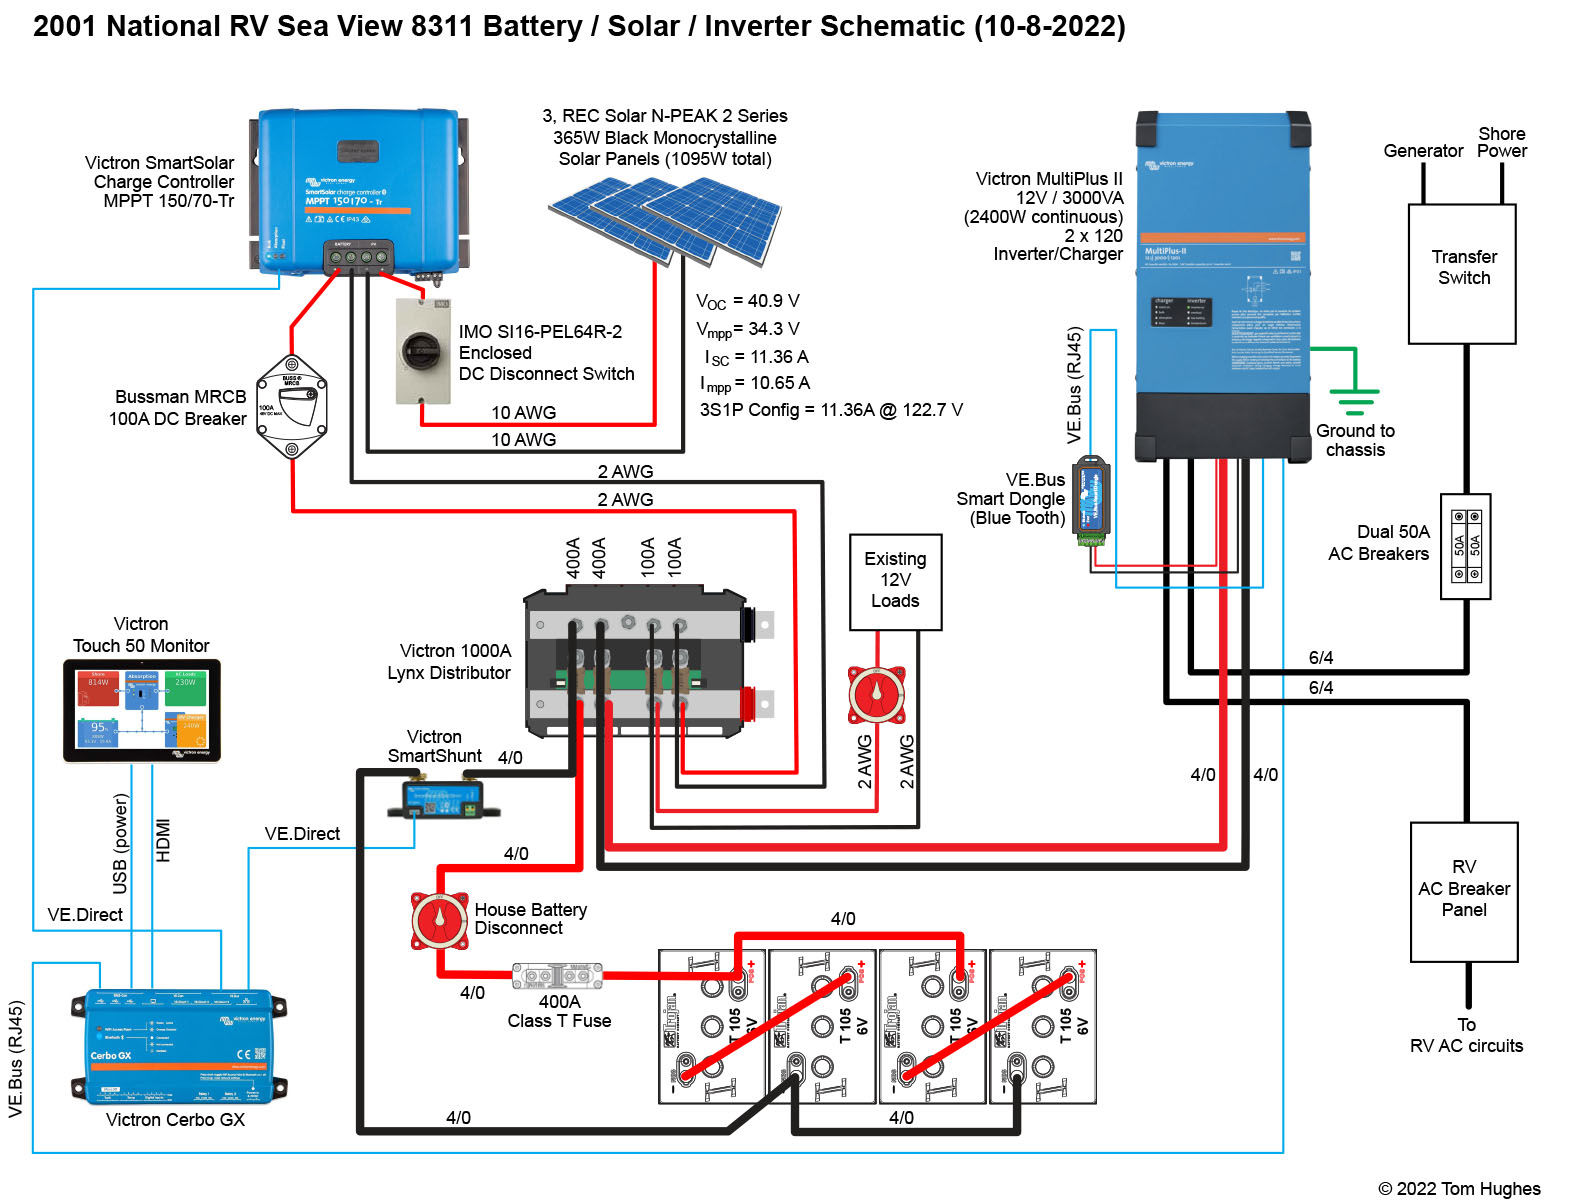
A well-designed solar power system can provide a reliable and sustainable source of energy, reducing reliance on traditional fuel-based generators and minimizing environmental impact. In this article, we will delve into the world of motorhome solar power wiring schematics, providing a comprehensive guide to help you design and install a safe and efficient solar power system for your motorhome.
Understanding the Basics of Solar Power
Before diving into the wiring schematic, it’s essential to understand the basics of solar power and how it works. Solar panels convert sunlight into electrical energy through a process known as photovoltaics (PV). The PV cells in the solar panels absorb sunlight and generate direct current (DC) electricity, which is then stored in deep cycle batteries or used to power electrical devices directly.
Components of a Motorhome Solar Power System
A typical motorhome solar power system consists of the following components:
- Solar Panels: These are the photovoltaic (PV) panels that convert sunlight into electrical energy. They come in various sizes and wattages, and their selection depends on the motorhome’s energy requirements.
- Charge Controller: This device regulates the flow of energy from the solar panels to the batteries, preventing overcharging and ensuring the batteries are charged efficiently.
- Deep Cycle Batteries: These batteries are designed to provide a steady flow of energy over a long period and are suitable for motorhome use. They store excess energy generated by the solar panels during the day for use at night or during periods of low sunlight.
- Inverter/Charger: This device converts the DC power from the batteries into alternating current (AC) power, which is used to power electrical devices such as lights, refrigerators, and air conditioners.
- Wiring and Connectors: These connect the various components of the solar power system, ensuring safe and efficient energy transfer.
Motorhome Solar Power Wiring Schematic
A wiring schematic is a diagram that shows the interconnection of the various components in a solar power system. It’s essential to create a wiring schematic before installing a solar power system to ensure safety, efficiency, and compliance with electrical codes.
Here’s a sample motorhome solar power wiring schematic:
Solar Panel Array

- Solar panels (2 x 200W) connected in parallel
- Solar panel output: 24V DC, 10A
- Wiring: 10 AWG, 20ft long

Charge Controller
- MPPT charge controller (30A, 24V)
- Input: Solar panel array output
- Output: Battery bank
- Wiring: 10 AWG, 10ft long
Battery Bank
- 2 x 200Ah deep cycle batteries connected in parallel
- Battery bank voltage: 24V DC
- Battery bank capacity: 400Ah
- Wiring: 4 AWG, 10ft long
Inverter/Charger
- 2000W pure sine wave inverter/charger
- Input: Battery bank
- Output: 120V AC, 20A
- Wiring: 10 AWG, 10ft long
AC Distribution Panel
- 120V AC distribution panel with circuit breakers
- Input: Inverter/charger output
- Output: Various AC loads (lights, refrigerator, air conditioner)
- Wiring: 12 AWG, 10ft long
Grounding and Bonding
- Grounding rod (8ft long)
- Bonding wire (10 AWG, 10ft long) connecting solar panel array, charge controller, battery bank, and inverter/charger to grounding rod
Safety Considerations
When designing and installing a motorhome solar power system, safety is paramount. Here are some essential safety considerations to keep in mind:
- Electrical shock: Ensure all wiring and connections are secure and insulated to prevent electrical shock.
- Fire risk: Keep flammable materials away from the solar power system, and ensure all components are installed and maintained properly.
- Overcharging: Use a charge controller to prevent overcharging of the batteries, which can cause damage or even a fire.
- Short circuits: Use circuit breakers or fuses to protect against short circuits, which can cause damage or even a fire.
Installation Best Practices
To ensure a safe and efficient solar power system, follow these installation best practices:
- Hire a professional: If you’re not experienced in electrical installations, hire a professional to design and install your solar power system.
- Follow manufacturer instructions: Read and follow the manufacturer’s instructions for each component, including solar panels, charge controllers, and inverters.
- Use proper wiring and connections: Use the correct gauge and type of wiring for each component, and ensure all connections are secure and insulated.
- Test the system: Test the solar power system before using it to ensure it’s functioning correctly and safely.
Conclusion
A motorhome solar power wiring schematic is a crucial component of a solar power system, ensuring safe and efficient energy transfer between the various components. By understanding the basics of solar power, selecting the right components, and following installation best practices, you can create a reliable and sustainable source of energy for your motorhome. Remember to prioritize safety and consult a professional if you’re unsure about any aspect of the installation process. With a well-designed solar power system, you can enjoy the freedom and convenience of motorhome travel while minimizing your environmental impact.
Additional Resources
For further information on motorhome solar power systems, including wiring schematics and installation guides, refer to the following resources:
- National Electrical Code (NEC) guidelines for solar power systems
- Manufacturer instructions for solar panels, charge controllers, and inverters
- Online forums and communities for motorhome owners and solar power enthusiasts
- Local electrical contractors and solar power installers
By following the guidelines and best practices outlined in this article, you can create a safe and efficient motorhome solar power system that meets your energy needs and helps reduce your environmental footprint. Happy camping!