“How to wire solar panels to a battery bank in a house”
One of the key components of a solar power system is the battery bank, which stores excess energy generated by the solar panels during the day for use at night or during periods of low sunlight. In this article, we will guide you through the process of wiring solar panels to a battery bank in a house, ensuring a safe and efficient installation.
Introduction to Solar Power Systems
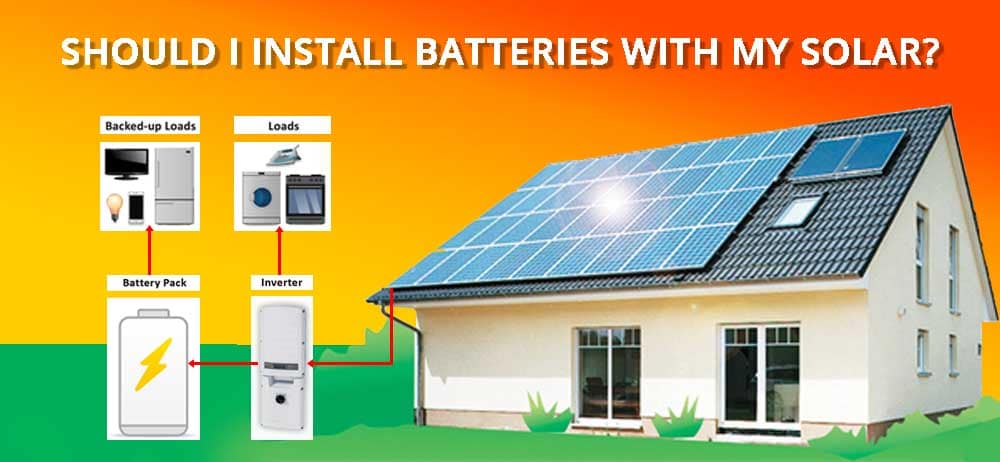
Before we dive into the wiring process, it’s essential to understand the basic components of a solar power system:
- Solar Panels: These are the photovoltaic (PV) panels that convert sunlight into electrical energy.
- Charge Controller: This device regulates the flow of energy from the solar panels to the battery bank, preventing overcharging and ensuring the batteries are charged efficiently.
- Battery Bank: This is the collection of deep cycle batteries that store excess energy generated by the solar panels for later use.
- Inverter/Charger: This device converts the DC power from the battery bank to AC power, which is used to power household appliances.
- Load Center: This is the main electrical panel that distributes power to the various circuits in the house.
Planning and Preparation

Before starting the wiring process, ensure you have:
- A suitable location for the battery bank: The battery bank should be installed in a well-ventilated area, away from living spaces and any potential ignition sources.
- A compatible charge controller: Choose a charge controller that matches the voltage and current ratings of your solar panels and battery bank.
- The correct wire sizing: Use wire that is rated for the maximum current and voltage of your system to prevent overheating and electrical fires.
- A wiring diagram: Create a detailed wiring diagram to ensure all connections are correct and safe.
Wiring the Solar Panels to the Charge Controller
To connect the solar panels to the charge controller:
- Connect the solar panel wires to the charge controller: Use MC4 connectors or equivalent to connect the solar panel wires to the charge controller. Ensure the positive (+) wire from the solar panel is connected to the positive input on the charge controller, and the negative (-) wire is connected to the negative input.
- Set the charge controller parameters: Configure the charge controller according to the manufacturer’s instructions, setting the voltage and current limits, as well as the charging algorithm.
- Connect the charge controller to the battery bank: Use heavy-duty cables to connect the charge controller to the battery bank. Ensure the positive (+) output from the charge controller is connected to the positive terminal on the battery bank, and the negative (-) output is connected to the negative terminal.

Wiring the Battery Bank to the Inverter/Charger
To connect the battery bank to the inverter/charger:
- Connect the battery bank wires to the inverter/charger: Use heavy-duty cables to connect the battery bank wires to the inverter/charger. Ensure the positive (+) terminal on the battery bank is connected to the positive input on the inverter/charger, and the negative (-) terminal is connected to the negative input.
- Configure the inverter/charger parameters: Set the inverter/charger parameters according to the manufacturer’s instructions, including the input voltage, output voltage, and charging algorithm.
- Connect the inverter/charger to the load center: Use a suitable wire size to connect the inverter/charger to the load center, ensuring the AC output from the inverter/charger is connected to the main electrical panel.
Wiring the Load Center
To connect the load center to the rest of the house:
- Connect the main electrical panel to the household circuits: Use suitable wire sizes to connect the main electrical panel to the various household circuits, including lighting, outlets, and appliances.
- Install circuit breakers or fuses: Install circuit breakers or fuses to protect the household circuits from overloads and shorts.
- Connect the grounding system: Connect the grounding system to the load center, ensuring all metal components are bonded to the grounding system.
Safety Considerations
When wiring a solar power system, safety is paramount:
- Use proper wiring and connectors: Ensure all wiring and connectors are rated for the maximum current and voltage of your system.
- Follow manufacturer instructions: Adhere to the manufacturer’s instructions for each component, including the solar panels, charge controller, battery bank, and inverter/charger.
- Install overcurrent protection: Install overcurrent protection devices, such as circuit breakers or fuses, to prevent electrical fires and damage to the system.
- Ground the system: Ensure the system is properly grounded to prevent electrical shocks and damage to the components.
Maintenance and Monitoring
To ensure the longevity and efficiency of your solar power system:
- Monitor the system performance: Use a monitoring system to track the performance of your solar power system, including the energy generated, energy consumed, and battery state of charge.
- Perform regular maintenance: Regularly inspect the system components, cleaning the solar panels and checking the battery bank for signs of wear and tear.
- Update the system software: Update the system software and firmware to ensure you have the latest features and improvements.
Conclusion
Wiring solar panels to a battery bank in a house requires careful planning, attention to safety, and adherence to manufacturer instructions. By following the steps outlined in this guide, you can ensure a safe and efficient installation of your solar power system, providing you with a reliable source of renewable energy for years to come. Remember to always follow local electrical codes and regulations, and consider hiring a professional if you are unsure about any aspect of the installation process.


