“How to connect solar panels to a home inverter system”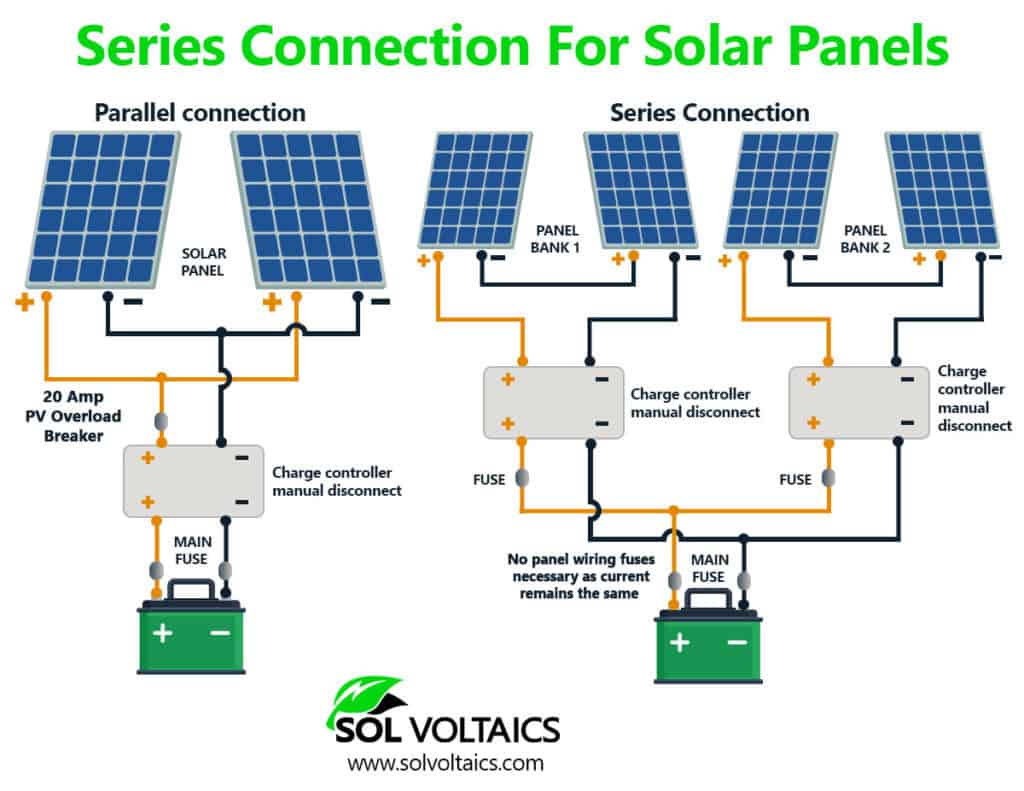
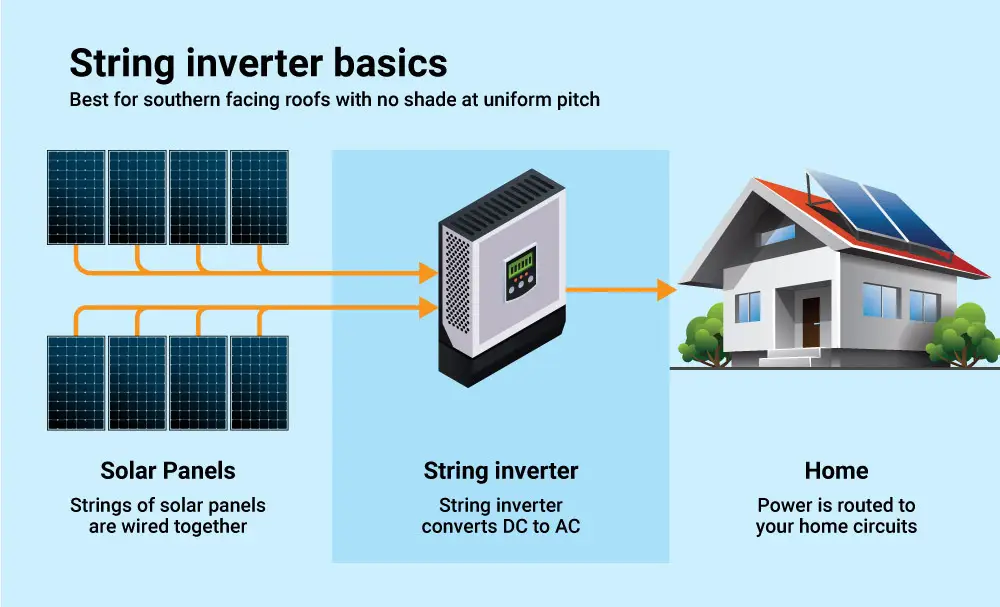
One of the key components of a solar power system is the inverter, which converts the DC power generated by the solar panels into AC power that can be used in the home. In this article, we will guide you through the process of connecting solar panels to a home inverter system, including the necessary steps, equipment, and safety precautions.
Introduction to Solar Panel Systems
Before we dive into the connection process, it’s essential to understand the basics of a solar panel system. A typical solar panel system consists of:
- Solar Panels: These are the photovoltaic (PV) panels that convert sunlight into DC power.
- Mounting System: This includes the racks, clamps, and other hardware that secure the solar panels to the roof or ground.
- Inverter: This device converts the DC power generated by the solar panels into AC power that can be used in the home.
- Charge Controller: This device regulates the flow of energy from the solar panels to the battery bank, if you have one.
- Battery Bank: This is an optional component that stores excess energy generated by the solar panels for later use.
Choosing the Right Inverter
Selecting the right inverter for your solar panel system is crucial to ensure efficient and safe operation. Here are some factors to consider when choosing an inverter:
- Power Rating: The inverter should be able to handle the total power output of your solar panel system.
- Efficiency: Look for an inverter with high efficiency ratings (typically above 95%) to minimize energy losses.
- Compatibility: Ensure the inverter is compatible with your solar panel system and battery bank, if you have one.
- Safety Features: Opt for an inverter with built-in safety features, such as overcharge protection, short-circuit protection, and ground fault protection.
Preparing the Solar Panels
Before connecting the solar panels to the inverter, make sure they are properly installed and configured. Here are the steps to follow:
- Inspect the Solar Panels: Check the solar panels for any damage or defects.
- Clean the Solar Panels: Clean the solar panels to ensure maximum energy production.
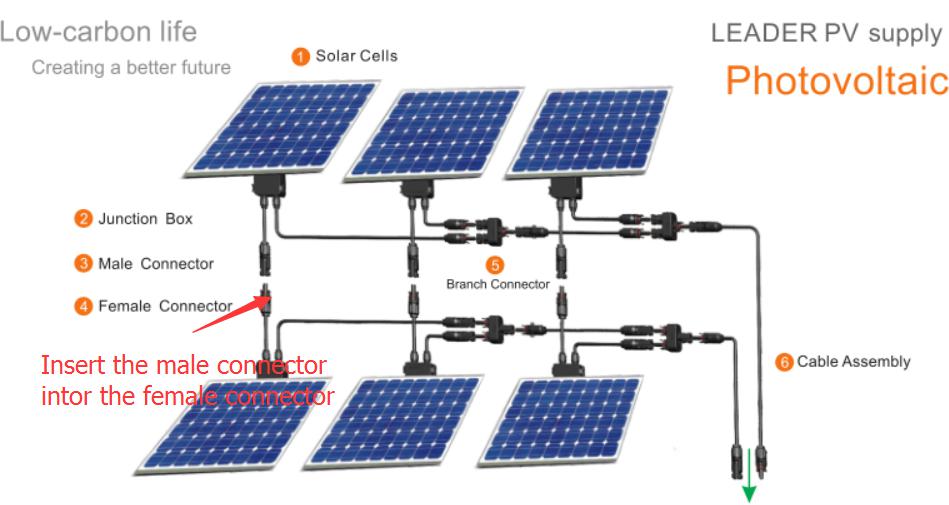
- Configure the Solar Panels: Connect the solar panels in series and/or parallel to achieve the desired voltage and current output.
- Test the Solar Panels: Use a multimeter to test the voltage and current output of the solar panels.

Connecting the Solar Panels to the Inverter
Now that the solar panels are prepared, it’s time to connect them to the inverter. Follow these steps:
- Connect the Positive Wire: Connect the positive wire from the solar panel array to the positive terminal on the inverter.
- Connect the Negative Wire: Connect the negative wire from the solar panel array to the negative terminal on the inverter.
- Secure the Connections: Use wire nuts or connectors to secure the connections to the inverter terminals.
- Test the Connection: Use a multimeter to test the voltage and current output of the solar panel array at the inverter terminals.
Configuring the Inverter
Once the solar panels are connected to the inverter, you need to configure the inverter settings to optimize performance. Here are the steps to follow:
- Set the Input Voltage: Set the input voltage range to match the voltage output of the solar panel array.
- Set the Output Voltage: Set the output voltage to match the voltage requirements of your home electrical system (typically 120/240V).
- Set the Frequency: Set the frequency to match the frequency of your home electrical system (typically 50/60Hz).
- Configure the Charge Controller: If you have a battery bank, configure the charge controller to regulate the flow of energy from the solar panels to the battery bank.
Connecting the Inverter to the Home Electrical System
Now that the inverter is configured, it’s time to connect it to the home electrical system. Follow these steps:
- Connect the Output Wires: Connect the output wires from the inverter to the electrical panel in your home.
- Connect the Ground Wire: Connect the ground wire from the inverter to the electrical panel ground bus.
- Secure the Connections: Use wire nuts or connectors to secure the connections to the electrical panel.
- Test the Connection: Use a multimeter to test the voltage and current output of the inverter at the electrical panel.
Safety Precautions
When connecting solar panels to a home inverter system, safety is paramount. Here are some safety precautions to follow:
- Turn off the Power: Turn off the power to the inverter and electrical panel before making any connections.
- Use Personal Protective Equipment: Wear personal protective equipment, such as gloves and safety glasses, when working with electrical systems.
- Follow Manufacturer Instructions: Follow the manufacturer instructions for the inverter, solar panels, and other components.
- Hire a Professional: If you’re not experienced with electrical systems, hire a professional to connect the solar panels to the inverter system.
Conclusion
Connecting solar panels to a home inverter system requires careful planning, attention to detail, and a focus on safety. By following the steps outlined in this guide, you can ensure a safe and efficient connection that maximizes the energy production of your solar panel system. Remember to always follow the manufacturer instructions and take necessary safety precautions when working with electrical systems. With a properly connected solar panel system, you can enjoy the benefits of renewable energy and reduce your reliance on the grid.
Additional Tips and Recommendations
- Monitor the System Performance: Regularly monitor the system performance to ensure it’s operating efficiently.
- Perform Regular Maintenance: Perform regular maintenance tasks, such as cleaning the solar panels and checking the connections, to ensure optimal system performance.
- Consider Energy Storage: Consider adding energy storage, such as a battery bank, to store excess energy generated by the solar panels for later use.
- Consult with a Professional: Consult with a professional if you’re unsure about any aspect of the connection process or system configuration.
By following the guidelines and recommendations outlined in this article, you can successfully connect your solar panels to a home inverter system and enjoy the benefits of renewable energy.