“How to connect a 12V solar panel to an RV battery bank?”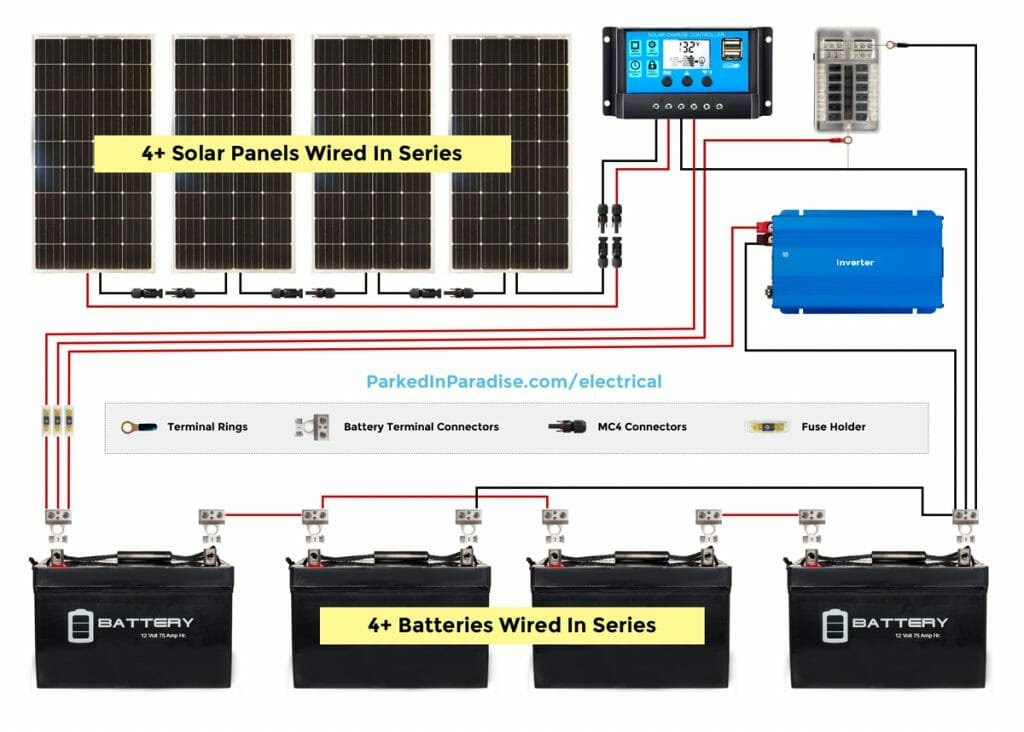
Connecting a 12V solar panel to an RV battery bank can be a daunting task, but with the right guidance, it can be a straightforward process. In this article, we will walk you through the steps to connect a 12V solar panel to an RV battery bank, ensuring a safe and efficient installation.
Understanding the Components
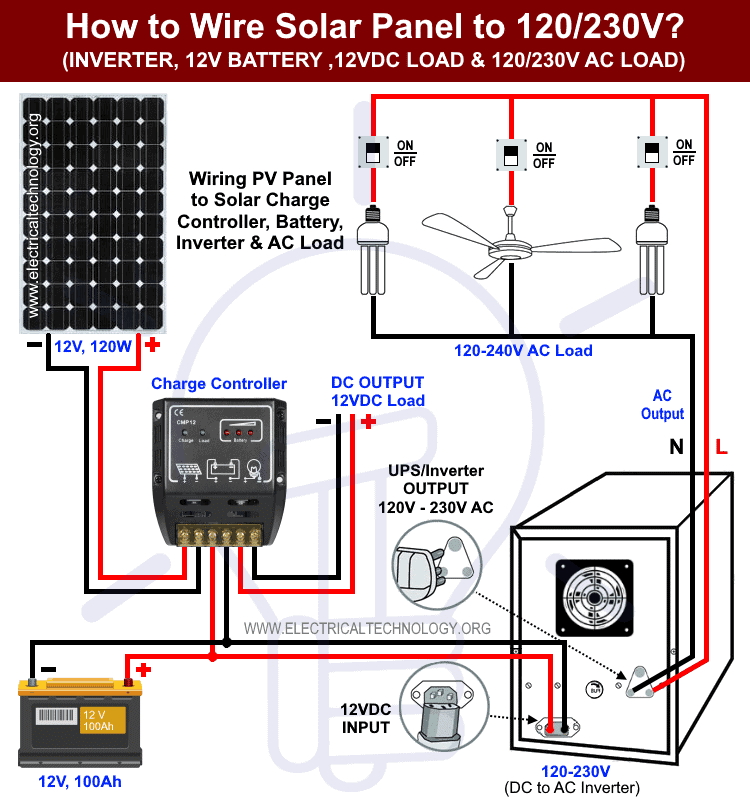
Before we dive into the installation process, it’s essential to understand the components involved. A typical RV solar panel system consists of:
- Solar Panel: A 12V solar panel is designed to generate electricity from sunlight. The panel’s voltage and current output will depend on its size and efficiency.
- Charge Controller: A charge controller regulates the flow of energy from the solar panel to the battery bank, preventing overcharging and ensuring safe charging.
- Battery Bank: The RV battery bank is a collection of deep cycle batteries designed to store energy for later use.
- Wiring and Connectors: The wiring and connectors used to connect the solar panel to the charge controller and battery bank must be suitable for outdoor use and able to handle the panel’s output.
Choosing the Right Components
To ensure a safe and efficient installation, it’s crucial to choose the right components for your RV solar panel system. Consider the following factors:
- Solar Panel Size: Choose a solar panel that meets your energy needs. A larger panel will generate more energy, but may be more expensive.
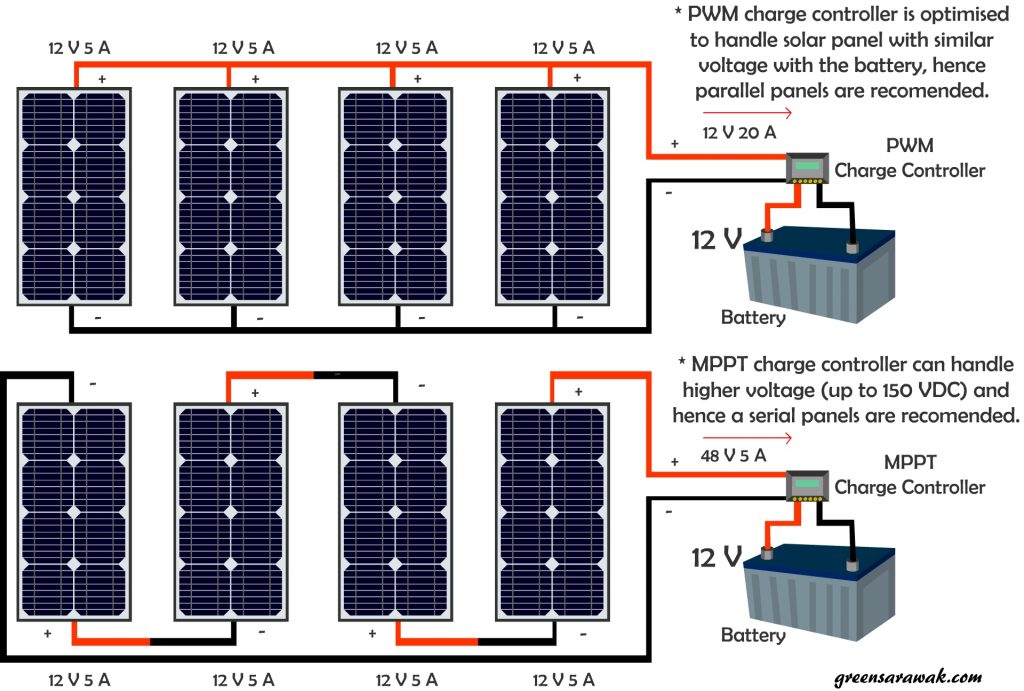
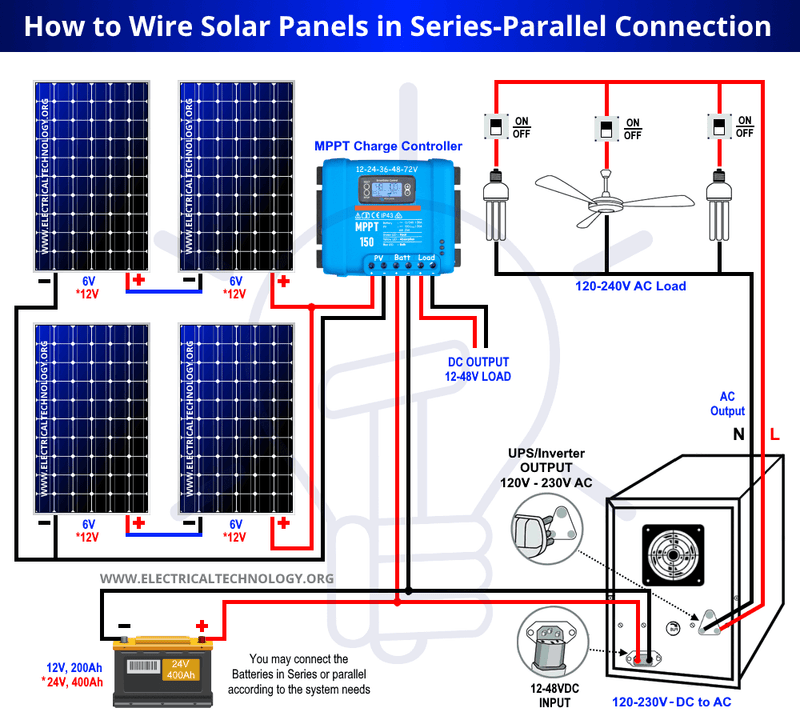
- Charge Controller Type: There are two types of charge controllers: PWM (Pulse Width Modulation) and MPPT (Maximum Power Point Tracking). MPPT charge controllers are more efficient, but also more expensive.
- Battery Bank Size: Ensure the battery bank is large enough to store the energy generated by the solar panel.
- Wiring and Connectors: Choose wiring and connectors that are suitable for outdoor use and can handle the panel’s output.
Preparation and Safety Precautions
Before starting the installation, take the following safety precautions:
- Turn off the RV’s electrical system: Ensure the RV’s electrical system is turned off to prevent any accidental short circuits.
- Wear protective gear: Wear protective gear, such as gloves and safety glasses, to prevent injury.
- Ensure a safe working area: Ensure the working area is clear of any obstacles or tripping hazards.
Step-by-Step Installation Guide
Now that we have covered the basics, let’s move on to the step-by-step installation guide:
Step 1: Mount the Solar Panel
- Choose a suitable location: Choose a location for the solar panel that receives maximum sunlight and is clear of any obstructions.
- Mount the panel: Mount the solar panel to the RV’s roof or a suitable mounting bracket, ensuring it is secure and level.
- Connect the panel’s wiring: Connect the solar panel’s wiring to the charge controller, ensuring the positive (+) and negative (-) wires are connected correctly.
Step 2: Install the Charge Controller
- Choose a suitable location: Choose a location for the charge controller that is protected from the elements and easily accessible.
- Mount the charge controller: Mount the charge controller to the RV’s wall or a suitable mounting bracket, ensuring it is secure and level.
- Connect the panel’s wiring: Connect the solar panel’s wiring to the charge controller, ensuring the positive (+) and negative (-) wires are connected correctly.
- Connect the battery bank wiring: Connect the battery bank wiring to the charge controller, ensuring the positive (+) and negative (-) wires are connected correctly.
Step 3: Connect the Battery Bank
- Choose a suitable location: Choose a location for the battery bank that is protected from the elements and easily accessible.
- Connect the battery bank wiring: Connect the battery bank wiring to the charge controller, ensuring the positive (+) and negative (-) wires are connected correctly.
- Ensure the battery bank is fully charged: Ensure the battery bank is fully charged before connecting it to the solar panel system.
Step 4: Test the System
- Turn on the RV’s electrical system: Turn on the RV’s electrical system and ensure all appliances are turned off.
- Check the charge controller’s display: Check the charge controller’s display to ensure it is functioning correctly and displaying the correct voltage and current readings.
- Check the battery bank’s voltage: Check the battery bank’s voltage to ensure it is within the recommended range (typically between 12.4V and 14.4V).
Troubleshooting Common Issues
If you encounter any issues during the installation or operation of your RV solar panel system, refer to the following troubleshooting guide:
- Low voltage readings: Check the solar panel’s wiring and connections to ensure they are secure and not damaged.
- High voltage readings: Check the charge controller’s settings to ensure it is configured correctly.
- No power output: Check the solar panel’s wiring and connections to ensure they are secure and not damaged.
Conclusion
Connecting a 12V solar panel to an RV battery bank can be a straightforward process if you follow the steps outlined in this guide. Remember to choose the right components, take necessary safety precautions, and test the system thoroughly to ensure a safe and efficient installation. With a properly installed RV solar panel system, you can enjoy the benefits of renewable energy and reduce your reliance on traditional power sources. Whether you’re a seasoned RVer or just starting out, a solar panel system can be a valuable addition to your RV’s electrical system.
Additional Tips and Recommendations
- Monitor your system’s performance: Regularly check your system’s performance to ensure it is operating efficiently.
- Keep your system clean: Regularly clean your solar panel and charge controller to ensure optimal performance.
- Consider upgrading to a larger system: If you find that your current system is not meeting your energy needs, consider upgrading to a larger system.
- Consult a professional: If you’re unsure about any aspect of the installation process, consult a professional to ensure a safe and efficient installation.
By following the steps outlined in this guide, you can enjoy the benefits of a 12V solar panel system and reduce your reliance on traditional power sources. Happy camping!