“How do I wire a 12V solar system in my RV?”
Installing a 12V solar system in your RV can be a great way to reduce your reliance on generators and shore power, and to enjoy the freedom to camp off-grid for longer periods. However, wiring a solar system can seem like a daunting task, especially for those without prior experience with electrical systems. In this article, we’ll walk you through the steps to wire a 12V solar system in your RV, and provide you with a comprehensive guide to help you get started.
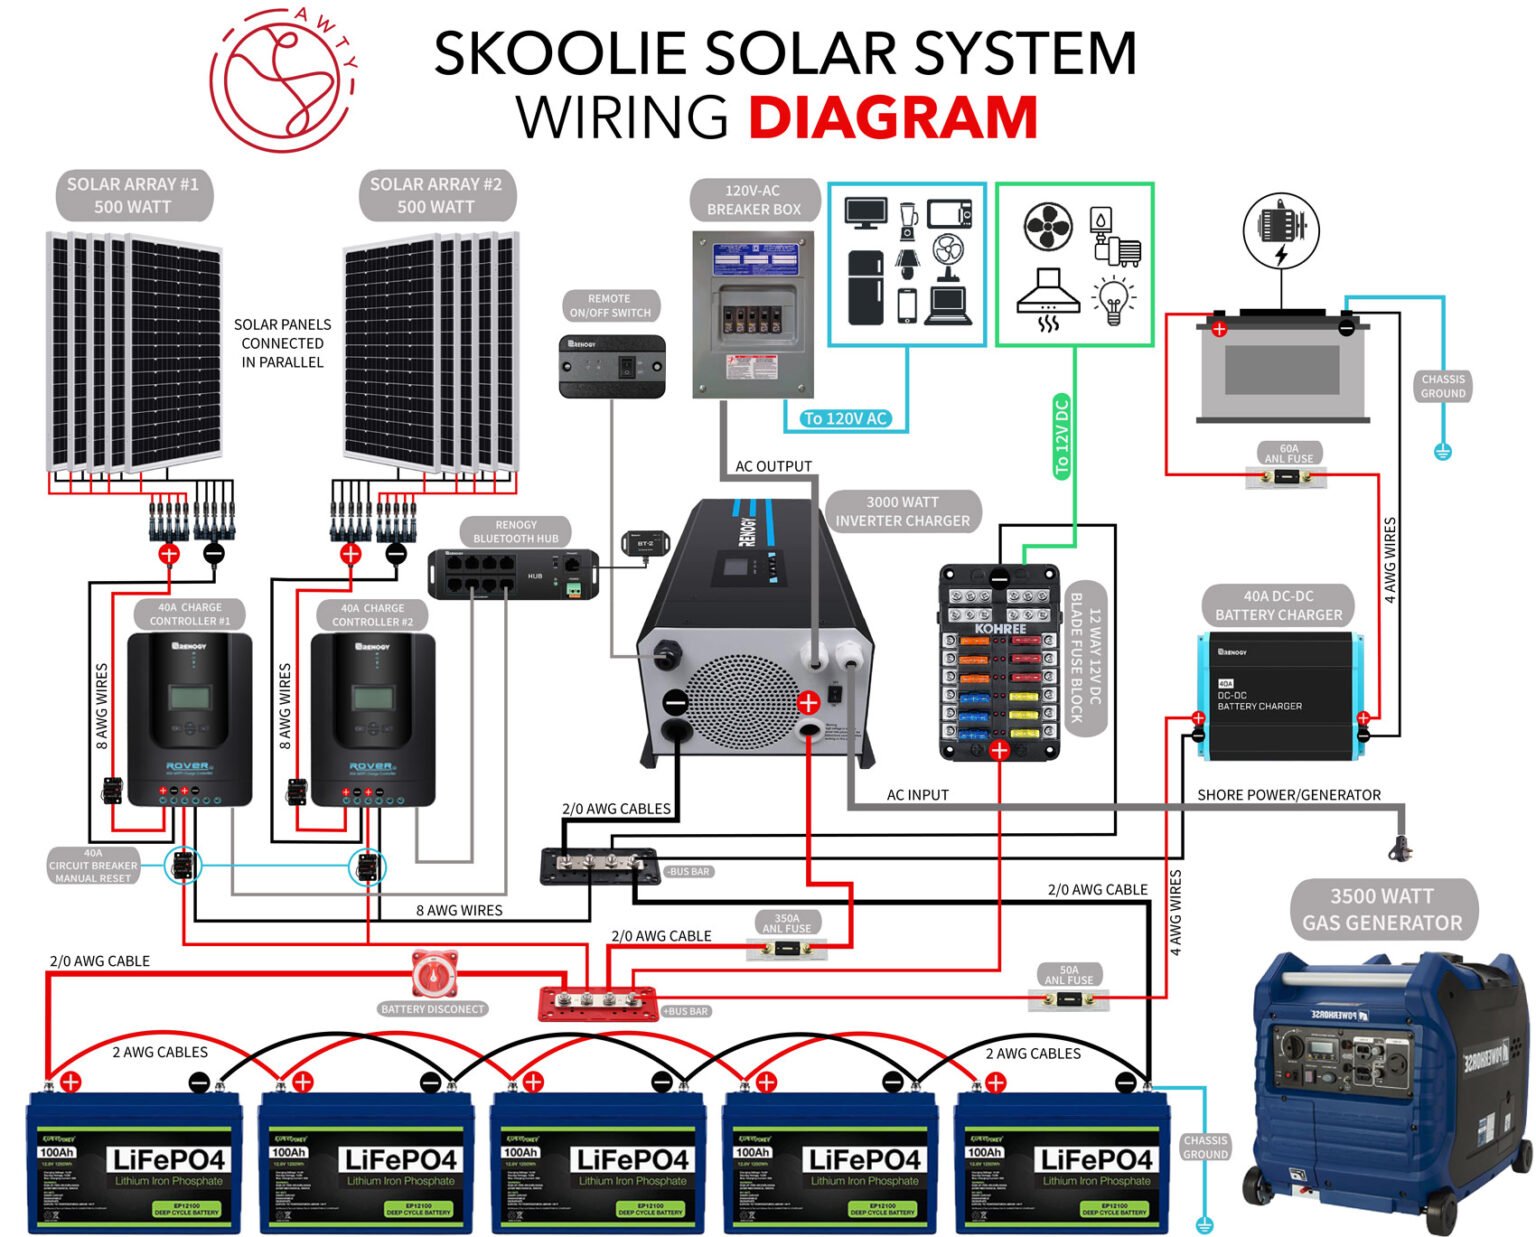
Understanding the Components of a 12V Solar System
Before we dive into the wiring process, it’s essential to understand the components of a 12V solar system. A typical 12V solar system consists of:
- Solar Panels: These are the devices that convert sunlight into electrical energy. They’re usually mounted on the roof of your RV and come in various sizes and wattages.
- Charge Controller: This device regulates the flow of energy from the solar panels to the battery bank. It ensures that the battery is charged safely and efficiently.
- Battery Bank: This is the storage system for your solar energy. It’s typically composed of deep cycle batteries that are designed to provide a steady flow of power over a long period.
- Inverter/Charger: This device converts the DC power from the battery bank into AC power, which is usable by your RV’s appliances. It also charges the battery bank when connected to shore power or a generator.
- Wiring and Connectors: These are the components that connect the various parts of the solar system together.
Step 1: Plan Your System
Before you start wiring your solar system, it’s crucial to plan your setup carefully. Consider the following factors:
- Power Requirements: Calculate your RV’s power needs by considering the appliances you’ll be using, their power consumption, and how long you’ll be using them.
- Solar Panel Size: Determine the size of the solar panels you’ll need to generate enough power to meet your energy requirements.
- Battery Bank Size: Calculate the size of the battery bank you’ll need to store enough energy to power your RV during periods of low sunlight or at night.
- Inverter/Charger Size: Choose an inverter/charger that can handle the power requirements of your RV and charge your battery bank efficiently.
Step 2: Mount the Solar Panels
Once you’ve planned your system, it’s time to mount the solar panels on your RV’s roof. Make sure to:
- Choose a suitable location: Select a location that receives direct sunlight for most of the day.
- Use a mounting system: Invest in a sturdy mounting system that can secure the solar panels to your RV’s roof.
- Ensure proper ventilation: Leave enough space between the solar panels and your RV’s roof to allow for proper ventilation and cooling.

Step 3: Install the Charge Controller
The charge controller is a critical component of your solar system, as it regulates the flow of energy from the solar panels to the battery bank. To install the charge controller:
- Choose a location: Mount the charge controller in a dry, cool location, such as a cabinet or a storage compartment.
- Connect the solar panels: Connect the solar panels to the charge controller using the recommended wiring and connectors.
- Configure the charge controller: Follow the manufacturer’s instructions to configure the charge controller for your specific solar system.
Step 4: Install the Battery Bank
The battery bank is the heart of your solar system, providing stored energy for your RV. To install the battery bank:
- Choose a location: Select a location that is dry, cool, and well-ventilated, such as a storage compartment or a battery box.
- Connect the batteries: Connect the batteries in a series-parallel configuration to achieve the desired voltage and capacity.
- Install a battery monitor: Install a battery monitor to keep track of your battery bank’s state of charge and health.
Step 5: Install the Inverter/Charger
The inverter/charger converts DC power from the battery bank into AC power for your RV’s appliances. To install the inverter/charger:
- Choose a location: Mount the inverter/charger in a dry, cool location, such as a cabinet or a storage compartment.
- Connect the battery bank: Connect the battery bank to the inverter/charger using the recommended wiring and connectors.
- Configure the inverter/charger: Follow the manufacturer’s instructions to configure the inverter/charger for your specific solar system.
Step 6: Wire the System
Now that you’ve installed all the components, it’s time to wire the system together. Make sure to:
- Use the correct wiring: Use wiring that is rated for the voltage and current of your system.
- Follow safety guidelines: Follow safety guidelines, such as using protective gear and ensuring proper insulation, to prevent electrical shock or fires.
- Test the system: Test the system to ensure everything is working properly and safely.
Safety Considerations
When wiring a 12V solar system, safety is paramount. Make sure to:
- Use proper protective gear: Wear protective gear, such as gloves and safety glasses, when working with electrical systems.
- Ensure proper insulation: Ensure that all wiring and connections are properly insulated to prevent electrical shock or fires.
- Follow manufacturer’s instructions: Follow the manufacturer’s instructions for each component, and ensure that all connections are secure and meet the recommended standards.
Troubleshooting and Maintenance
To ensure your solar system operates efficiently and safely, regular maintenance and troubleshooting are essential. Make sure to:
- Monitor the system: Regularly monitor the system’s performance, including the solar panel output, battery bank state of charge, and inverter/charger efficiency.
- Clean the solar panels: Clean the solar panels regularly to ensure maximum energy production.
- Check connections: Check all connections regularly to ensure they are secure and meet the recommended standards.
Conclusion
Wiring a 12V solar system in your RV can seem daunting, but with careful planning, attention to safety, and a thorough understanding of the components and wiring process, you can create a reliable and efficient solar system that meets your energy needs. Remember to follow safety guidelines, use proper protective gear, and ensure proper insulation to prevent electrical shock or fires. With a well-designed and properly installed solar system, you can enjoy the freedom to camp off-grid for longer periods, reduce your reliance on generators and shore power, and contribute to a more sustainable future.


