“Home solar electrical wiring tutorial”
Not only does it reduce your carbon footprint, but it also helps you save money on your electricity bills. However, installing a solar panel system can be a complex process, especially when it comes to electrical wiring. In this article, we will provide a comprehensive guide on home solar electrical wiring, covering the basics, safety precautions, and step-by-step instructions.
Introduction to Solar Panel Systems
A solar panel system consists of several components, including:
- Solar Panels: These are the photovoltaic (PV) cells that convert sunlight into electrical energy.
- Mounting System: This is the structure that supports the solar panels and holds them in place.
- Inverter: This device converts the DC power generated by the solar panels into AC power, which is usable in your home.
- Charge Controller: This component regulates the flow of energy from the solar panels to the battery bank (if you have one).
- Battery Bank: This is a collection of deep cycle batteries that store excess energy generated by the solar panels for later use.
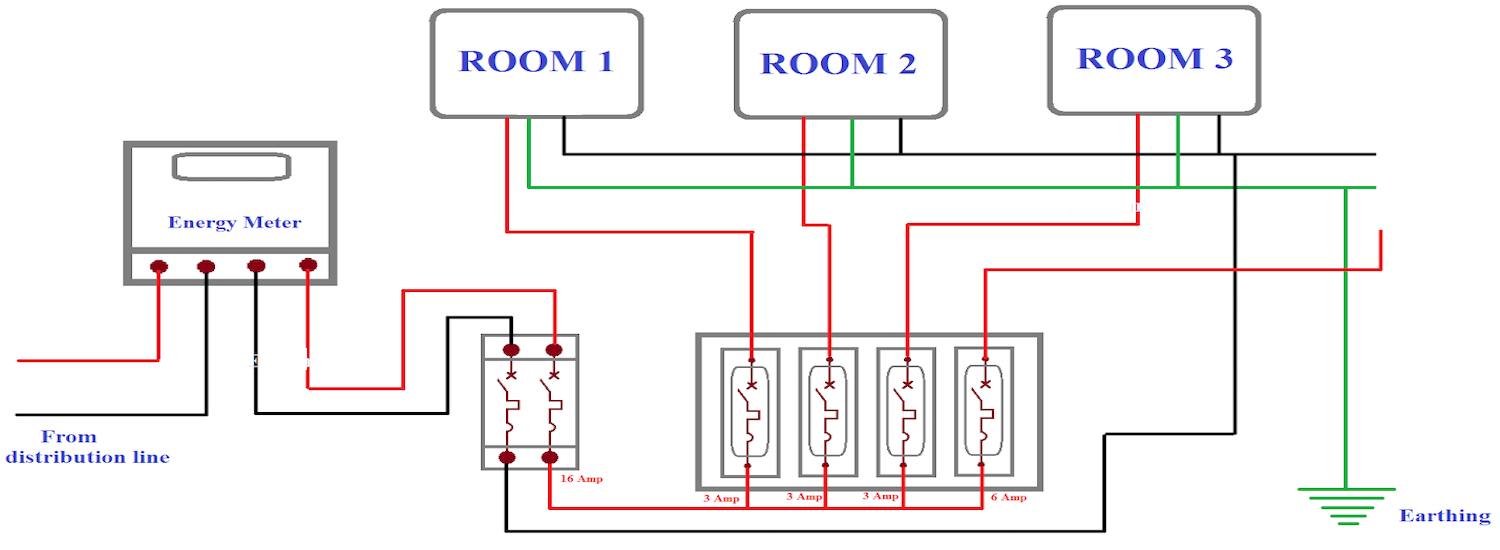
- Electrical Panel: This is the main distribution panel that connects the solar panel system to your home’s electrical grid.
Safety Precautions
Before starting any electrical work, it’s essential to take safety precautions to avoid injuries and damage to your property. Here are some guidelines to follow:
- Turn off the main power supply: Ensure that the main power supply to your home is turned off before starting any electrical work.
- Use personal protective equipment: Wear protective gear, such as gloves, safety glasses, and a hard hat, to prevent injuries.
- Follow local electrical codes: Familiarize yourself with local electrical codes and regulations to ensure compliance.
- Hire a licensed electrician: If you’re not experienced in electrical work, consider hiring a licensed electrician to perform the installation.
Electrical Wiring Basics
Before diving into the solar panel system wiring, it’s essential to understand the basics of electrical wiring. Here are some key concepts:

- Volts (V): Measure the voltage of an electrical circuit.
- Amps (A): Measure the current flow in an electrical circuit.
- Watts (W): Measure the power consumption of an electrical circuit.
- Ohms (Ω): Measure the resistance in an electrical circuit.
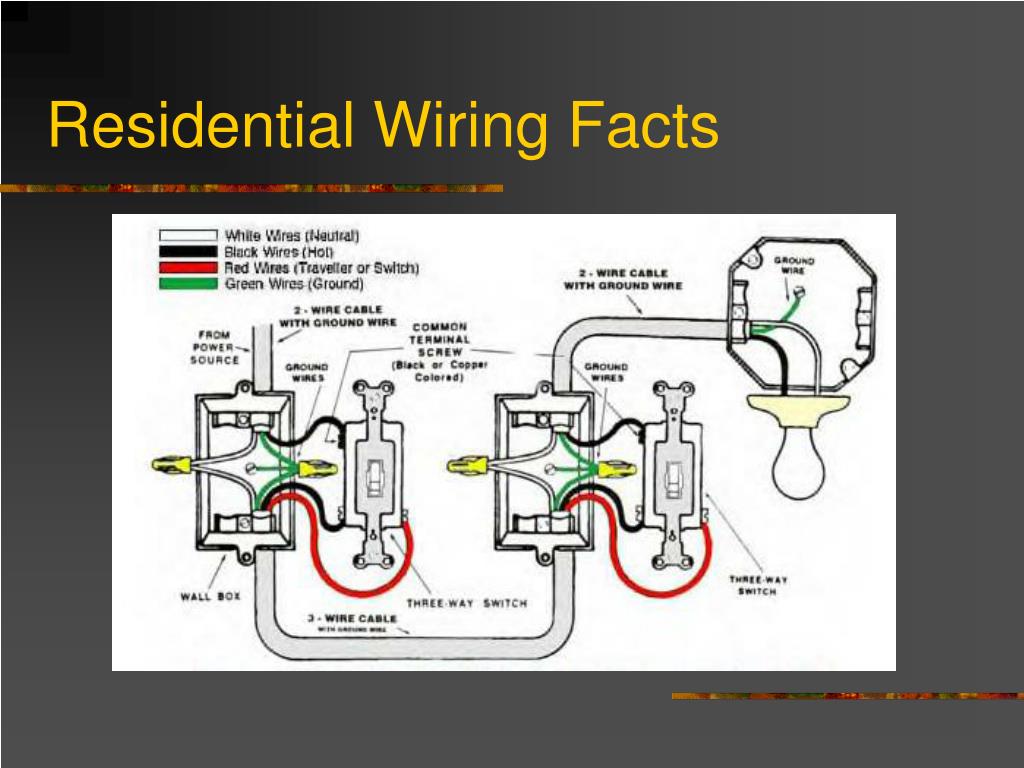
- Grounding: A grounding system provides a safe path for electrical current to flow to the ground, preventing electrical shock.
Solar Panel System Wiring
Now that we’ve covered the basics, let’s move on to the solar panel system wiring. Here’s a step-by-step guide:
Step 1: Connect the Solar Panels
- Series connection: Connect the solar panels in series to increase the voltage output.
- Parallel connection: Connect the solar panels in parallel to increase the current output.
- Use MC4 connectors: Use MC4 connectors to connect the solar panels to the rest of the system.
Step 2: Connect the Inverter
- DC input: Connect the DC output from the solar panels to the inverter’s DC input.
- AC output: Connect the inverter’s AC output to the electrical panel.
- Grounding: Ensure the inverter is properly grounded to prevent electrical shock.
Step 3: Connect the Charge Controller
- DC input: Connect the DC output from the solar panels to the charge controller’s DC input.
- DC output: Connect the charge controller’s DC output to the battery bank.
- Remote monitoring: Connect the charge controller to a remote monitoring system (if applicable).
Step 4: Connect the Battery Bank
- Series connection: Connect the batteries in series to increase the voltage output.
- Parallel connection: Connect the batteries in parallel to increase the current output.
- Use battery connectors: Use battery connectors to connect the batteries to the rest of the system.
Step 5: Connect the Electrical Panel
- AC input: Connect the AC output from the inverter to the electrical panel’s AC input.
- Main breaker: Ensure the main breaker is installed and functioning correctly.
- Grounding: Ensure the electrical panel is properly grounded to prevent electrical shock.
Testing and Commissioning
Once the wiring is complete, it’s essential to test and commission the system to ensure it’s functioning correctly. Here are some steps to follow:
- Visual inspection: Perform a visual inspection of the system to ensure all connections are secure and proper.
- Voltage and current tests: Use a multimeter to test the voltage and current output of the system.
- Inverter testing: Test the inverter to ensure it’s functioning correctly and producing the expected output.
- Remote monitoring: Test the remote monitoring system (if applicable) to ensure it’s receiving data from the system.
Conclusion
In conclusion, home solar electrical wiring can be a complex process, but with the right guidance, you can ensure a safe and efficient installation. Remember to follow safety precautions, understand the basics of electrical wiring, and follow the step-by-step guide outlined in this article. If you’re not experienced in electrical work, consider hiring a licensed electrician to perform the installation. With a properly installed solar panel system, you can enjoy the benefits of renewable energy and reduce your carbon footprint.
Additional Resources
For further information and guidance, consult the following resources:
- National Electric Code (NEC): The NEC provides guidelines for electrical wiring and safety.
- International Association of Electrical Inspectors (IAEI): The IAEI provides resources and training for electrical inspectors and contractors.
- Solar Energy Industries Association (SEIA): The SEIA provides resources and guidance for solar panel system installations.
- Local electrical codes and regulations: Familiarize yourself with local electrical codes and regulations to ensure compliance.
By following the guidelines outlined in this article and consulting additional resources, you can ensure a safe and efficient home solar electrical wiring installation. Remember to always prioritize safety and compliance when working with electrical systems.