“DIY solar panel wiring for home energy system”
With the cost of solar panels decreasing dramatically over the years, it’s now more feasible than ever to install a DIY solar panel system for your home. However, wiring your solar panels correctly is crucial to ensure a safe and efficient energy system. In this article, we’ll provide a step-by-step guide on DIY solar panel wiring for a home energy system.
Understanding Solar Panel Systems
Before we dive into the wiring process, it’s essential to understand the basic components of a solar panel system. A typical home solar panel system consists of:
- Solar Panels: Also known as photovoltaic (PV) panels, these are the panels that convert sunlight into electrical energy.
- Mounting System: The racking system that secures the solar panels to the roof or ground.
- Inverter: The device that converts DC (direct current) power from the solar panels into AC (alternating current) power for household use.
- Charge Controller: The device that regulates the flow of energy from the solar panels to the battery bank (if your system includes one).
- Battery Bank: A set of deep cycle batteries that store excess energy generated by the solar panels for later use.
- Electrical Panel: The main electrical panel that distributes power to the various circuits in your home.
Pre-Wiring Considerations
Before starting the wiring process, ensure that you’ve considered the following:
- System Size: Determine the size of your solar panel system based on your energy needs and available space.
- Panel Configuration: Decide on the configuration of your solar panels, including the number of panels, series, and parallel connections.
- Inverter Selection: Choose an inverter that matches your system’s power output and is compatible with your panel configuration.
- Wiring and Cabling: Ensure that you have the necessary wiring and cabling to connect the various components of your system.
- Safety: Familiarize yourself with local electrical codes and safety regulations, and take necessary precautions to avoid electrical shock or fire hazards.

Wiring the Solar Panels

To wire the solar panels, follow these steps:
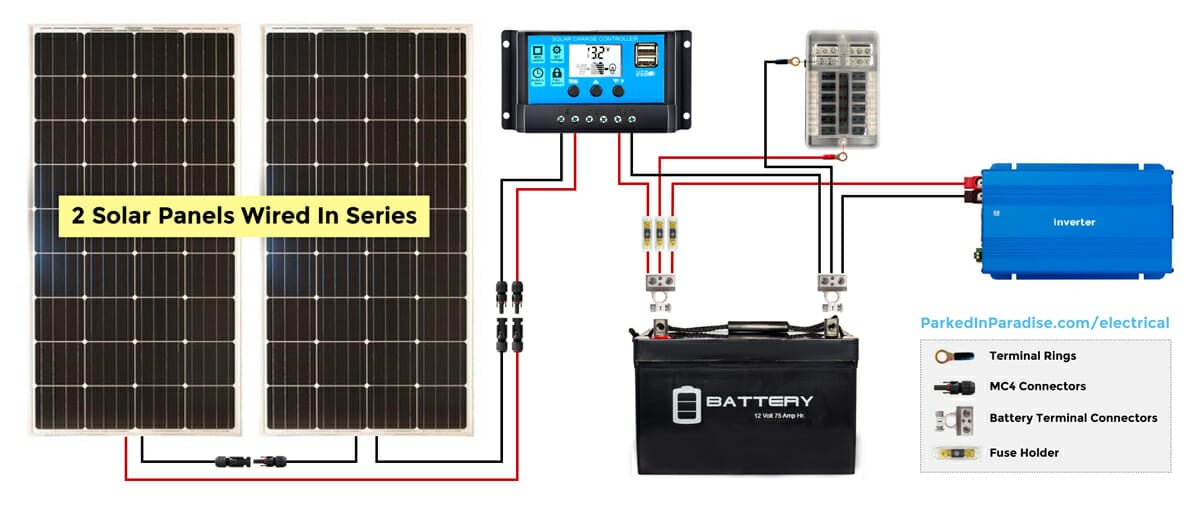
- Connect the Solar Panels in Series: Connect the positive terminal of one panel to the negative terminal of the next panel, creating a series connection. This will increase the voltage output of your system.
- Connect the Solar Panels in Parallel: Connect the positive terminals of multiple panels together, and the negative terminals together, creating a parallel connection. This will increase the current output of your system.
- Use MC4 Connectors: Use MC4 connectors to connect the solar panels to each other and to the charge controller or inverter. These connectors are specifically designed for outdoor use and can withstand harsh weather conditions.
- Secure the Wiring: Use wire clips or cable ties to secure the wiring to the solar panel frames or mounting system, ensuring that the wiring is protected from damage and weather exposure.
Connecting the Charge Controller
The charge controller regulates the flow of energy from the solar panels to the battery bank (if your system includes one). To connect the charge controller:
- Connect the Solar Panel Output: Connect the output of the solar panels (or the output of the series/parallel connection) to the charge controller input.
- Connect the Battery Bank: Connect the output of the charge controller to the battery bank (if your system includes one).
- Set the Charge Controller Parameters: Set the charge controller parameters, including the voltage and current limits, to ensure safe and efficient charging of the battery bank.
Connecting the Inverter
The inverter converts DC power from the solar panels (or battery bank) into AC power for household use. To connect the inverter:
- Connect the DC Input: Connect the output of the charge controller (or the output of the solar panels) to the DC input of the inverter.
- Connect the AC Output: Connect the AC output of the inverter to the electrical panel.
- Set the Inverter Parameters: Set the inverter parameters, including the AC output voltage and frequency, to ensure compatibility with your household electrical system.
Grounding and Bonding
Proper grounding and bonding are crucial to ensure the safety and efficiency of your solar panel system. To ground and bond your system:
- Ground the Solar Panels: Connect the solar panel frames to a grounding rod or system, ensuring that the panels are grounded and protected from electrical shock.
- Bond the System Components: Connect the system components, including the inverter, charge controller, and electrical panel, to the grounding system, ensuring that all components are at the same electrical potential.
Testing and Commissioning
Before energizing your solar panel system, perform the following tests:
- Visual Inspection: Inspect the wiring and connections to ensure that they are secure and meet local electrical codes.
- Voltage and Current Tests: Measure the voltage and current output of the solar panels, charge controller, and inverter to ensure that they are within the specified limits.
- System Performance Test: Monitor the system performance over a period of time to ensure that it is operating efficiently and safely.
Conclusion
Wiring your DIY solar panel system requires careful planning, attention to detail, and adherence to safety regulations. By following this comprehensive guide, you’ll be able to create a safe and efficient home energy system that harnesses the power of the sun. Remember to consult local electrical codes and regulations, and seek professional assistance if you’re unsure about any aspect of the wiring process. With a well-designed and installed solar panel system, you’ll be able to enjoy the benefits of renewable energy and reduce your carbon footprint for years to come.
Recommendations and References
For further information and guidance on DIY solar panel wiring, we recommend consulting the following resources:
- National Electric Code (NEC): The NEC provides guidelines for safe electrical installations, including solar panel systems.
- International Association of Electrical Inspectors (IAEI): The IAEI offers training and resources for electrical inspectors and installers, including solar panel system installations.
- Solar Energy Industries Association (SEIA): The SEIA provides guidance and resources for solar panel system installations, including wiring and electrical considerations.
- Local Electrical Codes and Regulations: Familiarize yourself with local electrical codes and regulations, which may vary depending on your location.
Remember, safety should always be your top priority when working with electrical systems. If you’re unsure about any aspect of the wiring process, seek professional assistance to ensure a safe and efficient installation.