“DIY 12 volt RV solar panel wiring instructions”
Installing a solar panel system on your RV can seem daunting, but with the right guidance, you can do it yourself and enjoy the benefits of clean, free energy. In this article, we will provide a step-by-step guide on how to wire a 12-volt RV solar panel system, helping you to harness the power of the sun and keep your RV’s batteries charged.
Understanding the Basics
Before we dive into the wiring instructions, it’s essential to understand the basics of a 12-volt RV solar panel system. A typical system consists of:
- Solar Panels: These are the panels that convert sunlight into electrical energy. They are usually mounted on the roof of the RV and come in various sizes and wattages.
- Charge Controller: This device regulates the flow of energy from the solar panels to the batteries, preventing overcharging and ensuring the batteries are charged efficiently.
- Batteries: These store the energy generated by the solar panels, providing power to the RV’s electrical systems when the sun is not shining.
- Wiring and Connectors: These connect the solar panels, charge controller, and batteries, allowing the energy to flow between components.
Materials Needed
To complete the wiring of your 12-volt RV solar panel system, you will need the following materials:
- Solar panels ( choose the right size and wattage for your RV)
- Charge controller ( compatible with your solar panel system)
- Batteries (deep cycle batteries are recommended)
- Wiring (10-14 AWG wire is suitable for most RV solar panel systems)
- Connectors (MC4 connectors are commonly used for solar panel systems)
- Fuses and fuse holders
- Circuit breaker or switch
- Electrical tape and cable ties
- Multimeter (for testing and troubleshooting)
Step 1: Plan Your System
Before starting the wiring process, it’s crucial to plan your system carefully. Consider the following factors:
- Energy Requirements: Calculate your RV’s energy needs, taking into account the appliances and devices you plan to power.
- Solar Panel Size and Wattage: Choose solar panels that can generate enough energy to meet your RV’s needs.
- Battery Capacity: Select batteries with sufficient capacity to store the energy generated by the solar panels.
- Charge Controller: Ensure the charge controller is compatible with your solar panel system and can handle the maximum power output.
Step 2: Mount the Solar Panels
Mount the solar panels on the roof of your RV, ensuring they are securely fastened and angled to receive the maximum amount of sunlight. Make sure to follow the manufacturer’s instructions for mounting and grounding the panels.
Step 3: Connect the Solar Panels
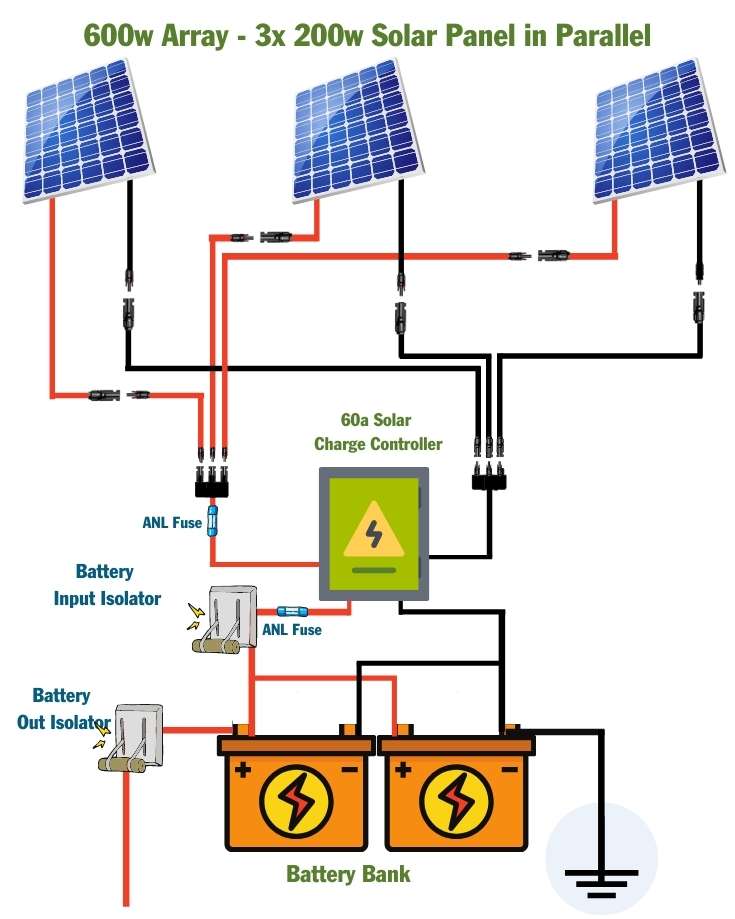
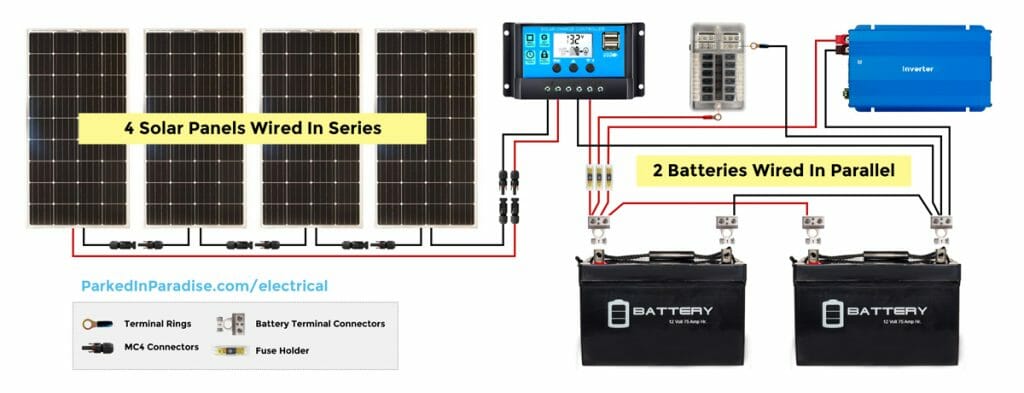
Connect the solar panels in series or parallel, depending on your system’s configuration. If you have multiple panels, you can connect them in series to increase the voltage or in parallel to increase the current.
- Series Connection: Connect the positive terminal of one panel to the negative terminal of the next panel, and so on.
- Parallel Connection: Connect the positive terminals of all panels together and the negative terminals together.
Step 4: Install the Charge Controller
Mount the charge controller in a well-ventilated area, away from direct sunlight and moisture. Connect the solar panels to the charge controller, following the manufacturer’s instructions.
- Positive Connection: Connect the positive wire from the solar panels to the positive terminal on the charge controller.
- Negative Connection: Connect the negative wire from the solar panels to the negative terminal on the charge controller.
Step 5: Connect the Batteries
Connect the batteries to the charge controller, ensuring the positive and negative terminals are connected correctly.
- Positive Connection: Connect the positive wire from the charge controller to the positive terminal on the batteries.
- Negative Connection: Connect the negative wire from the charge controller to the negative terminal on the batteries.
Step 6: Add Fuses and Fuse Holders
Install fuses and fuse holders to protect your system from overcurrent and short circuits.
- Fuse Rating: Choose a fuse with a rating that matches the maximum current output of your solar panel system.
- Fuse Holder: Install the fuse holder between the solar panels and the charge controller.
Step 7: Install a Circuit Breaker or Switch
Install a circuit breaker or switch to disconnect the solar panel system from the batteries when not in use.
- Circuit Breaker: Install a circuit breaker with a rating that matches the maximum current output of your solar panel system.
- Switch: Install a switch between the solar panels and the charge controller, allowing you to disconnect the system when not in use.
Step 8: Test the System
Use a multimeter to test the system, ensuring everything is working correctly.
- Voltage Test: Measure the voltage output of the solar panels and the charge controller to ensure they are within the expected range.
- Current Test: Measure the current output of the solar panels and the charge controller to ensure they are within the expected range.
Tips and Precautions
When working with electrical systems, it’s essential to follow safety precautions to avoid injury or damage to your RV.
- Use proper wiring and connectors: Ensure all wiring and connectors are rated for the maximum current output of your solar panel system.
- Avoid overloading: Don’t overload your system with too many appliances or devices, as this can cause damage to the components.
- Monitor your system: Regularly check your system’s performance and make adjustments as needed to ensure optimal performance.
- Follow manufacturer’s instructions: Always follow the manufacturer’s instructions for the specific components used in your system.
Conclusion
Installing a 12-volt RV solar panel system can seem daunting, but with the right guidance, you can do it yourself and enjoy the benefits of clean, free energy. By following these step-by-step instructions and taking the necessary safety precautions, you can create a reliable and efficient solar panel system that meets your RV’s energy needs. Remember to plan your system carefully, use proper wiring and connectors, and monitor your system’s performance to ensure optimal performance. Happy camping and enjoy the sunshine!


