“Complete wiring process for home solar system”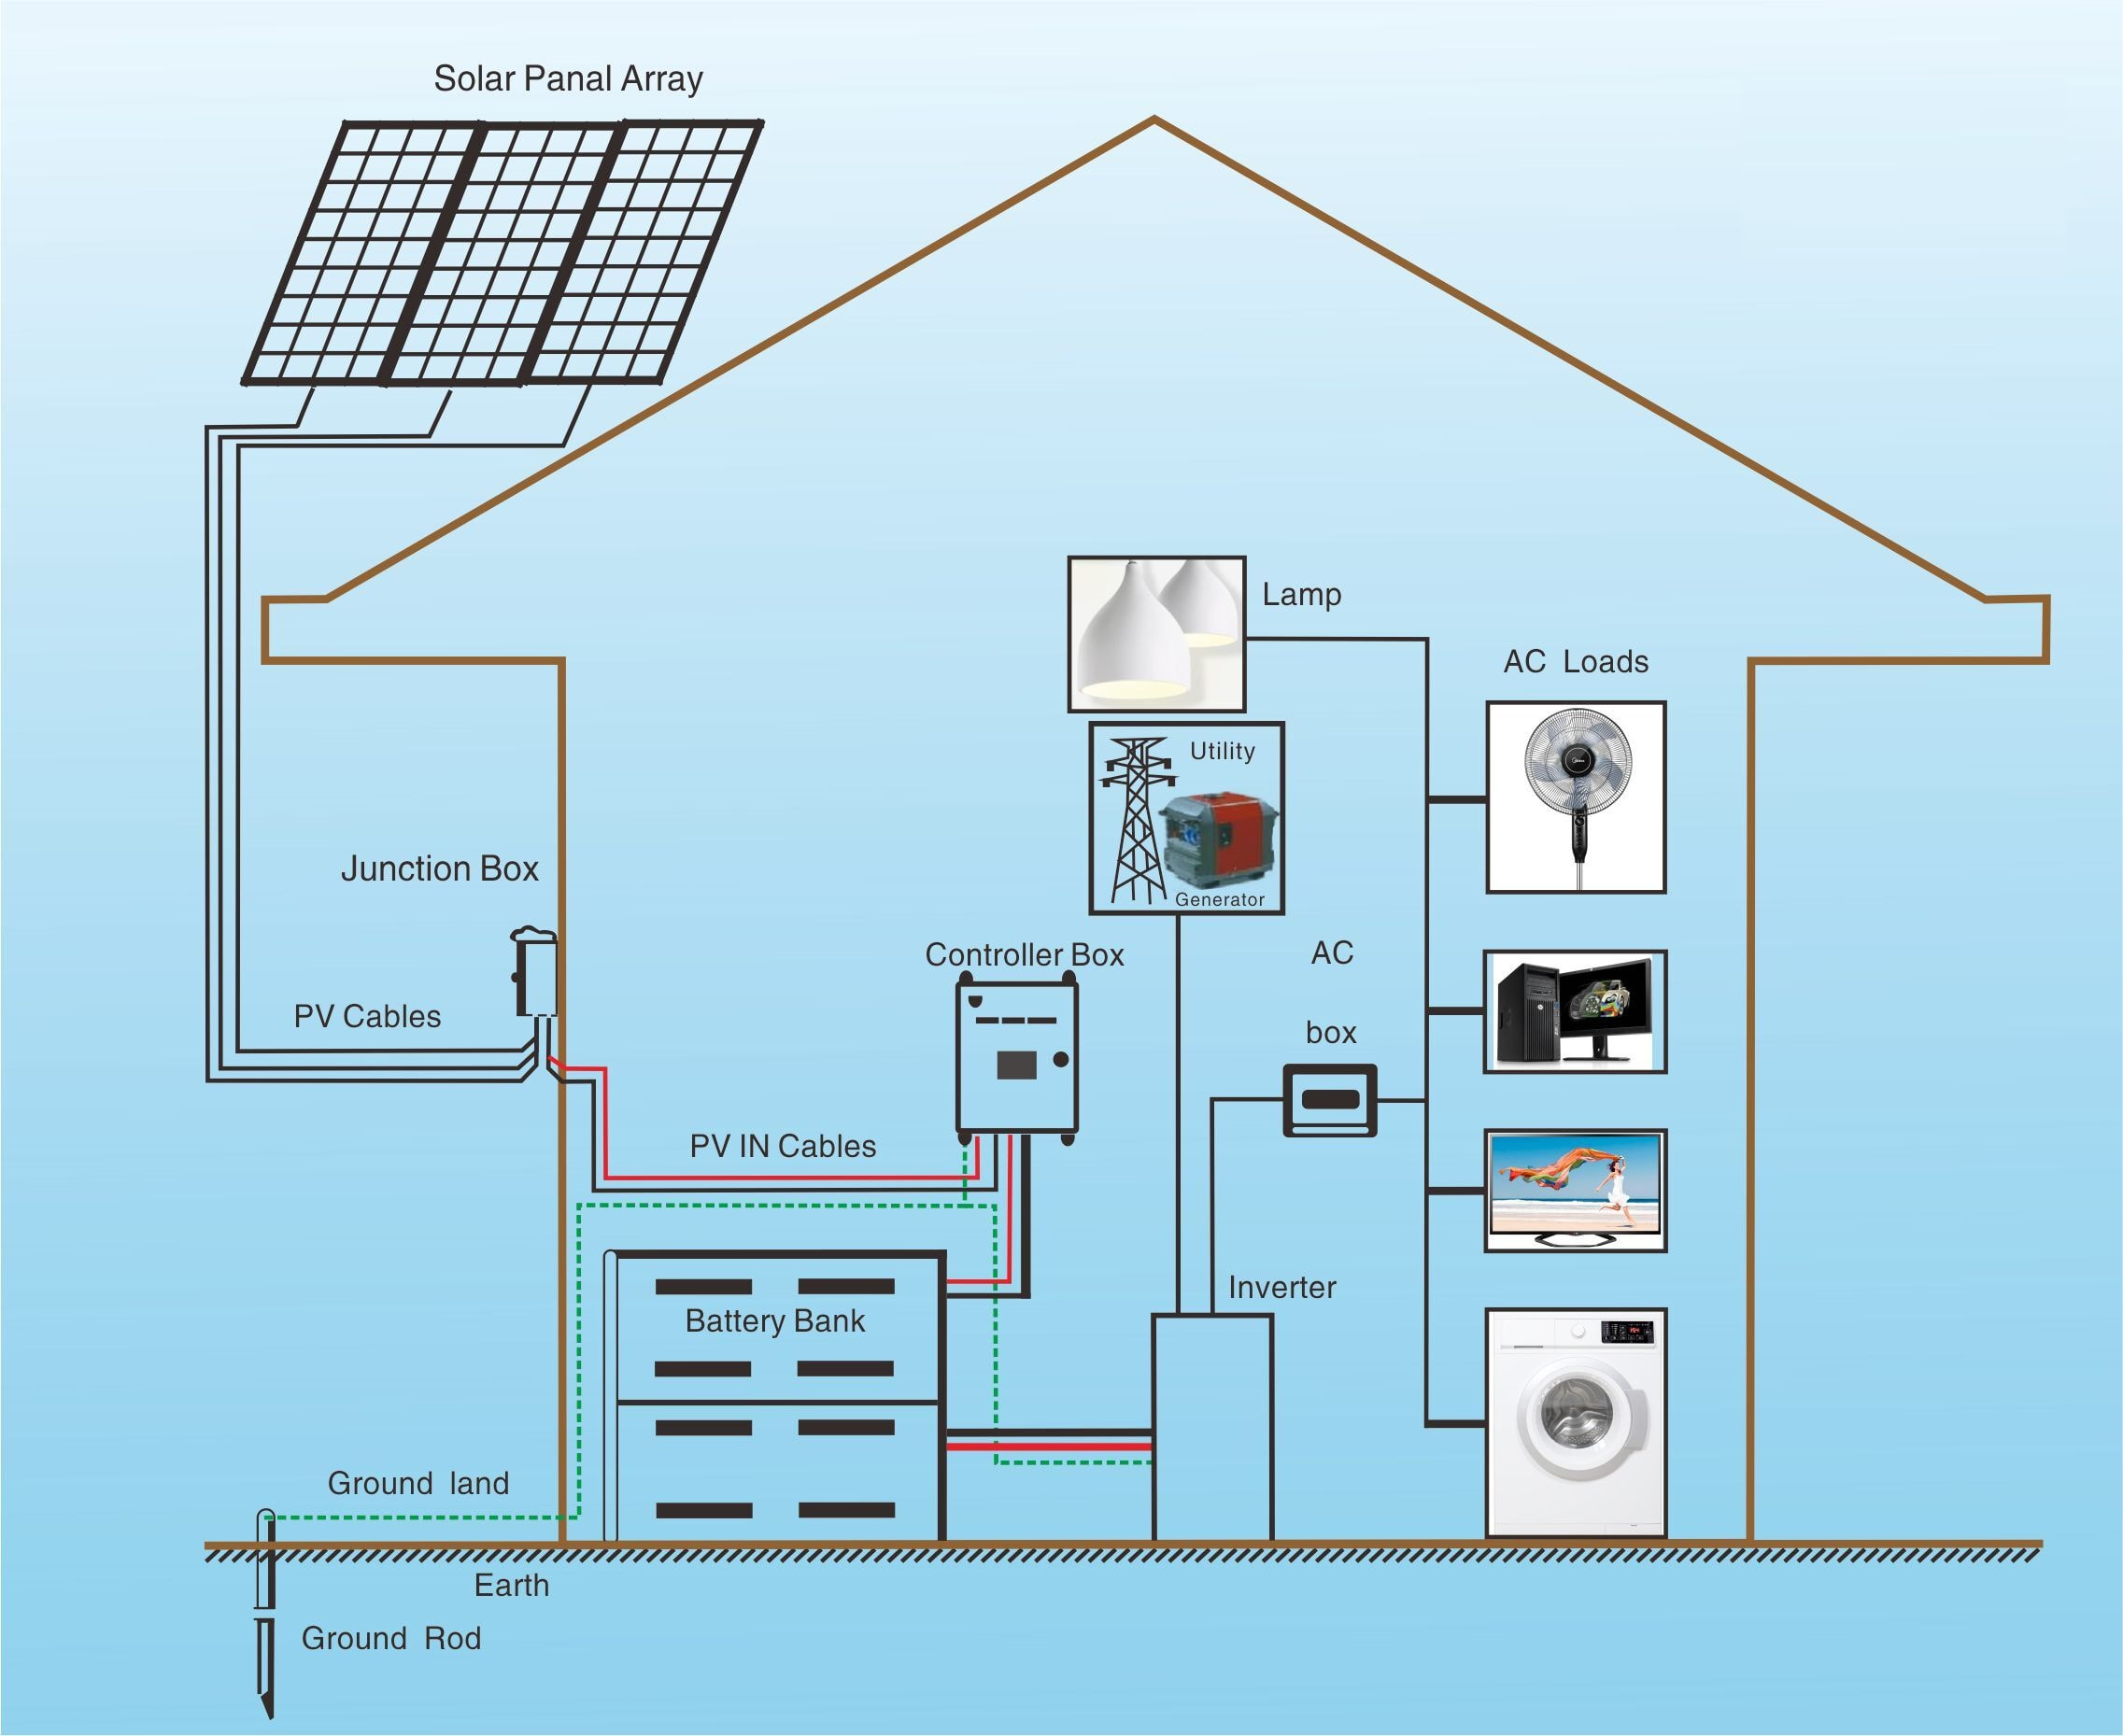
Installing a home solar system can significantly reduce your electricity bills and carbon footprint. However, the wiring process can be complex and requires careful planning and execution. In this article, we will guide you through the complete wiring process for a home solar system, ensuring a safe and efficient installation.
Introduction to Home Solar Systems
A home solar system, also known as a photovoltaic (PV) system, converts sunlight into electrical energy using solar panels. The system consists of several components, including:
- Solar Panels: These are the photovoltaic modules that convert sunlight into DC (direct current) electricity.
- Mounting System: This includes the frames, clamps, and tracking systems that secure the solar panels to the roof or ground.
- Inverter: This device converts the DC electricity from the solar panels into AC (alternating current) electricity, which is usable in your home.
- Charge Controller: This component regulates the flow of energy from the solar panels to the battery bank, preventing overcharging and damage to the system.
- Battery Bank: This is an optional component that stores excess energy generated by the solar panels for later use.
- Electrical Panel: This is the main distribution panel that connects the solar system to your home’s electrical grid.
Wiring Process Overview
The wiring process for a home solar system involves several steps:
- Assessing the Site: Evaluating the site for the solar panel installation, including the roof condition, orientation, and shading.
- Designing the System: Determining the system size, component selection, and wiring layout.
- Installing the Mounting System: Securing the solar panels to the roof or ground.
- Connecting the Solar Panels: Wiring the solar panels together in series and parallel configurations.
- Installing the Inverter: Connecting the inverter to the solar panels and electrical panel.
- Installing the Charge Controller and Battery Bank: Connecting the charge controller and battery bank to the solar panels and inverter.
- Connecting to the Electrical Panel: Integrating the solar system with your home’s electrical grid.


Step 1: Assessing the Site
Before installing a home solar system, it’s essential to assess the site to ensure it’s suitable for solar panel installation. Consider the following factors:
- Roof Condition: The roof should be in good condition, with no signs of damage or wear.
- Orientation: The solar panels should face the correct direction (south in the northern hemisphere) to maximize energy production.
- Shading: The site should have minimal shading from trees, buildings, or other obstructions.
- Roof Size: The roof should be large enough to accommodate the solar panels.
Step 2: Designing the System
Once the site has been assessed, it’s time to design the system. This involves:
- Determining System Size: Calculate the system size based on your energy requirements and available roof space.
- Selecting Components: Choose the solar panels, inverter, charge controller, and battery bank that meet your system requirements.
- Wiring Layout: Plan the wiring layout, including the solar panel connections, inverter connections, and electrical panel connections.
Step 3: Installing the Mounting System
The mounting system secures the solar panels to the roof or ground. This involves:
- Installing Roof Anchors: Secure the roof anchors to the roof, ensuring they are spaced correctly and can support the weight of the solar panels.
- Installing the Mounting Frame: Attach the mounting frame to the roof anchors, ensuring it is level and secure.
- Securing the Solar Panels: Attach the solar panels to the mounting frame, ensuring they are secure and evenly spaced.
Step 4: Connecting the Solar Panels
The solar panels are connected in series and parallel configurations to achieve the desired voltage and current. This involves:
- Series Connections: Connect the solar panels in series to increase the voltage.
- Parallel Connections: Connect the solar panels in parallel to increase the current.
- Using Connectors and Cables: Use connectors and cables that meet the system’s voltage and current requirements.
Step 5: Installing the Inverter
The inverter converts the DC electricity from the solar panels into AC electricity. This involves:
- Installing the Inverter: Mount the inverter in a secure location, such as a garage or utility room.
- Connecting the Solar Panels: Connect the solar panels to the inverter, ensuring the voltage and current match the inverter’s requirements.
- Connecting to the Electrical Panel: Connect the inverter to the electrical panel, ensuring the wiring meets the local electrical code requirements.
Step 6: Installing the Charge Controller and Battery Bank
The charge controller regulates the flow of energy from the solar panels to the battery bank. This involves:
- Installing the Charge Controller: Mount the charge controller in a secure location, such as a garage or utility room.
- Connecting the Solar Panels: Connect the solar panels to the charge controller, ensuring the voltage and current match the charge controller’s requirements.
- Connecting the Battery Bank: Connect the battery bank to the charge controller, ensuring the wiring meets the local electrical code requirements.
Step 7: Connecting to the Electrical Panel
The final step is to connect the solar system to your home’s electrical panel. This involves:
- Installing a New Circuit: Install a new circuit in the electrical panel to accommodate the solar system.
- Connecting the Inverter: Connect the inverter to the new circuit, ensuring the wiring meets the local electrical code requirements.
- Testing the System: Test the system to ensure it’s functioning correctly and safely.
Conclusion
The wiring process for a home solar system requires careful planning and execution to ensure a safe and efficient installation. By following the steps outlined in this article, you’ll be able to complete the wiring process and enjoy the benefits of renewable energy. Remember to always follow local electrical codes and regulations, and consult a professional if you’re unsure about any aspect of the installation. With a well-designed and installed home solar system, you’ll be harnessing the power of the sun to reduce your energy bills and carbon footprint.
Recommended Tools and Materials
To complete the wiring process for a home solar system, you’ll need the following tools and materials:
- Solar panels
- Mounting system
- Inverter
- Charge controller
- Battery bank
- Electrical panel
- Wiring and connectors
- Cable ties and clips
- Drill and bits
- Screwdriver and pliers
- Multimeter and voltage tester
- Personal protective equipment (PPE)
Safety Considerations
When working with electrical systems, it’s essential to take safety precautions to avoid injuries and damage. Here are some safety considerations to keep in mind:
- Turn off the power: Before starting work, ensure the power is turned off at the electrical panel.
- Use PPE: Wear personal protective equipment, including gloves, safety glasses, and a hard hat.
- Follow local electrical codes: Ensure the wiring meets local electrical code requirements.
- Use proper wiring techniques: Use proper wiring techniques, including stripping, crimping, and soldering.
- Test the system: Test the system to ensure it’s functioning correctly and safely.
By following the wiring process outlined in this article and taking the necessary safety precautions, you’ll be able to complete a safe and efficient home solar system installation.


