“Camper solar wiring layout”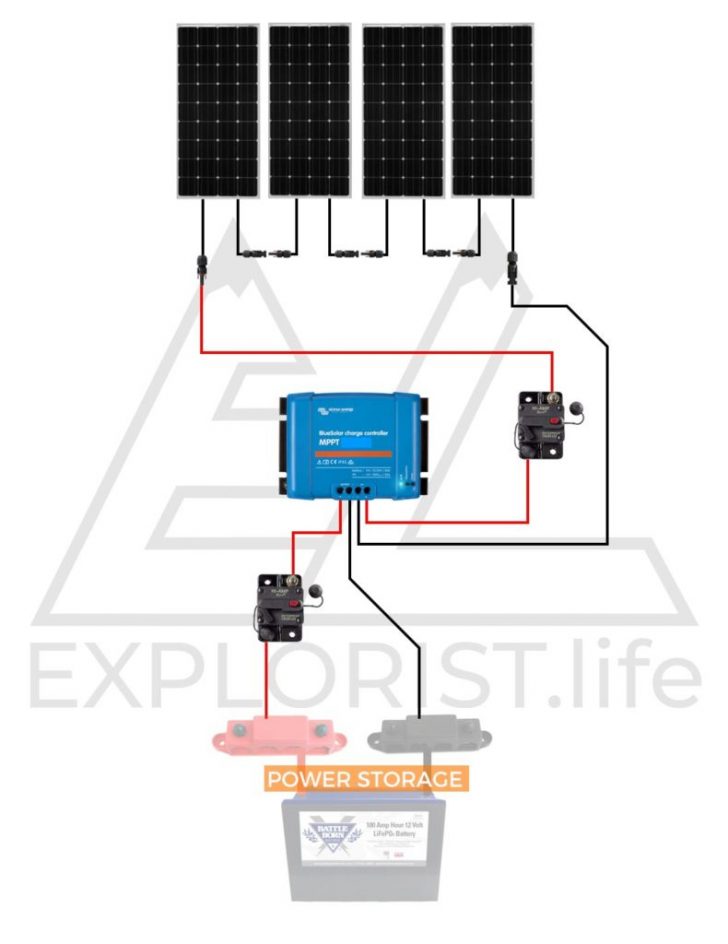
A well-designed solar wiring layout is crucial to ensure efficient and safe energy harvesting, storage, and distribution. In this article, we will delve into the world of camper solar wiring, exploring the basics, best practices, and advanced techniques to help you create an efficient and reliable solar-powered system for your camper.
Understanding the Basics
Before we dive into the wiring layout, it’s essential to understand the fundamental components of a camper solar system. These include:
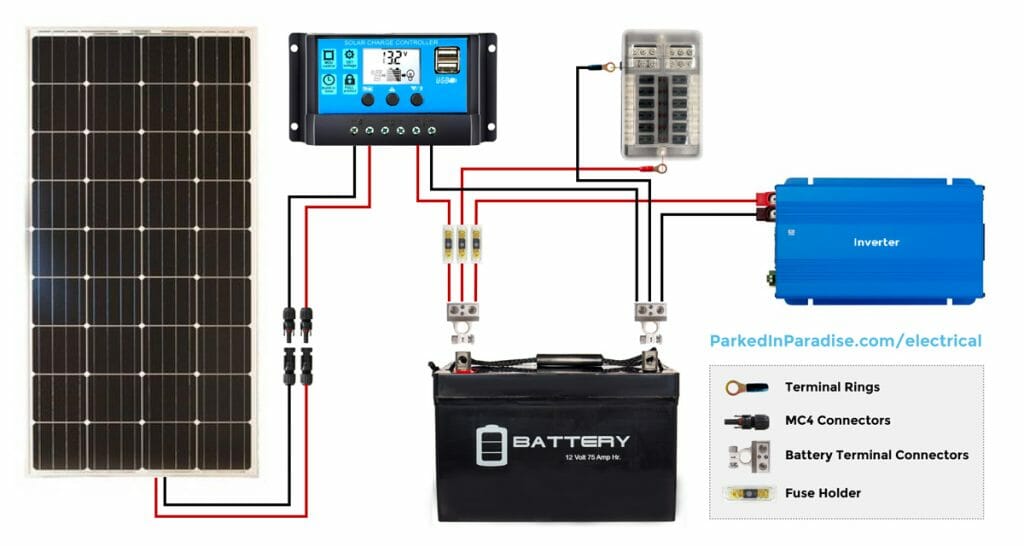
- Solar Panels: These are the primary source of energy, converting sunlight into electrical energy.
- Charge Controller: This device regulates the energy flow from the solar panels to the battery, preventing overcharging and ensuring safe operation.
- Battery: This is the energy storage component, providing power when the sun is not shining.
- Inverter/Charger: This device converts DC power from the battery to AC power for appliances and charging devices.
- Wiring and Connectors: These are the veins of the system, connecting all components and facilitating energy transfer.
Wiring Layout Considerations
When designing a camper solar wiring layout, several factors must be considered to ensure a safe, efficient, and reliable system. These include:
- Wire Size and Type: Choosing the correct wire size and type is crucial to minimize energy loss and ensure safe operation. thicker wires (e.g., 10 AWG) are recommended for longer runs, while thinner wires (e.g., 14 AWG) can be used for shorter connections.
- Voltage Drop: Voltage drop occurs when energy is lost due to wire resistance. To minimize voltage drop, keep wire runs as short as possible and use larger gauge wires.
- Circuit Protection: Circuit protection devices, such as fuses or circuit breakers, must be installed to prevent overcurrent conditions and protect the system from damage.
- Grounding: A proper grounding system is essential to ensure safety and prevent electrical shock. Connect all components to a common grounding point, such as the camper’s frame.
- Labeling and Documentation: Clearly label all wires and components, and maintain detailed documentation of the system, including wiring diagrams and component specifications.
Camper Solar Wiring Layout Best Practices
To create an efficient and reliable camper solar wiring layout, follow these best practices:
- Keep it Simple: Avoid complex wiring layouts, as they can lead to confusion and increased risk of errors.
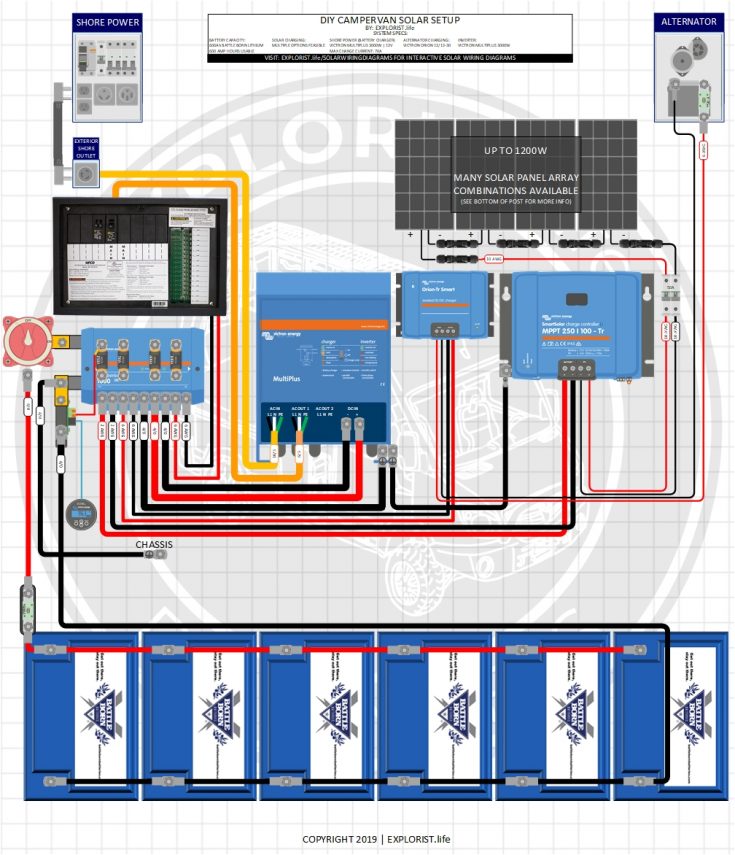
- Use a Central Distribution Point: Designate a central location for the charge controller, inverter/charger, and other components to minimize wire runs and simplify maintenance.
- Separate DC and AC Systems: Keep DC and AC systems separate to prevent interference and ensure safe operation.
- Use Color-Coded Wires: Use color-coded wires to differentiate between positive, negative, and ground wires, making it easier to identify and troubleshoot issues.
- Test and Inspect: Regularly test and inspect the system to ensure proper operation and identify potential issues before they become major problems.
Advanced Camper Solar Wiring Layout Techniques
For more complex systems or larger campers, consider the following advanced techniques:
- Multi-Panel Arrays: Connect multiple solar panels in series or parallel to increase energy production and improve system efficiency.
- Battery Monitoring Systems: Install a battery monitoring system to track state of charge, voltage, and temperature, ensuring optimal battery performance and longevity.
- Remote Monitoring: Install a remote monitoring system to track system performance, receive alerts, and perform maintenance tasks remotely.
- Load Management: Implement load management techniques, such as load shedding or load shifting, to optimize energy distribution and minimize energy waste.
- Energy Storage Systems: Consider installing energy storage systems, such as lithium-ion batteries, to provide a stable and reliable source of energy.
Common Camper Solar Wiring Layout Configurations
Several common configurations are used in camper solar wiring layouts, including:
- Series Wiring: Connecting solar panels in series to increase voltage and reduce current.
- Parallel Wiring: Connecting solar panels in parallel to increase current and reduce voltage.
- Series-Parallel Wiring: Combining series and parallel wiring to optimize energy production and system efficiency.
- DC-DC Charging: Using a DC-DC charger to charge the battery from a DC source, such as a solar panel or alternator.
Conclusion
A well-designed camper solar wiring layout is crucial to ensure efficient and safe energy harvesting, storage, and distribution. By understanding the basics, considering wiring layout factors, and following best practices, you can create a reliable and efficient solar-powered system for your camper. Advanced techniques, such as multi-panel arrays and remote monitoring, can further enhance system performance and convenience. Remember to always follow safety guidelines and consult professional resources if you’re unsure about any aspect of the installation process. With a properly designed and installed camper solar wiring layout, you’ll be able to enjoy the freedom and convenience of solar power on your next adventure.
Additional Resources
For further information and guidance, consult the following resources:
- National Electric Code (NEC): A comprehensive guide to electrical wiring and safety standards.
- Solar Energy Industries Association (SEIA): A leading industry organization providing resources and guidance on solar energy systems.
- Camper and RV manufacturers: Many manufacturers provide specific guidelines and recommendations for solar wiring layouts and system installations.
- Online forums and communities: Join online forums and communities to connect with experienced solar enthusiasts and professionals, sharing knowledge and best practices.
By following the guidelines and best practices outlined in this article, you’ll be well on your way to creating a safe, efficient, and reliable camper solar wiring layout, empowering you to enjoy the benefits of solar power on your next adventure.


