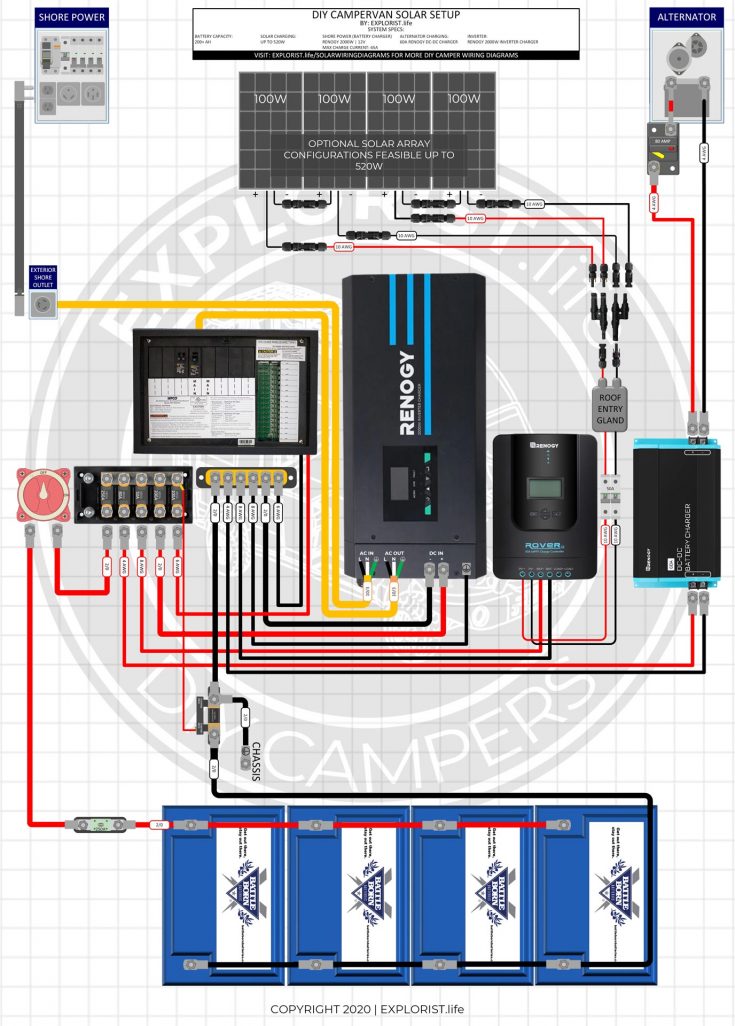
“Camper solar panel wiring layout”
Installing solar panels on your camper can provide a reliable and sustainable source of energy, allowing you to enjoy the great outdoors while reducing your carbon footprint. However, designing and implementing a solar panel wiring layout can be a complex task, especially for those without prior experience. In this article, we will provide a comprehensive guide to help you create a safe and efficient camper solar panel wiring layout.
Understanding the Basics
Before we dive into the wiring layout, it’s essential to understand the basic components of a solar panel system:
- Solar Panels: These are the photovoltaic (PV) panels that convert sunlight into electrical energy.
- Charge Controller: This device regulates the flow of energy from the solar panels to the battery, preventing overcharging and ensuring safe charging.
- Battery: This is the deep cycle battery that stores the energy generated by the solar panels for later use.
- Inverter: This device converts the DC power from the battery into AC power for use with appliances and devices.
- Wiring: This refers to the cables and connectors that connect the various components of the solar panel system.
Designing the Wiring Layout
When designing a camper solar panel wiring layout, there are several factors to consider:
- System Size: Determine the size of your solar panel system based on your energy needs and the space available on your camper.
- Panel Configuration: Decide on the configuration of your solar panels, such as series or parallel connections.
- Cable Size: Choose the correct cable size to ensure safe and efficient energy transfer.
- Connector Type: Select the appropriate connectors to ensure secure and reliable connections between components.
- Wiring Route: Plan the wiring route to minimize damage and ensure easy maintenance.

Wiring Layout Best Practices
To create a safe and efficient wiring layout, follow these best practices:
- Keep it Simple: Avoid complex wiring configurations that can increase the risk of errors and faults.
- Use Color-Coded Cables: Use color-coded cables to identify the positive and negative wires, making it easier to troubleshoot and maintain the system.
- Label Components: Label each component and connection to ensure easy identification and maintenance.
- Secure Cables: Secure cables to the camper’s structure using cable ties, clips, or conduit to prevent damage and minimize noise.
- Test the System: Test the system regularly to ensure it’s functioning correctly and efficiently.
Camper Solar Panel Wiring Layout Examples
Here are a few examples of camper solar panel wiring layouts:
Example 1: Simple Series Connection
- 2 x 200W solar panels connected in series
- 1 x charge controller
- 1 x 12V deep cycle battery
- 1 x 2000W inverter
Wiring Layout:
- Solar panels connected in series using MC4 connectors
- Charge controller connected to the solar panels using 10AWG cable
- Battery connected to the charge controller using 10AWG cable
- Inverter connected to the battery using 10AWG cable
Example 2: Parallel Connection with Multiple Batteries
- 4 x 200W solar panels connected in parallel
- 2 x charge controllers
- 2 x 12V deep cycle batteries
- 1 x 4000W inverter
Wiring Layout:
- Solar panels connected in parallel using MC4 connectors
- Charge controllers connected to the solar panels using 10AWG cable
- Batteries connected to the charge controllers using 10AWG cable
- Inverter connected to the batteries using 10AWG cable
Example 3: Complex System with Multiple Panels and Batteries
- 6 x 200W solar panels connected in a combination of series and parallel
- 3 x charge controllers
- 3 x 12V deep cycle batteries
- 1 x 6000W inverter
Wiring Layout:
- Solar panels connected in a combination of series and parallel using MC4 connectors
- Charge controllers connected to the solar panels using 10AWG cable
- Batteries connected to the charge controllers using 10AWG cable
- Inverter connected to the batteries using 10AWG cable
Troubleshooting and Maintenance
Regular maintenance and troubleshooting are essential to ensure the safety and efficiency of your camper solar panel wiring layout. Here are some common issues to watch out for:
- Overcharging: Check the charge controller settings to ensure the batteries are not overcharging.
- Undercharging: Check the solar panel output to ensure the batteries are receiving enough energy.
- Short Circuits: Check the wiring and connections for signs of damage or wear.
- Grounding Issues: Check the grounding system to ensure it’s functioning correctly.
Conclusion
Designing and implementing a camper solar panel wiring layout requires careful planning and attention to detail. By following the best practices outlined in this article, you can create a safe and efficient system that meets your energy needs. Remember to regularly maintain and troubleshoot your system to ensure optimal performance and extend the lifespan of your components. With the right wiring layout, you can enjoy the benefits of solar power and explore the great outdoors with confidence.
Additional Resources
For more information on camper solar panel wiring layouts, we recommend the following resources:
- National Electric Code (NEC): A comprehensive guide to electrical wiring and safety standards.
- Solar Panel Manufacturers: Consult the manuals and guidelines provided by your solar panel manufacturer for specific recommendations on wiring and installation.
- Online Forums and Communities: Join online forums and communities dedicated to camper solar panel systems to share knowledge and experiences with other enthusiasts.
By following the guidelines and best practices outlined in this article, you can create a safe and efficient camper solar panel wiring layout that meets your energy needs and enhances your outdoor adventures. Happy camping!


