“Solar wiring layout for camper van”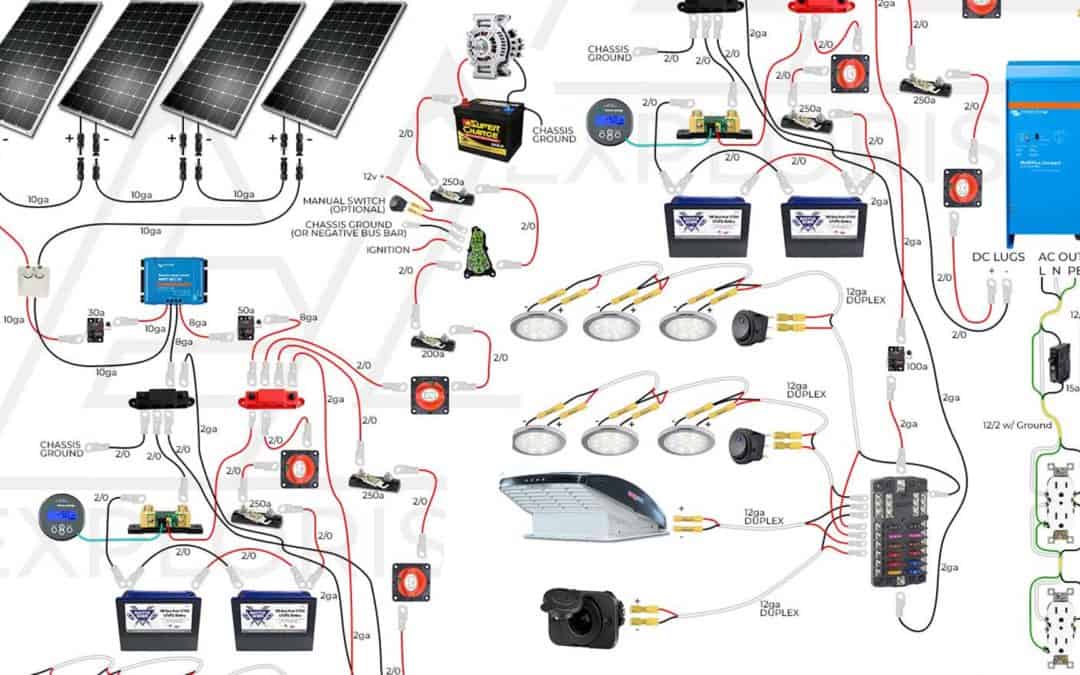
A well-designed solar wiring layout is crucial for a safe, efficient, and reliable solar system. In this article, we will delve into the world of solar wiring for camper vans, exploring the key components, best practices, and common mistakes to avoid.
Understanding the Basics
Before we dive into the nitty-gritty of solar wiring, it’s essential to understand the basic components of a solar system. A typical solar system consists of:
- Solar Panels: These are the photovoltaic panels that convert sunlight into electrical energy.
- Charge Controller: This device regulates the flow of energy from the solar panels to the battery, preventing overcharging and ensuring efficient energy storage.
- Battery: This is the energy storage unit that stores excess energy generated by the solar panels for later use.
- Inverter/Charger: This device converts DC power from the battery to AC power for use with appliances and charges the battery from an external power source (e.g., shore power or generator).
- Wiring and Connections: This refers to the cables, connectors, and wiring that connect the various components of the solar system.
Solar Wiring Layout Considerations
When designing a solar wiring layout for your camper van, several factors must be considered to ensure a safe and efficient system. These include:
- System Voltage: The voltage of your solar system will determine the type of wiring and components required. Most camper vans use a 12V or 24V system.
- Wire Size and Type: The size and type of wire used will affect the efficiency and safety of your system. Larger wires can handle more current, reducing voltage drop and heat buildup.
- Cable Management: Keeping cables organized and secure is crucial to prevent damage, overheating, and electrical shock.
- Component Placement: Strategic placement of components, such as the charge controller and inverter, can improve system efficiency and reduce costs.
- Safety Features: Incorporating safety features, such as fuses, circuit breakers, and grounding, is essential to protect people and equipment from electrical shock and damage.

Best Practices for Solar Wiring
To ensure a reliable and efficient solar system, follow these best practices:

- Use High-Quality Components: Invest in reputable, high-quality components that meet your system’s specifications.
- Keep Wiring Runs Short: Minimize wiring runs to reduce voltage drop and heat buildup.
- Use Proper Wire Sizing: Select wire sizes that can handle the maximum current requirements of your system.
- Label and Document: Label and document your wiring and connections to facilitate maintenance, troubleshooting, and future upgrades.
- Regularly Inspect and Maintain: Regularly inspect your wiring and connections to prevent damage and ensure optimal system performance.
Common Mistakes to Avoid
When designing and installing a solar wiring layout, be aware of these common mistakes:
- Undersized Wiring: Using wire sizes that are too small can lead to overheating, voltage drop, and system inefficiency.
- Inadequate Cable Management: Poor cable management can result in damaged cables, overheating, and electrical shock.
- Insufficient Grounding: Inadequate grounding can lead to electrical shock and system malfunctions.
- Incorrect Component Placement: Placing components in areas with poor ventilation or high temperatures can reduce system efficiency and lifespan.
- Lack of Safety Features: Failing to incorporate safety features, such as fuses and circuit breakers, can put people and equipment at risk.
Solar Wiring Layout Example
To illustrate a well-designed solar wiring layout, consider the following example:
- Solar Panel Array: 2 x 200W solar panels connected in parallel, with a total output of 400W.
- Charge Controller: A 40A MPPT charge controller, connected to the solar panel array and the battery.
- Battery: A 200Ah deep cycle battery, connected to the charge controller and the inverter/charger.
- Inverter/Charger: A 2000W pure sine wave inverter/charger, connected to the battery and the AC distribution panel.
- Wiring and Connections: 10AWG wire used for all connections, with a maximum wire run of 10 feet.
Conclusion
A well-designed solar wiring layout is essential for a safe, efficient, and reliable solar system in your camper van. By considering system voltage, wire size and type, cable management, component placement, and safety features, you can create a system that meets your electrical needs and provides years of trouble-free operation. Remember to follow best practices, avoid common mistakes, and regularly inspect and maintain your system to ensure optimal performance.
Additional Tips and Recommendations
- Consult a Professional: If you’re not experienced with electrical systems, consider consulting a professional to design and install your solar wiring layout.
- Use a Wiring Diagram: Create a detailed wiring diagram to visualize your system’s connections and components.
- Test and Verify: Test your system to verify that it’s functioning as expected and make adjustments as needed.
- Monitor and Maintain: Regularly monitor your system’s performance and maintain it to ensure optimal efficiency and lifespan.
By following these guidelines and best practices, you’ll be well on your way to creating a reliable and efficient solar wiring layout for your camper van. Happy camping and enjoy the sunshine!


